

(Written by William)
Ever since I built the #10220 LEGO Volkswagen Camper over a decade ago, I’ve been a huge fan of the large LEGO display vehicles in the LEGO Creator Expert (now LEGO Icons) collection. I do my best to get them all for one simple reason; they tend to be some of the most satisfying building experiences for adult LEGO fans.


I recently built the #10304 LEGO Chevrolet Camaro Z/28 1969 and was very happy with it (link to my review at the end of this post), so I was ready to build an even bigger and more involved vehicle. the #10317 LEGO Land Rover Classic Defender 90. At roughly $240 USD MSRP, it is one of the most expensive vehicles in the LEGO Icons line. It seemed more comparable to the sets featuring a special Intellectual Property like Batman.
I know that, in general, a higher price goes hand in hand with a more involved build. And even the lower-cost vehicles in the LEGO Icons line are no slouch when it comes to complexity. So, it was a bit of a shock when I dug into the Land Rover and didn’t find it to be the most satisfying building experience.
The odd thing is, after everything is said and done, it is a great design. All the complexity I could have hoped for is built into the model. So, it left me a bit perplexed as to what disrupted my enjoyment of the build. I let my experience sit for a couple of weeks and the closest thing I could come up with is the first building technique I want to discuss. I’ll cover why it tripped me up and why that wasn’t a bad thing in retrospect.
LEGO LAND ROVER – COMPARTMENTALIZATION
The #10317 LEGO Land Rover Classic Defender 90 is the biggest vehicle model in the LEGO Icons line to date. One common feature of large LEGO models is compartmentalization. Trying to build a massive model all at once is both impractical and frustrating. Therefore, after you reach a certain size, it’s often better to break a model down into easier-to-manage components. Case in point, this is exactly how LEGO designers have you build the Land Rover.

Up to this point, I hadn’t realized that many of the previous vehicles push builders to their limits when it comes to set design. The instructions direct you to build large sections of a vehicle all at once. Turns out, I really like the mental challenge this presents. With the Land Rover, this challenge is lost as the larger chunks are chopped into much more manageable elements.
For instance, you build a good chunk of the vehicle’s base but leave some of the links hanging loose. Or maybe you start the gear work for the steering wheel but don’t even address the wheels (which aren’t connected until nearly the end of the build). Each time I felt the complexity was ramping up and going to show me something interesting, it would pause, refocus, then move on to a simpler part of the model.

As a longtime builder, I found the experience to be rather disorientating. It was as if I was preparing for a long hard run, only to find out I was walking to the next area where I would prepare for a long hard run. This cycle of less stressful building kept me off balance and unfocused from what I had grown used to.
Here’s the kicker, this is actually a good thing. You see, this style of building makes models more accessible to more people. Additionally, it is the smart way to build. For example, if I wanted to make a complex machine, I’d have a much easier time troubleshooting any issues I had with the design if sections were compartmentalized. You’ll also find it is a much better way to make progress on large models. I just know from my own experience that if this is unexpected, it can throw you for a loop.
LEGO LAND ROVER – SPRINGY SUSPENSION
Plenty of these large vehicle models feature working steering, but very few also contain spring shocks. I believe the #10269 LEGO Harley Davidson Fat Boy had some, but it only had to worry about a single wheel in front and in the back. Turns out, the more wheels you have, the more thought needs to go into the design.
The key feature to keep in mind is flexibility. Having a spring-loaded shock on each side of the vehicle is not terribly hard. Keeping it steady while letting it move is much trickier. Not only that, but LEGO designers also modeled the suspension on the actual vehicle itself. So, what is involved to make it all work?
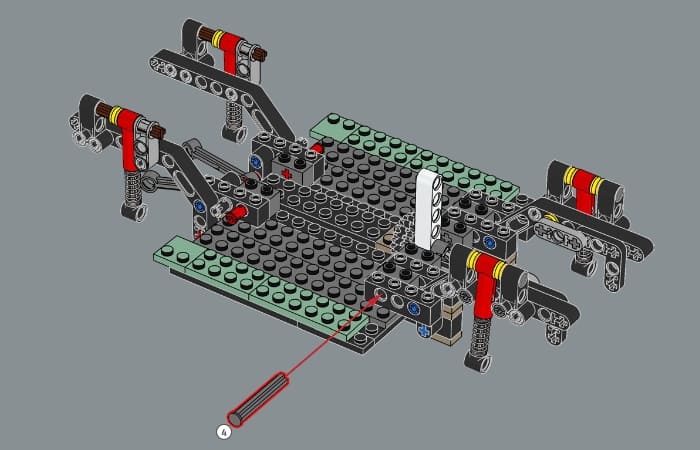
First, we have the two shocks hanging down from the vehicle’s frame. Suspended between them will be the contraption that holds the wheel or, in the case of the front, the steering mechanism for the wheels. So far so good. You got wheels that can spring and a wheelbase that the vehicle will slump left or right over like a drunken sailor.

This is where each axle base uses four LEGO Technic ball links. The ball link connections allow for the flexibility to move in various directions. The quantity of links used provides stability so that the wheels attempt to align themselves with the center of the vehicle. This is good as that’s where the most benefit comes from in a suspension system.

It’s worth noting that each link is connected a bit more narrowly to the frame of the car than they are to the axles. This provides a more solid base and reinforces the wheels’ inclination to align with the vehicle’s center mass.
As for the steering, it uses two sets of ball socket connectors that an axle can fit in. The last time I personally played with this connector was in the large #10247 LEGO Ferris Wheel set from 2015. But generally, the part is used to absorb odd movements to allow a straight piece like an axle to work. And that is it.
LEGO LAND ROVER – APPLYING WHAT YOU LEARN
Compartmentalization is a great way to think about something that feels larger than what you can handle. The magic behind most builds is the fact that all the small steps are hidden away and broken down into smaller elements. Sometimes it is not even a functional element you are trying to figure out. Maybe you just want to see how to achieve a certain slope shape. Compartmentalization will always be your friend in tackling issues like these. Simply break the problem down into smaller chunks and tackle each section individually. And if the problem is still too big, just keep breaking it down until you have something manageable. Sure, it won’t be a great building experience, but this is the case where the ends are much more important than the means.
As for a springy suspension, I thought it would be a very complex problem to overcome. But as you can probably guess, this set’s compartmentalization made it feel rather trivial. It has more to do with accommodating the movement you want while minimizing the movement you don’t want. And all that can boil down to smart part choices and sensible attachments. In the video below, I talk a bit more about the set.
The biggest difficulty in models like this, whether it is compartmentalization or figuring out how to build a springy suspension, is being familiar with what is available. Many fans coming from the LEGO System side can tackle fancy curves and detail work all day long without breaking a sweat. Likewise, LEGO Technic fans will scratch their head wondering why people are confused with the actual functionality in their models. This is why I try to expose myself to as many different types of models as possible. And this is why the LEGO Icons vehicles hold a special spot in my heart since they are a fusion of the two building systems. And just know, there are techniques that LEGO uses so you don’t feel out of your element. If you want to check out the set, it’s available at the LEGO Icons section of the Online LEGO Shop.

What do you think? Do you have any of the large LEGO Ideas vehicles? Which one is your favorite so far? And what do you think of the techniques we discussed here? Feel free to share your thoughts and own review in the comment section below!
And you might also like to check out the following related posts:
- Brick Breakdown: LEGO Icons Chevrolet Camaro Z28
- Built for Speed – New LEGO Chevrolet Camaro Z28!
- Brick Breakdown: LEGO Creator Fiat 500
- Brick Breakdown: LEGO Creator London Bus
- Brick Breakdown: LEGO Creator Ford Mustang
- LEGO Volkswagen T2 Camper Van
- LEGO Porsche 911 Turbo and Targa
- LEGO Technic Land Rover Press-Release (2019 model)


Fantastic review. Yes, Lego has been simplifying instructions for decades. I remember building my first sets and there were like 10 steps in each step. Now the same step would take 10 pages. And yes, this takes away from the enjoyment of the process. Especially in Technic sets where you really want to understand the logic of each step.
It would be interesting to compare this to the Technic Defender. Both sets use both system and technic elements and techniques. I would love to see a side by side.
Good review. I was reading that the reason they are dumping down the instructions is because they are using the same format in the app. I agree with you that some of the intellectual challenge is now missing.
I like the Technic one better. I feel it has a better design overall. And I like the color better too. Some of these vehicles are getting so big I don’t really have room to put them anymore.
I was so impressed by the suspension of the Technic Land Rover. I suppose this is simpler, but still looks like a fun build. I might get this one too, but man, that Corvette looks amazing!
Look at all that sand green! Yum! I would love to build this, but smaller. I wonder how many of the features could be jammed in.