

(Written by William)
As a Braille user myself, I was excited to hear that LEGO was releasing their Braille Bricks to the public which was previously only available to educational institutions. The LEGO Playing with Braille set is now available both in English and French versions to the public, and I had a chance to try them out both. Given the fact that these sets are made to help teach Braille, we thought it might be good to go over some of the basics of Braille and how it can be built into your own LEGO model.
Before we begin, we should go over a few notes. First, there are multiple forms of Braille out there. However, your standard Braille is fairly unified among all languages that use the Latin alphabet. Second, Braille users will often refer to one of two styles of writing Braille. Either they say it’s “Grade 1” or “Uncontracted” Braille versus “Grade 2” or “Contracted” Braille. Grade 1 (Uncontracted) will write out each and every character. This means it will take up a lot of space and take longer to read since you have to feel more characters. Grade 2 (Contracted) creates shortcuts in how Braille is written out. One or two characters next to one another could represent five or more characters making the reading experience more compact and concise.
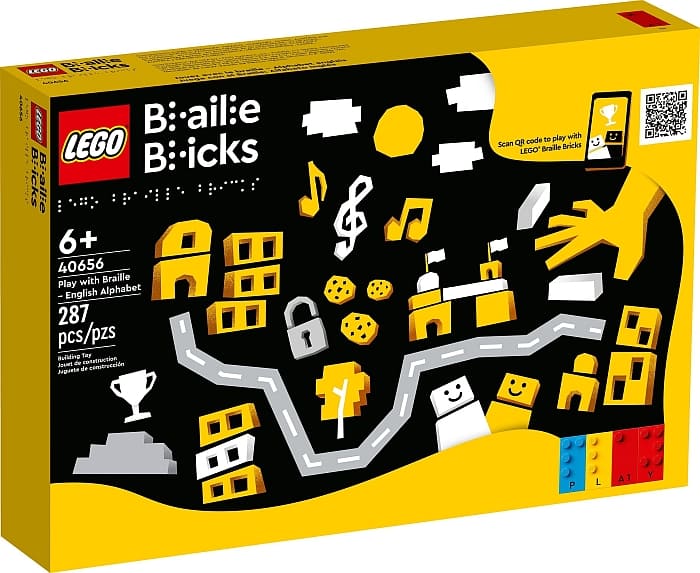
LEGO Braille Bricks starts us off with Grade 1 Braille. That means we won’t get too complex in trying to remember dozens of special contractions. We’ll write out things simply. Now with that out of the way let’s take a look at the #40656 LEGO Braille Bricks set.

LEGO BRAILLE BRICKS – CELLS
The standard Braille cell consists of six round dots. These dots form all the characters we use. Think of them as the lines you see in a digital clock display. All those lines make up every number. It all depends on their configuration, which tells us which number or, in the case of Braille, which character we see/feel.
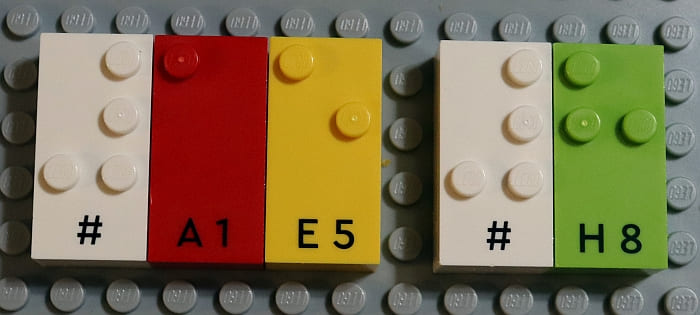
LEGO uses a 2×4 brick template for each of its Braille cells. The top 2×3 section has studs in the spaces where the dots will appear. The bottom part of every brick that is not used for the cell features printing. This helps sighted folks understand what the character is.
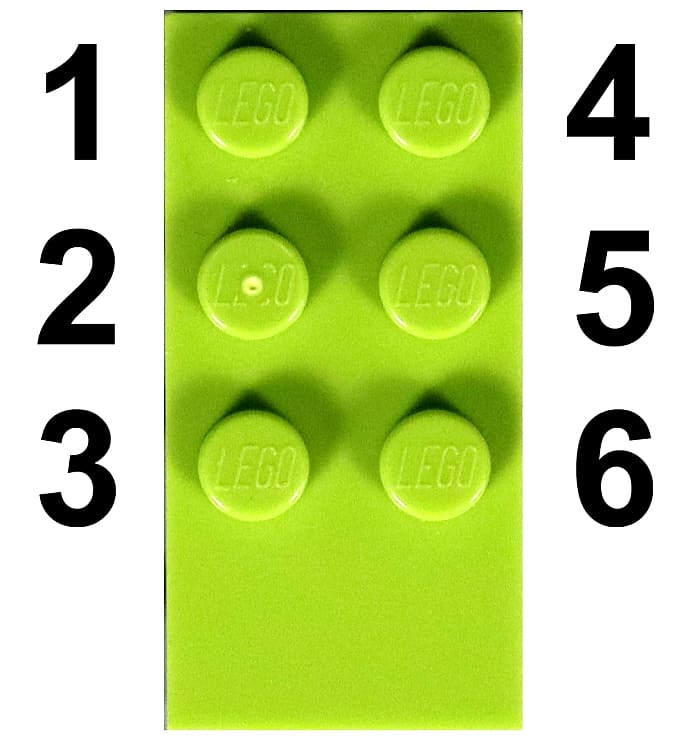
Each dot in a Braille cell has a designation numbered 1 through 6. The top left dot is 1. The dot underneath 1 is 2 and under 2 is 3. The upper right is 4 with 5 and 6 below it respectively. This allows us to say things like “E” is dots 1 and 5. Fortunately, LEGO has given us a full Braille cell.
The full cell is handy for those first learning to feel out Braille letters. At first, it can feel rather disorientating trying to make out what letter is what without any reference. Teachers will often start their students by having a full Braille cell right next to each letter so your fingers have something to reference. You can reference the full cell to help make sense of all other Braille characters.
LEGO BRAILLE BRICKS – NUMBERS & LETTERS
When first learning Braille, you don’t jump into learning the entire alphabet. Rather, you just stick to the first ten letters of the alphabet.

The reason for this is that these both represent the first ten letters of the alphabet and all ten digits including zero when writing out numbers. Additionally, these will also help learn the rest of the letters in the alphabet. More on that later.
| Letter | Dots | Letter | Dots | Letter | Dots | Letter | Dots | Letter | Dots |
| A | 1 | C | 1,4 | E | 1,5 | G | 1,2,4,5 | I | 2,4 |
| B | 1,2 | D | 1,4,5 | F | 1,2,4 | H | 1,2,5 | J | 2,4,5 |
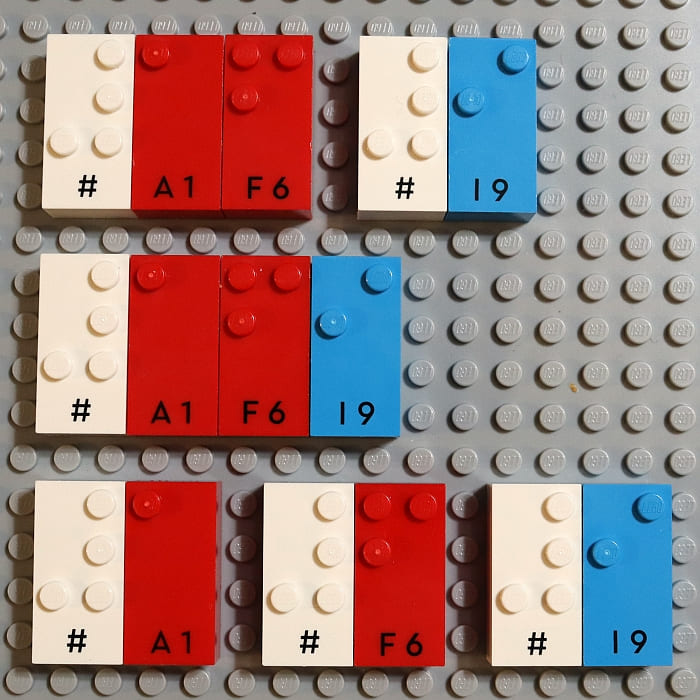
If you want any of these letters to be treated as a number then you need a number sign right in front of the letter. The number sign is dots 3,4,5,6 and must be directly in front of any other sign. As soon as you add a space it stops treating the cells as numbers. For the time being, we’ll use the hashtag to stand in for the number sign.
If you write #AEH that will be read as 158.
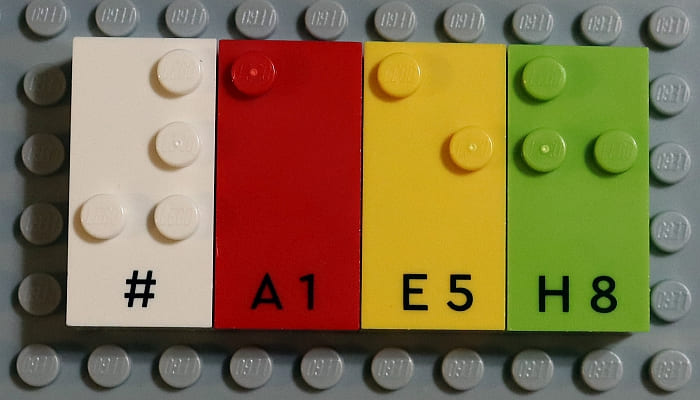
If you write #AE H, then that is read as 15 H.
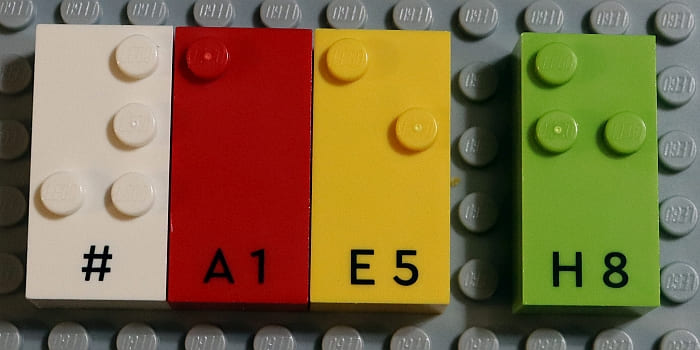
If you write #AE #H, that is read as 15 8 (two distinct numbers).
Remember, just because the LEGO bricks show the number on each piece, it does not mean it is a number. This makes the “#” a very important symbol. It’s also worth noting that the letters K through Z do not represent any number. All numbers in Braille are made up of only A through J with the number symbol.
LEGO BRAILLE BRICKS – THE REST OF THE ALPHABET
The rest of the alphabet continues the pattern starting in the first ten letters with one exception. That exception is “W”. I’m not sure why, but it breaks the pattern.
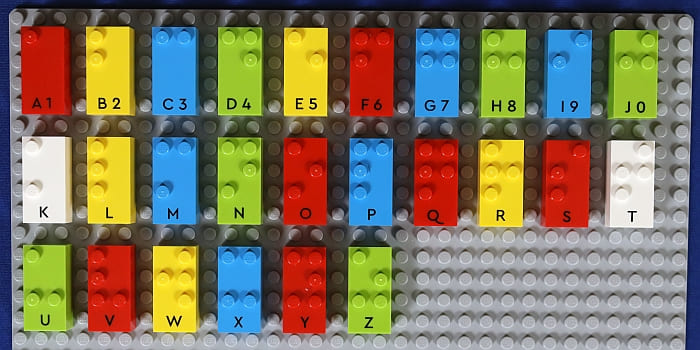
The next ten letters (K-T) repeat everything in A-J, but there is one extra dot. The dot 3 to be specific. Let’s take a look.
| Letter | Dots | Letter | Dots | Letter | Dots | Letter | Dots | Letter | Dots |
| A | 1 | C | 1,4 | E | 1,5 | G | 1,2,4,5 | I | 2,4 |
| B | 1,2 | D | 1,4,5 | F | 1,2,4 | H | 1,2,5 | J | 2,4,5 |
Now compare it to K through T.
| Letter | Dots | Letter | Dots | Letter | Dots | Letter | Dots | Letter | Dots |
| K | 1,3 | M | 1,3,4 | O | 1,3,5 | Q | 1,2,3,4,5 | S | 2,3,4 |
| L | 1,2,3 | N | 1,3,4,5 | P | 1,2,3,4 | R | 1,2,3,5 | T | 2,3,4,5 |

As you can see, each letter matches up with the previous letter in the same position. Since K is first in this new set, it matches up with A. The only difference is that it has dot 3.
The final six letters start a new pattern by adding both dots 3 and 6. The only exception as mentioned before is W. It does not correspond to anything in the pattern. See below.
| Letter | Dots | Letter | Dots | Letter | Dots |
| U(A,K) | 1,3,6 | W | 2,4,5,6 | Y(D,N) | 1,3,4,5,6 |
| V(B,L) | 1,2,3,6 | X(C,M) | 1,3,4,6 | Z(E,O) | 1,3,5,6 |
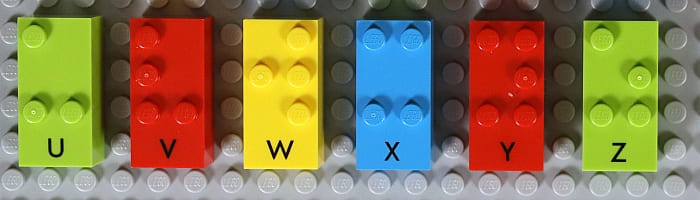
Since there aren’t ten more letters, I wrote in the letters they match up with for the pattern. The closest W comes to matching anything is the letter J but it is missing a dot 3. There are Braille cells that continue this pattern, but as soon as we leave the alphabet, we start getting into contractions where one Braille cell stands in for multiple words/letters. That goes beyond what we are trying to learn here.
The idea for general builders is that if you want to build something with a basic Braille sign, all you need is the basic alphabet as well as a couple of special symbols. Speaking of which, let’s see what the two extra symbols I think you should know are.
LEGO BRAILLE BRICKS – EXTRA SYMBOLS
The two symbols that would be great for the average builder to know are the number sign and the symbol that signifies capitalization. It is easy to use these symbols. Simply put them in front of the letter you want to change. Let’s look at some basic examples.
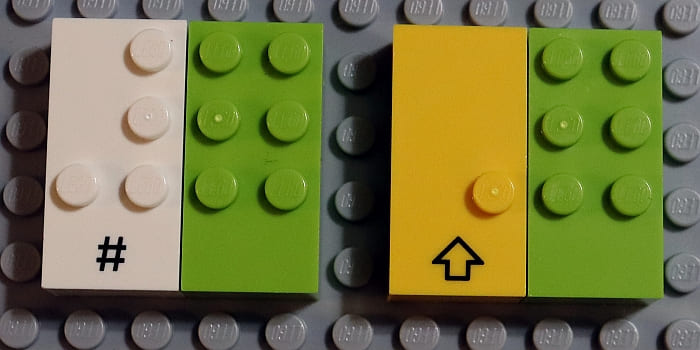
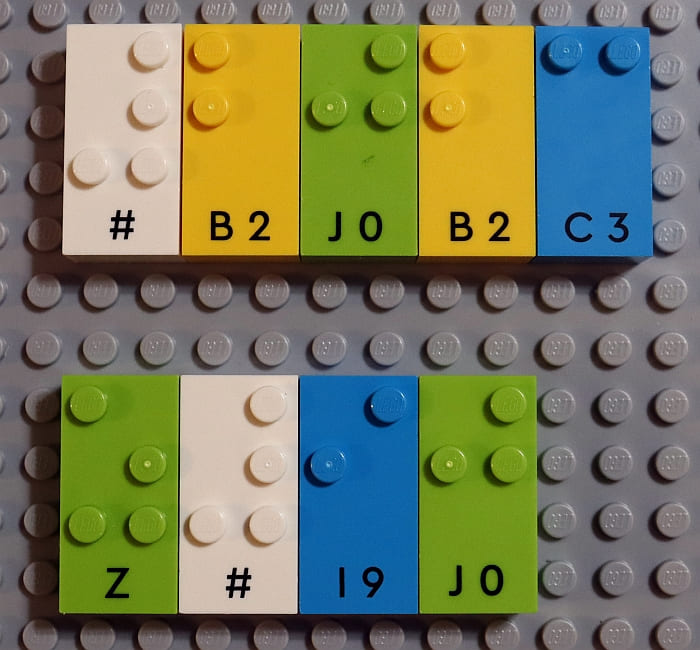
For starters, the number symbol uses dots 3,4,5,6. Let’s say I want to write two numbers: 16 and 9. So, I’ll write it like this #AF #I. If I wrote it as #AFI, I would have written 169. Or if I wrote #A #F #I, that would have given me 1 6 9.
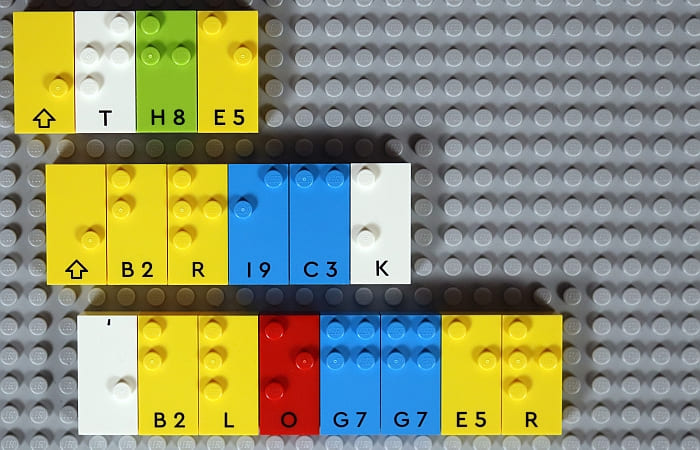
Knowing numbers makes it great for writing out specific years like 2023 or model numbers like Z90. In the case of Z90, you can write it as Z#IJ.
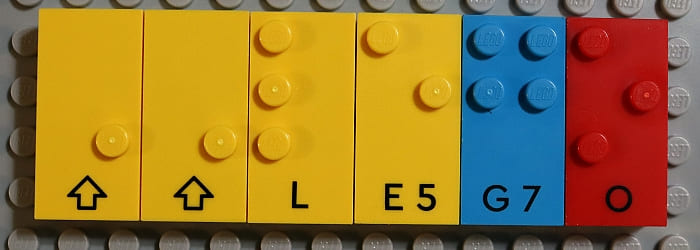
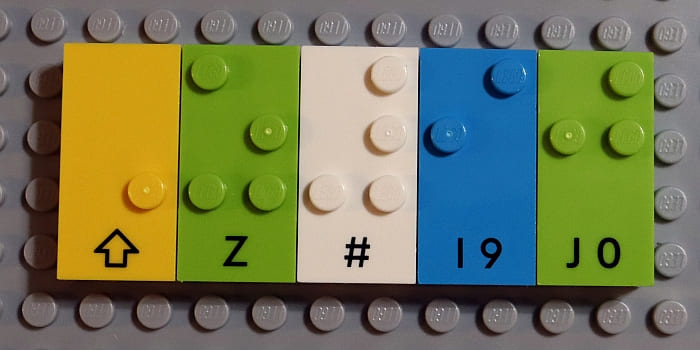
I’ve been writing all these letters in uppercase format for the purpose of clarity, but in truth, all of them have been in lowercase. So, let’s fix that. LEGO Braille Bricks give us four yellow bricks with a single dot. The dot is dot 6, and the symbol written on the brick is a little up arrow. This just means that it is changing the letter after it to upper case. We’ll use the “^” symbol to stand in for dot 6.
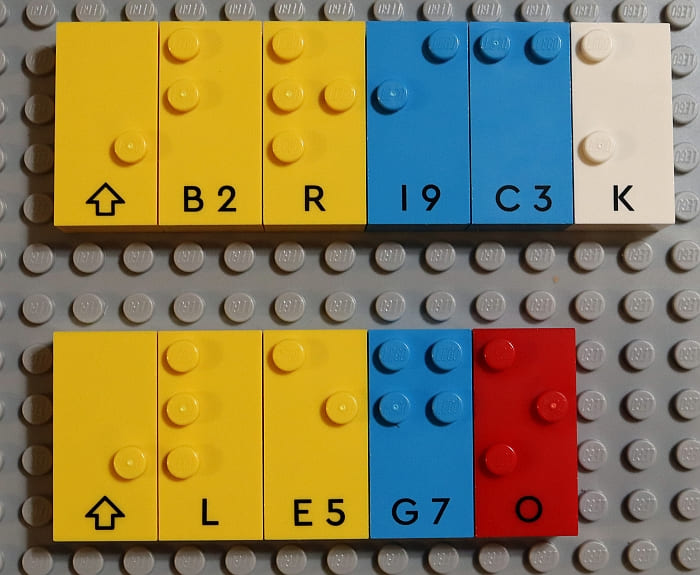
So, if you wrote ^BRICK, a Braille user will read it as “Brick”. And if you write ^LEGO, a Braille user will read that as “Lego”, which we all know is wrong. All the letters in LEGO need to be capitalized. So, how is that done? Simple, we just use two ^^ in a row before writing the word. So, if we write ^^LEGO, a Braille user will read it as “LEGO”, which is right!
Now, let’s put these two ideas together. Remember Z90? The first way we wrote it was Z#IJ, which would give us z90. However, if we wanted the Z capitalized, we’d need to write ^Z#IJ. This would give us Z90.
The rest of what’s in the box of Braille bricks covers mathematical symbols and, in the case of the French version, accents for specific letters. That goes beyond what I think you really need to know. However, if you are interested, check out the link that takes you to what LEGO has put together to help teach the basics of Braille using this wonderful set: LEGOBrailleBricks.com.
LEGO BRAILLE BRICKS – OTHER CONSIDERATIONS
As much as I love this set, I do want to point out a few areas that might cause someone to stumble. First, there is no texture on the short ends of the bricks to help indicate which way is right side up for someone who is completely blind. Normally, this is not an issue since the side of the brick with printing is always smooth. However, there are a number of symbols like the various punctuation/math symbols that use only the lower section of the Braille cell. This means there is no clear right way up for these bricks.
For example, I did not realize LEGO only offered four capitalization bricks. So, I ended up using the comma brick (dot 2). Turned upside down, it feels like the capitalization brick (dot 6). This just means if you’re doing something really complex or long, you may need a second or even third copy of the set, if you want all the printing to appear on the lower section of each brick.
The other issue to make you aware of is the fact that the LEGO Braille cell is larger than your standard Braille cell. By design, the Braille cell sticks to a certain size. This allows each cell to fit comfortably under a single finger’s tip at any one time. The Braille on the LEGO brick is almost twice the size of a standard cell. Additionally, when placed together, the Braille cells can run together much more with the LEGO bricks.
This means it can take a Braille user a bit longer to read anything you write using this format. In truth, this system is a great way to teach Braille, but it is not the most optimum way to read Braille. Let me give you an example of what a Braille user might experience.
Let’s say you have a poster with ten lines of text. Each word is blown up to be 75-point font. Put your nose one inch away from the poster. Chances are you can still read each word as you move left to right top to bottom, but it will take more time if you can’t step back and see more of the words. It’s a bit like this with the LEGO Braille bricks.
However, the upside is that every Braille user you show this set to will be over the moon. It shows a level of acceptance and caring that is not necessarily normal in a blind person’s day-to-day life. It’s kind of like someone gave you a LEGO model in your favorite color because they knew you really liked that color. It’s very touching on a personal level. And the added bonus is that it can hide in plain sight. You don’t even need to write the Braille in different colors if you don’t want to.
LEGO BRAILLE BRICKS – WRITING WITH BRICKS
Having this set will be a huge aid in figuring out where dots need to be. The set comes with two 32×32 baseplates for you to arrange your bricks on. Once you have everything in place, you can examine it and use your own bricks to write out the Braille symbols.
Keep in mind that each cell is in a 2×3 space. So, you can use a 2×3 plate and ignore the 2×4 brick space that the Braille bricks use. Next place 1×1 plates on the 2×3 plate where the dots need to be. Then tile the rest. It’s just that easy!

LEGO BRAILLE BRICKS – RECAP
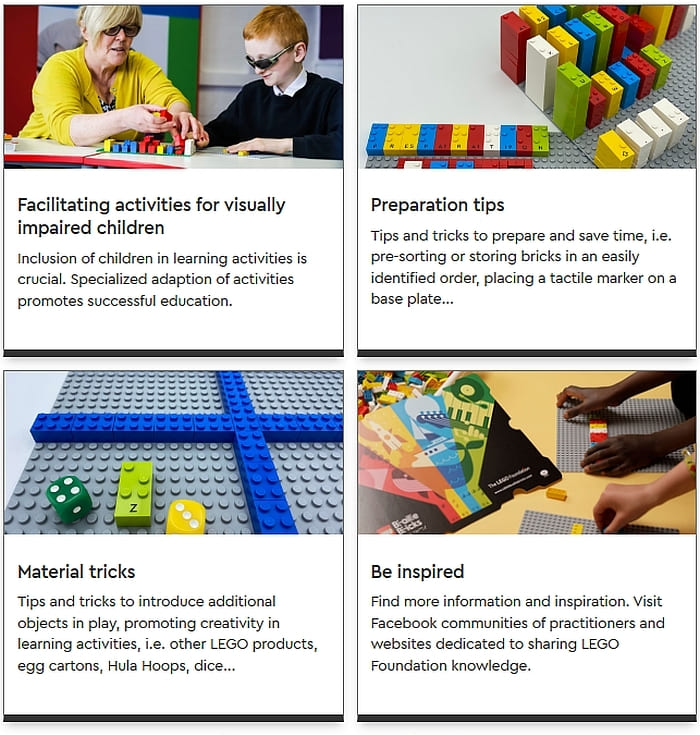
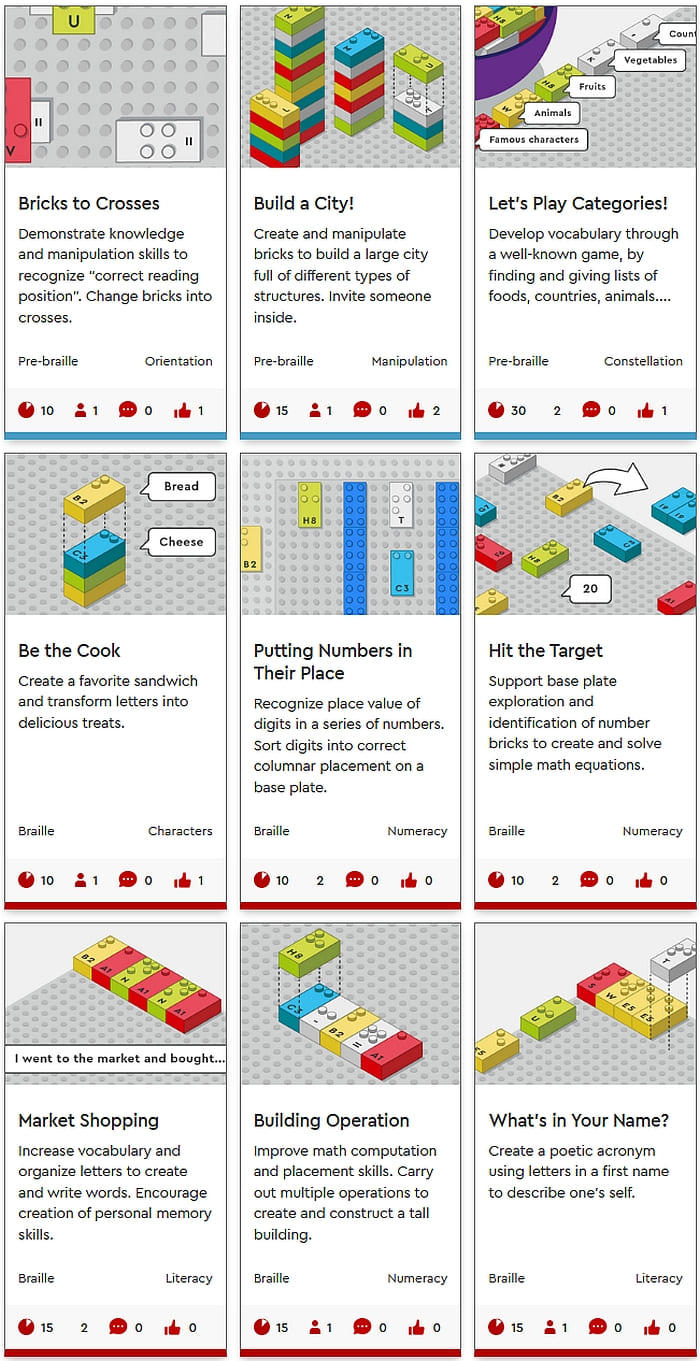
The #40656 LEGO Braille Bricks set, of course, is ideal for teaching Braille to new users. Many of the exercises LEGO has put together are made for facilitators with sight to easily teach the basics. However, there are some pretty handy things for the average builder to get out of this set as well. You can make labels and signs for your model just a little more accessible.
To this end, the ideal use for these bricks is to learn the Braille alphabet and the two special symbols I suggested above; the number sign and the capitalization symbol. This will be enough for anyone to use Braille in its most basic form known as Grade 1 or Uncontracted Braille. This is the most useful method since anyone using Grade 2 has to first learn Grade 1, so both novice and expert Braille users will know what you wrote. In the video below, we will discuss Braille Bricks in a bit more detail.
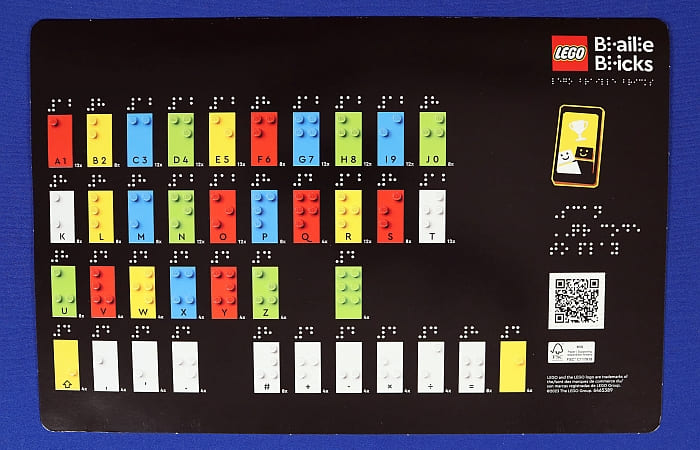
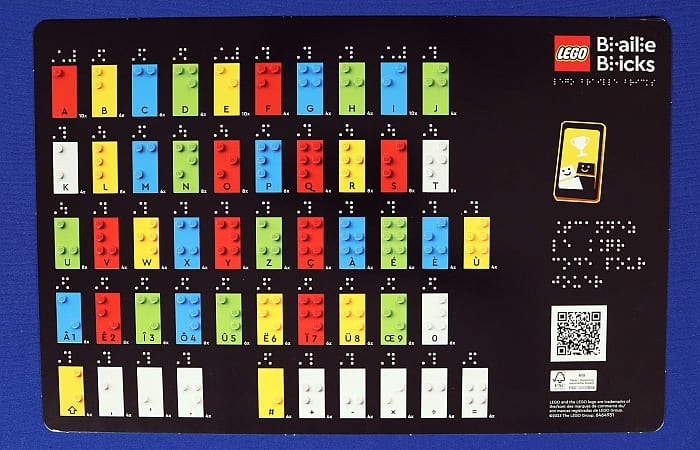
Hopefully, all of this give you a decent primer on writing Braille using LEGO bricks and gives you an idea of what you can find in the #40656 LEGO Braille Bricks set. set. Speaking of which, each set comes with a large textured card that works as an inventory for what bricks are in the set. Additionally, there is a QR code to lead people to the activity page LEGO has created to support this set.
As for languages, LEGO has created activities in English, French, and Spanish. Just know that English-speaking countries will only have #40656 LEGO Braille Bricks available, which doesn’t have the accent bricks found in the French version. So, those wanting a more robust language experience may need to import the #40655 LEGO Braille Bricks set (French version) for more options.
The set number for the English version is #40656 LEGO Braille Bricks Play with Braille, and is available in the United Kingdom for 79.99: GBP, Ireland for 89.99 EUR, the United States for 89.99 USD, Canada for 119.99 CAD, Australia for 149.99 AUD, and New Zealand for 169.99 NZD. The set number for the French version is #40655 LEGO Braille Bricks Play with Braille and is available in France for 89.99 EUR, Canada for 119.99 CAD, Switzerland for 109,00 CHF, Luxembourg for 89,99 EUR, and Belgium for 89,99 EUR. In early 2024, the set will also be available in Italian, German, and Spanish, but the version numbers and prices are not yet known.
As we mentioned in a previous article (see links at the end of this post), the LEGO Foundation will continue to carry out research and distribute LEGO Braille Bricks educational kits free of charge through partnering with national blindness associations and other partnering organizations. If you have any questions or thoughts about the set and how to use it, feel free to discuss in the comment section below.
And you might also like to check out the following related posts:


Wow. Thank you so much for this. I have been curious about this set ever since it was announced.
Fantastic, thank you! I wonder if the pieces will show up at bricks and pieces.
I like your point that we can make our own braille bricks by using the card for reference. I’m thinking of making some braille signs for my city. I have a cousin who is legally blind.
I always thought braille was so mysterious. Now I understand it a lot better. Very cool review. Thanks
I guess it should be “Latin alphabet”. It might have been a mixup with “Arabic numerals”…
Thank you, Hakan. Good catch. Got it fixed on behalf of William. 🙂
Good overview. I’m wondering though I’d the big dots are an issue for children. As you said, Braille cells should for under a fingertip. But I appreciate Lego’ s effort.
Sorry for my ignorance, but what do vision impaired people use these days if not braille?
Very interesting review by the way. It definitely piqued my interest.
It should still be used in written text, but there are software and apps that would allow texts be automatically spoken out through AI and such. I saw a video about a guy who apparently could “speed listen” online text through his smartphone, although most others would only understand the rapid-pace AI voice as white noise…
I have seen an earlier version of this at my kids’ school. It’s very cool that they are making it available for purchase. I might pick one up just for novelty’s sake.