(Written by William)
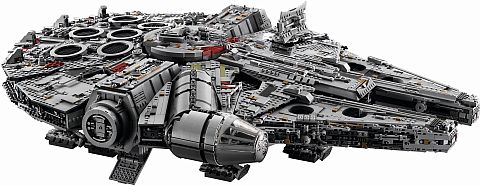
Last week, we talked about the experience of building the #75192 LEGO Star Wars UCS Millennium Falcon, and what an experience that is! It took my wife and I over 7 weeks to build it, in sessions lasting between half an hour and two hours (grand total for just building time is 1,765 minutes, or 1 day 5 hours 25 minutes). You can read more about the building experience here: Building the LEGO Star Wars UCS Falcon. Today, we will address some of the interesting build techniques found in the set. 🙂

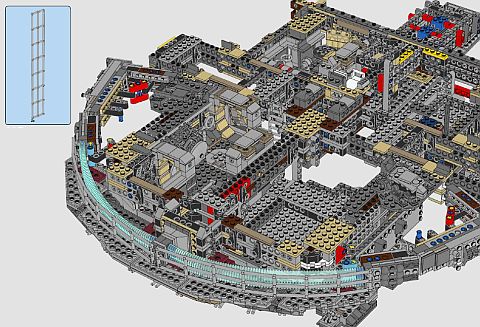
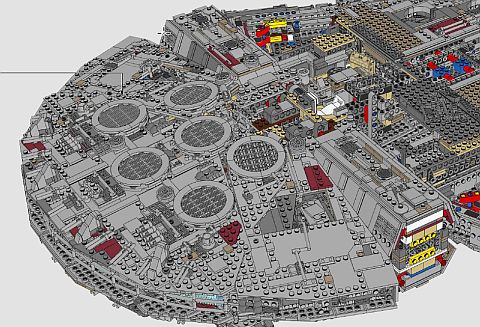
As a LEGO Star Wars Ultimate Collector’s Series set, and the largest LEGO set ever released for retail (at least so far) it’s expected to see some interesting building techniques. However, many of the techniques I found, mostly have to do with how to deal with the sheer size and weight of the model, rather than interesting connections you can learn from and copy in your own builds. For this reason, I recommend using much of this breakdown as a guide on creating large models. As for interesting parts in the set, there are a few here and there, but mostly it’s just re-colors. There is a modified 2×2 plate with studs on one side, leaving the rest smooth like a tile, but you only get one of those, and it isn’t even used in an interesting way. All that leaves are some nicely printed elements and a large quantity of normal parts.

➡ LEGO UCS MILLENNIUM FALCON TECHNIQUES: REPEATING FRAMES
As I mentioned above, handling all that weight is a critical part of this set. Given its dimensions and amount of detail, you’ll have trouble just figuring out how to pick it up. This means it needs a very sturdy superstructure that holds the model together. Normally, large sets utilize a LEGO Technic framework due to their more reliable connection points. However, what happens when even that is not enough? Simple, you build another frame just like the first, which, essentially, works like the interlocking brick technique.
Early on in the LEGO hobby, we find out that LEGO walls stay together better if we overlap the bricks, as opposed to stacking them in straight lines. Similarly, if we have multiple bricks doing the same job, our model is more durable. For example, a wall that is one stud thick is not as sturdy as a wall that is two studs thick. Those are the two concepts used in the repeating frames. It’s the application of the fact that most things are stronger together than individually – a principle that you will find everywhere. If you want to see it in practice, take a dry spaghetti noodle and break it, then take a handful of noodles and break them. You can easily tell which took more effort to break.
Using dual layers of LEGO Technic bricks in the Falcon allow each layer to handle a part of the load, rather than needing to handle the entire mass. Additionally, between these layers are plates that provide the interlocking, along with connectors that directly attach the top and bottom layers together. It is basically a three-dimensional approach to interlocking pieces. And, there is also an extra benefit of repeating frames; the possible points of connection have just doubled. Since we are building an outer hull for the top and bottom of the Falcon, it makes sense to have twice the number of connection points.
➡ LEGO UCS MILLENNIUM FALCON TECHNIQUES: FREE-FLOATING SLIDING HATCH
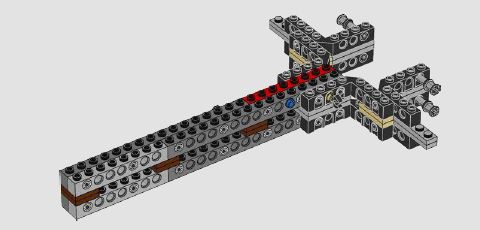
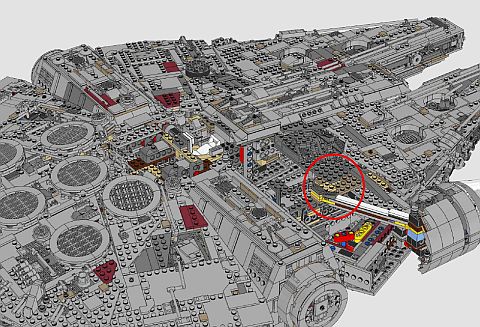
This is one of the smaller techniques in the set that I found very interesting. It is a sliding hatch door. The trick to sliding doors is to make sure there is a solid channel, and stoppers, so that the door doesn’t slide too far. Of course, we have seen sliding doors in LEGO sets before, but what’s different here is that the door opens to face down, rather than to the side. Additionally, it is built so that it won’t fall open when the ship happens to tilt. It is this last quality that really struck me as interesting, and the feature that I wanted to emphasize.

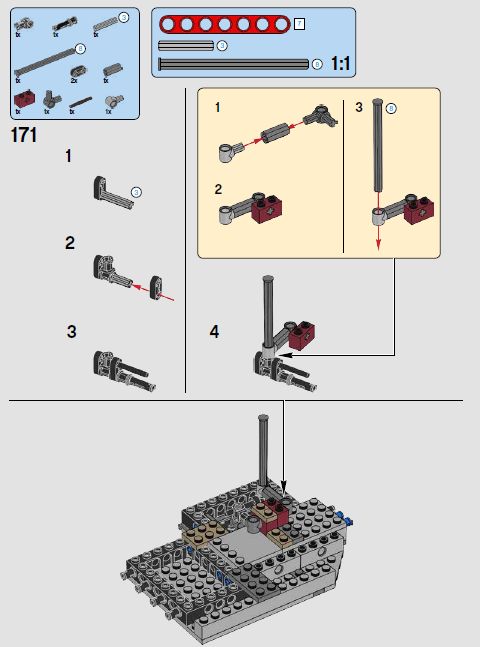
First, a sliding door is made with clear channels and stoppers. Then, a rubber connector is added that lightly touches the door (the black piece in Step #170 with two LEGO Technic axle holes). This simple element makes all the rest possible. Keep in mind that the placement of the rubber friction element is key, but once you have it at the right place, you end up with a sliding hatch that can be placed in any position and look awesome.
By the way, you don’t need the small rubber connector used in the Falcon to accomplish this. You can use a fixed tire, or a gear on a LEGO Technic pin with friction ridges (in other words a pin that doesn’t turn easily). Even rubber bands could be used to achieve the same purpose. All you need to do is to remember to make sure the friction/rubber element touches the door in every position. This means when it is open or closed it needs to touch. Second, make sure the friction/rubber element doesn’t stop movement completely.
➡ LEGO UCS MILLENNIUM FALCON TECHNIQUES: GRAVITY DROP ACTION ELEMENT
Since I just finished talking about the hatch, I figure this is a good time to mention what the hatch covers; a gravity drop action element. In terms of this model, this is an anti-boarding gun that is hidden under the ship. I really like these type of action features, as they have such a sudden impact. Gravity drop action elements come in two varieties; either fixed or loose. A fixed gravity drop is something that will stay connected in the model, like a dropping elevator. A loose element, on the other hand. typically drops some sort of flaming rock or deadly ammunition. Fixed drop elements are always cooler in my book, because they essentially change the state of the model. In this case, there is now a gun where there wasn’t one before. At least in my opinion, loose drops are just messy, but they can provide an interesting effect in the moment. (Maybe one of these days, we’ll see a bride and groom under a shower of flower pieces.)
In the Millennium Falcon, we get a fixed version of the gravity drop action element, which leads us to the tips you want to follow when making your own. First, make sure the thing dropping doesn’t catch on whatever is holding it up. Rounded elements work very well for this purpose, as do curved slopes. Second, try to avoid putting seams where the dropping element stops. In the example of the gun, the axle’s stopper is part of the axle itself, so it won’t break apart when it hits the stop. Third, use minimal points of contact. The more things your drop element touches, the more chances it has to hang up on something. Follow these tips and you should have a fun time with gravity. Bonus tip; if you need to simulate gravity, you can always use a rubber band. This will allow you to use the same concept to make things spring up rather than just fall down. Keep in mind that this will put more pressure on the closure that is keeping the element from going off, so it may require a bit more thought than a simple gravity element.
➡ LEGO UCS MILLENNIUM FALCON TECHNIQUES: CRADLING
Going back to big model techniques, this ship presents an odd problem. It is big enough to have two interior rooms, but these rooms need to be held inside the ship. The standard technique of building from the bottom up would not be sufficient for solving this issue, so we get cradling. Inside the superstructure of the ship are large empty holes. In order to fill these holes, we must build solid platforms. However, we can’t just cover the holes up with these platforms, so we add lift-arms to sink the platforms in those spaces. The end result is inner sections of the ship that are cradled within its skeletal frame. Not only does this give us the space we need, but each platform is surprisingly sturdy. In fact, they make up the spaces that the instructions tell you to use when you want to lift the ship up.
This technique is nothing I’ve ever considered using in my own LEGO creations. The biggest reason is because I would have thought this approach was not strong enough to hold together. However, this set demonstrates that this is far from the case. The use of parts here are capable of handling all the model’s weight. The downside of this technique is that it can be a bit tough to hide the connection points the platform hangs from. It works decently in a ship since it has a very industrial feel, but might be out of place in other models. Nevertheless, it is a good solution when you need to suspend a platform while trying to conserve vertical space, since the technique is more side-to-side than up and down.
➡ LEGO UCS MILLENNIUM FALCON TECHNIQUES: EXTENDED WEDGE CURVES
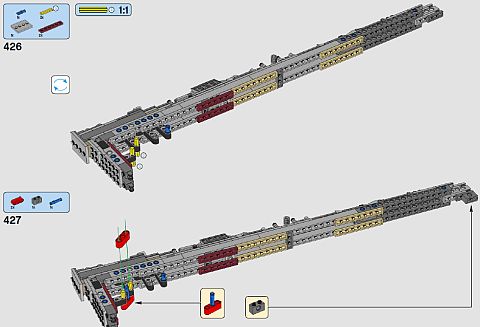
One of the most marvelous features of this model is how it achieves its very unique shape. So I’d be amiss if I didn’t bring up one of the crucial techniques that makes this oddly shaped ship a reality. The technique in question is the extension of angles by the use of stacked wedge plates. LEGO makes a wide variety of angled wedge plates which means you can go in dozens of directions. This is seen in every instance as you create large panels for the Millennium Falcon. Take the back panel section for example, the overall curve needs to look practically round.
Many large curves are used to span the great distance of the ship, but smaller wedges correct the angle so that in the end you get a rounded shape. Additionally, the wedges are stacked with others and offset. This makes interlocking plates easier, while also smoothing out the look of the plate. This technique gives the wedges a tapered look in addition to a curved one. Both the extension of the curve, and tapering by using a stack of wedges, work in directing the eyes of the viewer. What you are left with is the illusion of very curved shapes, rather than a blocky pixilated model seen in some of LEGO’s earliest sets when everything was mainly just bricks.
➡ LEGO UCS MILLENNIUM FALCON TECHNIQUES: LARGE FLEXIBLE ELEMENTS
At the back of the Millennium Falcon we get to see a very interesting technique. It is in how the back thrusters are created. LEGO designers knew that out of all the parts of the ship, the thrusters should look more fluid than the rest of the ship. That’s because the blue represented energy, rather than actual rigid paneling. That meant it was necessary to use some large flexible parts. Most of the time, when we see the use of large flexible pieces, they are either used for making straight lines (like rigging on a sailing ship), or for some really twisted hose-work (like in a vehicle’s engine compartment). But this model shows a third use that happens to look extremely good.
Creating a slight, almost imperceptible bend is something we rarely think of in our LEGO creations. We are surrounded by so many rigid LEGO elements that we naturally think of straight lines more than anything else. But these large flexible elements are well suited in making some fabulous curves. Good examples of this can also be found in the front of the #10220 LEGO Creator Volkswagen T1 Camper Van, and the #21003 LEGO Architecture Seattle Space Needle. Both of these sets, and the Falcon, take elements that have just a little bend to them. These parts are then placed in sections that are just slightly smaller than they are. And, before you know it, you have a very interesting look that the part is not straining to maintain.
➡ LEGO UCS MILLENNIUM FALCON TECHNIQUES: BRACING ANGLED CONNECTIONS
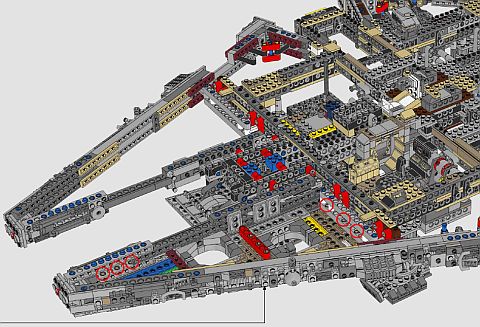
The Falcon uses a lot of pieces to frame the shape of the ship. In doing so, it also requires ninety-degree angles to be formed using finger-hinges. Since these finger-hinges are not stationary, a number of techniques are used to brace the connections. The first one is a rigid brace. This is achieved with a combination of brackets and clever mounting, so that a minifigure base can be placed as a solid connection point to define the angle.
However, even this is not enough, and reinforcing the inside angle is also necessary, given the size of the frames. To do this, LEGO designers use lift-arms that stick out from two sides of the frame, and connect them together with a set of smaller lift-arms, set at a forty-five degree angle. What you get is a braced angle that has bracing both internally and externally. Given your own creations, you may not need to go this far, but it is a nice technique to fall back on in case an issue comes up.
➡ LEGO UCS MILLENNIUM FALCON TECHNIQUES: KITING
This is an interesting technique that can drastically reduce the weight of large LEGO models. I personally call it kiting, because it is like building a kite. You start out with a number of framing pieces (these frames don’t have to be on the edges of whatever you are building), then you cover the frame with a thinner layer like stacked plates. This means you can have a hollow center, and thus saving a lot of weight.
Connecting everything properly to the frame is key with this technique. The thinner material will actually give the frame added strength by defining the shape you are building. Whereas the frame will shore up the weak points of the thinner material. That is not to say this technique is simple. Once you get past basic rectangular shapes, the building of both the frames and their coverings can get really tricky. However, as seen in this set, mastering this technique can be very rewarding.
➡ LEGO UCS MILLENNIUM FALCON TECHNIQUES: PINNING WITH AXLES
This is probably one of the first techniques I’ve seen LEGO use that I personally wouldn’t recommend. However, personal feelings aside, it is worth mentioning, since it allows for a rather unique look. As you know, the Millennium Falcon has a gradually sloped top section to its hull. Like it or not, there aren’t really any parts that can replicate this perfectly, so large panel sections are created and then layered on top of the ship. Imagine laying down a stack of leaves to form some sort of pattern, problem is the slightest breeze or movement would ruin this carefully laid design. That is where the technique of pinning comes into place.
Since there is very little chance to solidly secure a large panel, the solution here was to make one flexible connection. This is done using an axle attached to a reinforced hinge. This axle is then slid into a pinhole thereby pinning the panel into place. As far as stability goes, this is probably the most minimal you can do and still expect a model to keep its shape. That is why I personally don’t care for this technique all that much. Despite this, the actual pinning of a panel gives us a very easy method to angle fairly large sections of a creation in rather unorthodox ways. As a bonus tip, it is possible to secure the axle you use for pinning with a bush. The reason that wasn’t done here has a lot to do with how the model comes together. It would be a nearly impossible connection to get in place and only provide a very small benefit. However, with proper planning you can make this technique much more secure.
➡ LEGO UCS MILLENNIUM FALCON TECHNIQUES: SET-INS
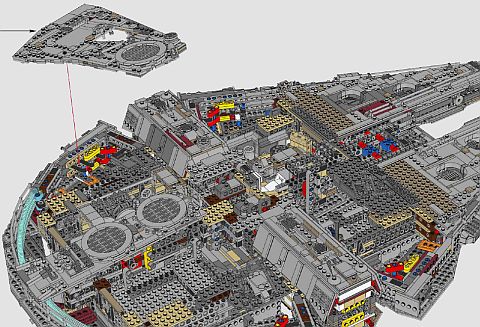
A set-in is a part of your model that, once built, rests on or in your creation. It has no actual points of connection, although it may have a few guiding points for additional stability. In the step shown here, we see two types of set-in creations. The actual step shows us the completely free-floating type. For this type, gravity is the primary thing that holds the set-in in place. You do have the shape that surrounds your set-in to help it stay in place, but gravity is what’s doing all the work.
Right next to this set-in, we have a different type. This set-in uses half-pin half-axles to partially secure the set-in in place. If you’re not sure which part I’m talking about then it’s doing its job (it is the part that has the circular vent on the panel leading towards the front of the ship). This other type of panel is the guided variety of set-in. The other side of the middle of the ship will have another example later on, as will the rounded tunnel leading to the cockpit. In all these examples, there is something else other than just gravity helping to hold the position of the panel. In the case of the rounded tunnel, it creates a channel for a thin, tiled rail to fit into then locks itself into place with some locking hinge work near the cockpit.
Set-ins can be rather complex and multi-dimensional to get the job done. As for their use, most of the time they are to accommodate some sort of play feature. For instance, most of the set-ins in the Falcon are there to allow you to get into the decorated inner portions of the ship. Another use for a set-in is to handle odd shapes like the rounded tunnel or even the panels that used pinning in the previous technique. For those looking for a difference between pinning and set-ins, pinning is a very specific way to make a type of set-in while the category of set-ins is much broader. As a broad category, set-ins deal with the use of gravity to hold your model together. Even the central circular panel on the very top of the ship uses a variant of pinning, but given the length of the lift-arms that are used as pins, it adds a level of friction to enhance the stability.
➡ LEGO UCS MILLENNIUM FALCON TECHNIQUES: TRIANGULAR BRACE
Sometimes a LEGO creation will have an odd feature that doesn’t fit into the normal symmetry of most designs. We usually end up building a separate support for this oddity to hold it in place. However, when you start dealing with very large scaled projects like the Falcon, this can put a great deal of strain on whatever type of support you use. That’s why the Falcon uses braces, the simplest of which is the triangular brace.
The triangular brace consists of one section that connects at a different angle than the main arm that holds up the part that needs bracing. This style of brace not only helps hold the weight but it stabilizes the main support. The longer something gets, the weaker it usually becomes. That’s because along with the extra length, you are introducing more surface area. For instance, waving an antenna around will put stress on it from the motion of waving, the wind that might catch it, the weight of the antenna itself, and so on. Each time you add a guideline to a tall structure like this, you are giving it a triangular brace and reducing some of the variables that can break or bend the antenna.
In the case of the Millennium Falcon, we have a straight arm that holds the cockpit. But we need some extra support so that this piece does not wobble around. Adding just a thin strut as a triangular base does this without needing to make an overly elaborate design. As for when you may need a triangular base, try moving your own creation around. If there are parts that move and wobble too much, you may consider finding ways to secure it with a brace.
➡ APPLYING WHAT YOU LEARN
Most of the techniques mentioned here are primarily for large LEGO models. What’s more is that they are for models that aren’t necessarily stationary like a building. Therefore, I recommend starting with large stationary models first, and learn how to accommodate for their size, before building something like the Falcon.

The key take-away is that with very large models, you should add bracing and sturdy connections whenever and wherever you can, because you never know when you may have to resort to set-ins and pinning loose sections. It’s only through a very solid base that it makes much less solid techniques an option later down the line. As for gravity drops and free-floating hatches, these are great ways to transform a model without dismantling it. In the Falcon, they are used in a very small way, but that doesn’t mean they can’t be expanded.
When it comes to fan creations, we tend to strive for designs that seem alive or at least lived-in. These are the types of techniques that will help towards that goal. Given the price of the #75192 LEGO Star Wars UCS Millennium Falcon, I suspect that this will be a set that few will have the chance of building on their own. However, by learning from it, you can appreciate what it offers, and use the techniques in your own models. If you do plan to buy the Falcon, I recommend that you build it in stages, so you have time and energy left for studying the techniques.
I hope the previous overview about the building experience and this article about building technique give you a glimpse of what to expect from the Falcon. It really is some of the most unique sets LEGO has to offer, and definitely the biggest one. While the set still shows as out of stock, hopefully LEGO will be able to make more before the holidays. You can check the status at the LEGO Star Wars section of the Online LEGO Shop.

What do you think? Are you excited about the re-release of the Falcon? Do you have it already, or are you planning to get it? If you do have it, are there any other pointers you would like to discuss about the building process? Feel free to share your thoughts and own review in the comment section below so we can further discuss this monster! 😉
And you might also like to check out the following related posts: