In the September-October issue of the LEGO Club Magazine there is a 10-page insert focusing on the new LEGO Star Wars: The Force Awakens sets and characters. We have already discussed the new LEGO Star Wars sets (see: LEGO Star Wars: The Force Awakens Reviews), but since the film won’t be released until December, we don’t fully know how the sets and characters fit into the plot. However the LEGO Club Magazine gives us some clues, especially about the new heroes and villains. So let’s take a look. 🙂

The LEGO Club Magazine insert starts out with summarizing the saga so far: “A long time ago in a galaxy far, far away… for thousands of years, the peaceful Galactic Republic governed the galaxy. Made up of countless worlds and star systems, it was protected by the Jedi Knights, an order of guardians and warriors who wielded the mystical power of the Force. But the Jedi were betrayed and the Republic fell. In its place rose a cruel Galactic Empire, ruled by a mighty Sith Lord, who had mastered the dark side of the Force – and his apprentice, the dreaded Darth Vader. An alliance of brave rebel heroes gathered to oppose the Empire’s tyranny. In a series of daring battles, they defeated the Emperor’s evil plans and ended the threat of the dark side forever. This December a new adventure will begin. Once, the Republic struggled against the Separatists. Then the Rebel Alliance fought the Empire. Now the galaxy has erupted in a new conflict, as the Resistance faces the furious onslaught of the First Order!”
Then, right in the middle of the insert, there is a two-page spread with all the LEGO Star Wars: The Force Awakens characters. Each of them have a little bio so you can see what roles they play in this epic saga. Some of them are old friends, others are brand new characters:

- REY – A resilient survivor and scavenger who has been toughened by a life on the harsh desert world of Jakku. Available in #75099 LEGO Star Wars Rey’s Speeder.
- CHEWBACCA -This fearless Wookiee co-pilot has fiercely stood by his captain’s side through countless adventures. Available in #75105 LEGO Star Wars Millennium Falcon.
- HAN SOLO – The adventures of Han Solo are legendary – he’s been a smuggler captain of the Millennium Falcon, and a hero of the Rebel Alliance. Available in #75105 LEGO Star Wars Millennium Falcon.
- TASU LEECH – Leader of the notorious Kanjiklub gang, an intergalactic criminal organization. Available in #75105 LEGO Star Wars Millennium Falcon.
- KANJIKLUB GANG MEMBER – A grizzled one-eyed gangster who works for Tasu Leech. Available in #75105 LEGO Star Wars Millennium Falcon.
- FINN – A trained fighter who wants to escape his past, he is plunged into adventure along a heroic but dangerous path. Available in #75105 LEGO Star Wars Millennium Falcon.
- FIRST ORDER OFFICER – High-ranking officers and commanders in the vast military of the First Order. Available in #75101 First Order Special Forces TIE Fighter.
- JAKKU THUG – A strong-armed bully who works for junk dealer Unkar Plutt to help keep his scavenging business running. Available in #75099 LEGO Star Wars Rey’s Speeder.
- FIRST ORDER TIE FIGHER PILOT – Skilled First Order pilots who hunt down enemy vessels and protect installations and warships. Available in #75101 First Order Special Forces TIE Fighter.
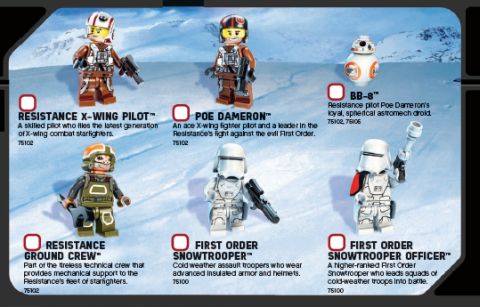
- RESISTANCE X-WING PILOT – A skilled pilot who files the latest generation of X-wing combat starfighters. Available in #75102 LEGO Star Wars Poe’s X-wing Fighter.
- POE DAMERON – An ace X-wing fighter pilot and a leader in the Resistance’s fight against the evil First Order. Available in #75102 LEGO Star Wars Poe’s X-wing Fighter.
- BB-8 – Resistance pilot Poe Dameron’s loyal spherical astromech droid. Available in: #75102 LEGO Star Wars Poe’s X-wing Fighter and #75105 LEGO Star Wars Millennium Falcon.
- RESISTANCE GROUND CREW – Part of the tireless technical crew that provides mechanical support to the Resistance’s fleet of starfighters. Available in #75102 LEGO Star Wars Poe’s X-wing Fighter.
- FIRST ORDER SNOWTROOPER – Cold weather assault troopers who wear advanced insulated armor and helmets. Available in #75100 LEGO Star Wars First Order Snow Speeder.
- FIRST ORDER SNOWTROOPER OFFICER – A higher-ranked First Order Snowtrooper who leads squads of cold-weather troops into battle. Available in #75100 LEGO Star Wars First Order Snow Speeder.
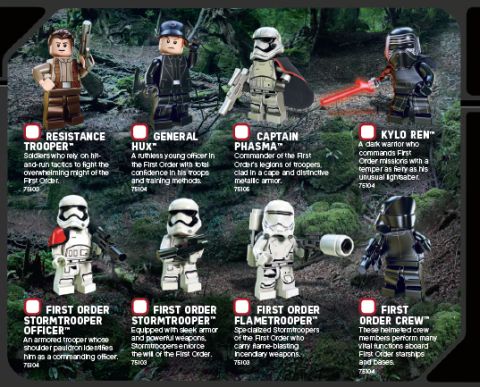
- RESISTANCE TROOPER – Soldiers who rely on hit-and-run tactics to fight the overwhelming might of the First Order. Available in #75103 LEGO Star Wars First Order Transporter.
- GENERAL HUX – A ruthless young officer in the First Order with total confidence in his troops and training methods. #75104 LEGO Star Wars Kylo Ren’s Command Shuttle.
- CAPTAIN PHASMA – Commander of the First Order’s legions of troopers, clad in a cape and distinctive metallic armor. Available in #75103 LEGO Star First Order Transporter.
- KYLO REN – A dark warrior who commands First Order missions with a temper as fiery as his unusual lightsaber. Available in #75104 LEGO Star Wars Kylo Ren’s Command Shuttle.
- FIRST ORDER STORMTROOPER OFFICER – An armored trooper whose shoulder pauldron identifies him as a commanding officer. Available in #75104 LEGO Star Wars Kylo Ren’s Command Shuttle.
- FIRST ORDER STORMTROOPER – Equipped with sleek armor and powerful weapons, Stormtroopers enforce the will of the First Order. Available in #75103 LEGO Star Wars First Order Transporter.
- FIRST ORDER FLAMETROOPER – Specialized Strormtroopers of the First Order who carry flame-blasting incendiary weapons. Available in #75103 LEGO Star Wars First Order Transporter.
- FIRST ORDER CREW – These helmeted crew members perform many vital functions aboard First Order starships and bases. Available in #75104 LEGO Star Wars Kylo Ren’s Command Shuttle.

So now that you know the main characters of the upcoming film, what do you think? Are you looking forward to it? Do you have any of the new LEGO Star Wars sets already? Which one is your favorite? Feel free to share your own thoughts and reviews on the sets and characters in the comment section below! And if you don’t have the sets already, you can find them under the LEGO Star Wars section of the Online LEGO Shop.

And you might also like to check out the LEGO Star Wars section for more news, reviews and discussions, or select from the following recent posts: