(Written by Cameron)
If you are a regular reader here you know already that LEGO Minifigure Series 11 got released this month, and it is a particularly nice series with some very interesting minifigures and unique accessories; a Diner Waitress, a Yeti, a Gingerbread Man, a Holiday Elf, a Female Scientist, a Grandma, a Pretzel Girl, an Evil Mech, a Welder, a Constable, a Barbarian, a Scarecrow, a Tiki Warrior, a Jazz Musician, a Lady Robot, and a Mountain Climber. A great selection, isn’t it? 🙂
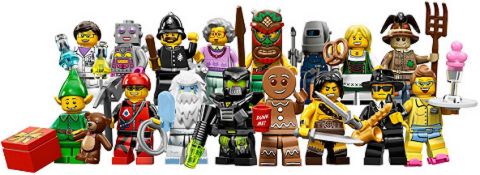
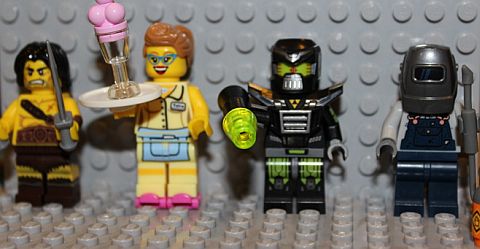
In a previous article we have looked at how to identify the minifigs in the Series 11 blind-bags (see: Guide to Feeling for LEGO Minifigs Series 11), and today I would like to show you some of the minifigures in more detail. In this article we will take a closer look at the Barbarian, the Evil Mech, the Diner Waitress, and the Welder, and in future articles we will continue with the other minifigures in the series.
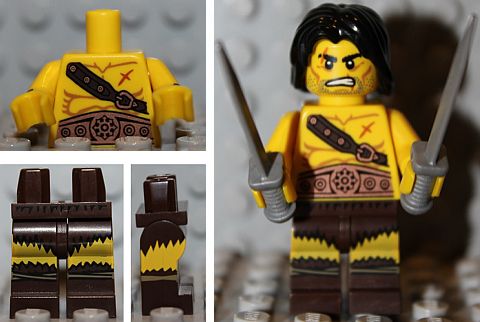
So let’s start with the LEGO Minifigures Series 11 Barbarian. He is quite ferocious looking, and one of my favorites in this series. His hair-piece is common; first introduced with the LEGO Prince of Persia Dastan minifigure, and also used for the LEGO Minifigures Series 7 Jungle Boy. His head comes with an angry facial expression. I do wish LEGO would have given him a double-sided head with a neutral face on one side, and an angry face on the other, but he likely spent most of his life fighting, and therefore never smiled. Poor guy. 😕
The Barbarian’s torso is bare and muscular, with a belt, a shoulder-strap, and a small cut on his chest. The backside of the torso is also printed, but not too interesting; it just got the continuation of the belt and the strap. The Barbarian’s legs got a printing of ripped pants, which I find very cool. Although I don’t get why his boots look ripped also. His swords are the same as the ones in many of the LEGO Lord of the Rings sets as well as previously released LEGO Collectible Minifigure packets.
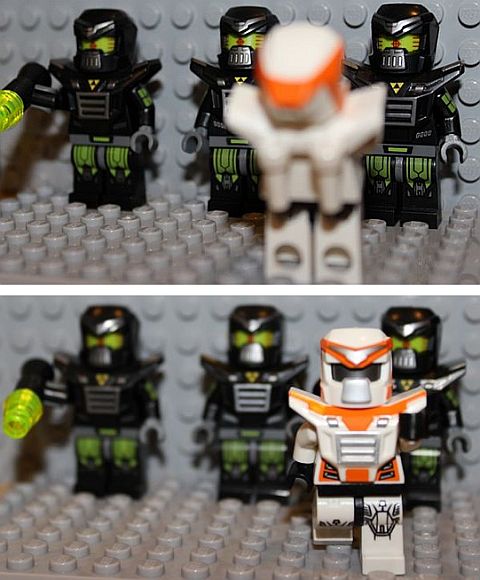
Now let’s look at the LEGO Minifigures Series 11 Evil Mech. It is pretty much the exact replica of the orange and white Battle Mech from Series 9, except that this one is black and comes with a gun. The helmet and the armor are the same mould as previously, but with different printing. Also, the body printing beneath the armor is excellent.
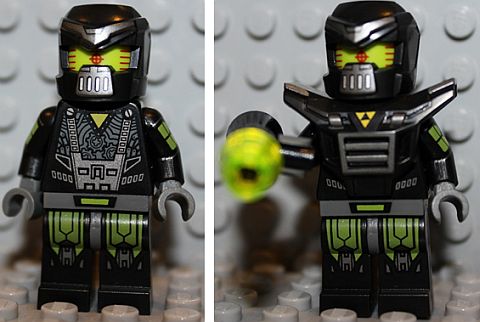
I forgot to take a picture of the head separately, but it is lime-green with a red target-finder printed on it, and looks really cool. Oh, and did you notice the Blacktron logo on the armor? The gun is just a megaphone with a 1×1 cone. The Evil Mech can’t hold it straight out because of the armor being in the way, but it can be held sideways. I already have three Evil Mechs and I’m thinking of building a whole army! The Battle Mech better watch out! 🙄
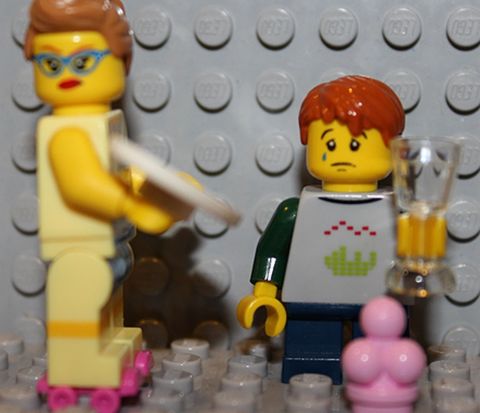
Now on to the LEGO Minifigures Series 11 Diner Waitress. It’s hard to tell from the front, but her heir is actually pulled back in a ponytail. The curl on the front is a nice touch. Her facial printing looks very happy and energetic. Her glasses are nice too. The head is reversible, with a frown on the other side (for minifigures who don’t leave a tip). On her shirt there is a nametag that says “Tara”. I presume it is her name, as well as the name of one of the LEGO designers – they often hide their names in LEGO sets. One thing that kind of looks awkward are the sleeves. It looks like she is wearing just a tank-top. Her arms should be pink or even cream to match the rest of her outfit, and differentiate the color of her skin.

If you look closely on her leg printing, you can see a note-pad sticking out. Also, from the printing you can tell she is wearing an apron and shorts. The tray is the same as the Waiter’s in Series 9, but in white. The ice cream isn’t a new piece, but the color is, and it fits into the cup perfectly without falling off. The cup isn’t new either, but it is perfect for the ice cream that would otherwise end up in a puddle. The Waitress’ roller-skates are the same as the Roller Derby Girl’s from Series 9, but in pink.
The last minifigure we will look at today is the LEGO Minifigures Series 11 Welder. Six of them are found in a full box of Series 11 minifigures, so you should have no trouble finding one. Also, maybe collectors don’t want him as bad because my brother found loads of them at Toys’R’Us. As far as the actual minifigure, let’s start with the helmet first; I think LEGO did a great job with this helmet. It does really looks like a welder’s mask. His head is very well done too; with some grease splatters on it, and if you look closely, you can also see a drop of sweat.
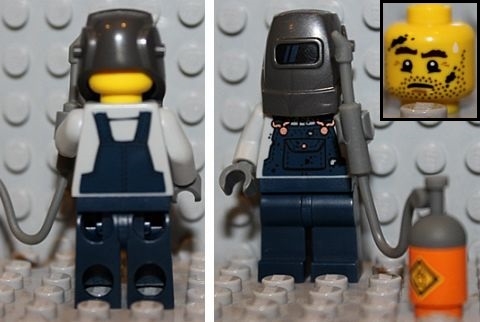
What would you find on a typical welder? Grease! Lots and lots of grease! So the Welder’s torso-printing has some more grease splatters. The torso does have back printing, but it’s just the back of the overalls. The legs are standard dark-blue legs; I wish there were some grease splatters on them too! It might have been overdoing it though. The Welder’s accessories are also very well done; especially the blowtorch. I like how it connects to the barrel. The barrel has a new printed design on it, showing that it is flammable.

That wraps up Part 1 of my review of the LEGO Minifigures in Series 11. So what do you think? Do you have a favorite out of the four minifigures featured so far? Or do you prefer some of the other minifigs in the series? Feel free to share your thoughts in the comment section below! Also, I’m a KFOL (Kid-Fan-of-LEGO) and this is my first post here at theBrickBlogger. Hope you enjoy! Thanks for reading, and feedback is welcome! 😉
And you might also like to check out the LEGO Minifigures section for more news, reviews and discussions, or choose from the following posts: