 LEGO magnet-sets have been a wonderful way to acquire minifigs without having to buy a whole expensive set. Unfortunately the good times are over. From 2011 all magnet sets are being glued! 🙁
The minifig’s legs are glued to the magnet base. In addition, the torso/legs assembly is glued to the torso. The minifig’s heads are removable from the torso, and any crown, hair or other headgear is also removable. Weapons and other accessories are separate and removable. Because the figs are glued to the magnet-base they are no longer useful for much more than as refrigerator décor.
The LEGO Ambassador for Bricklink contacted LEGO about this and she received the following reply from a LEGO-rep:
 “All Extended Line minifigure magnet sets will as of Jan 1st 2011 be glued. Based on new requirements, the magnet base and the minifigures will have to be permanently fixed together on LEGO Star Wars magnet sets.
To ensure a consistent consumer experience across all LEGO minifigure magnet sets we have chosen to permanently fix the minifigure to the magnet base on all magnet sets moving forward from Jan 1st 2011 (incl. Pharaoh’s Quest launching Dec 1st).
This decision has been carefully considered and was not taken easily as we know that many consumers will obviously not like this change.”
Of course LEGO-fans are not at all happy about this change and have been trying to rescue their figs from their magnet shackles. So far I have seen people trying to pry off figs with a hobby-knife or chisel. This method will separate the minifig from the magnet base, but unfortunately it also tends to break the back of the legs.
I decided to spend a bit of time myself trying to find a solution that is both safe for the minifig and the person using the method. (Please read our Tutorials Disclaimer for your safety here.) I will start with the process that I found working, and below that I will list my failed attempts for your further amusement (and horror!). 😉
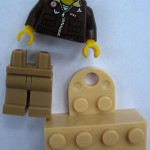 1. THE HOT WATER PROCESS – this works!: Originally I thought LEGO is using some kind of strong glue, like Superglue, and tried methods that I knew could work for glue. However none of these worked. (See failed attempts.) Then I did a little research on the methods LEGO used to glue parts.
I have discovered that LEGO is not using glue at all, but a solvent, that actually loosens the surface of the ABS plastic and allows the molecules to combine. Once the solvent evaporates, it leaves behind a cleanly fused surface with no residue at all.
Reading further on the subject, I found that LEGO has been using two types of solvents. One is called MEK (methyl-ethyl-ketone) and at some point they switched to GBL (gamma-butyrolactone). I’m no chemist, so I had no idea what these are, but I read that both of them are water soluble at certain temperatures. So, I thought to try loosening the seal between the minifig and the magnet by hot water.
The challenge is that ABS plastic itself has a melting point, which is 176 Fahrenheit (80 Celsius). So, I had to make sure I don’t cross over that temperature.
 TOOLS NEEDED:
• Stove
• Medium size pot with water (for heating)
• Strainer
• Cooking Thermometer
• Cold water (for cooling)
• Watch (for measuring time)
• Kitchen mitts or cloth (to keep your hands from burning)
 PREPARE MINIFIG:
Remove minifig accessories (tools/weapons, headgear and head)
Bend minifig at the waist so it is in a sitting position (this gives the best angle for the hot bath, and also helps to lift it out of the water)
Lift minifigs hands up, like it is reaching out for something (this also assures the correct angle)
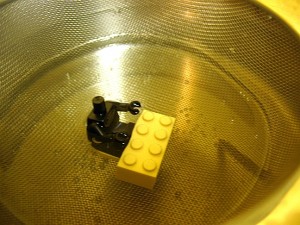
PROCESS:
1. Fill pot with water
2. Place strainer on top of the pot
3. Make sure the water level is above the strainer by about an inch
4. Place Cooking Thermometer in pot
5. Heat water to 160 Fahrenheit (71 Celsius) (I found this to be a perfect temperature for the process. Not too hot to damage the plastic, but hot enough to loosen the seal.)
6. Turn off heat (if you have an electric stove, it is best to take the pot off the burner)
7. Place minifig in hot water and leave it there for 5 minutes
8. Remove minifig from hot water (just grabbing it by the neck-stud works great; the water is really not that hot)
 9. Hold minifig/magnet assembly in kitchen-mitts with one hand and bend the torso straight back as much as you can (but gently!) to see if the seal is starting to loosen. WARNING! Do not try to wiggle the torso left and right! This will loosen the leg-pins and you will have a fig with very loose legs! ONLY bend the torso straight back!
10. As you bend the torso backwards against the extension plate on the magnet you will see the seal getting loose. At this point the fig may pop right off.
11. If it doesn’t, DO NOT force the fig to come off! Just put it back in the hot water and leave it there for another couple of minutes.
12. Take the fig out again and bend the torso backwards. By this time the fig should either pop right off, or the seal should be very loose.
 13. If the fig doesn’t pop off, but the seal is very loose, gently insert a kitchen-knife in the gap between the back of the fig’s legs and the magnet-base. (The fig is fused ONLY at the back of the legs to the studs on the magnet. NOT at the bottom of the feet.)
14. Once the fig is off, run it under cold water to cool it off. WARNING! Don’t move the legs and arms until the fig is completely cooled! You can damage the joints and they will become very loose!
15. DONE! 🙂
NOTES:
• This method DOES NOT damage the plastic, as we are staying below its melting point. It also won’t damage the print on the minifig.
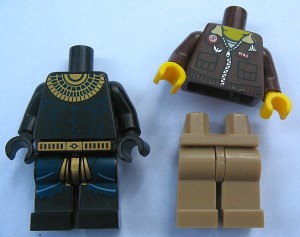
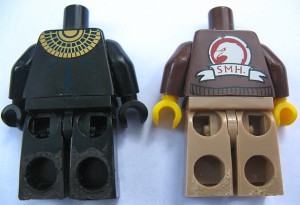
• Once the minifig is off, on the back of the legs you will see where the fig was fused to the magnet is kind of rough. There is not much we can do about that. But at least we have rescued the minifig from its bondage! (I would not recommend sanding this area to smooth it as I have read that the fusing process makes the ABS plastic more brittle. The back of the legs are already very thin, so smoothing them down may weaken them further.)
• This process may also release the bond between the torso and the leg-assembly. On one of my figs the torso just slipped right off. On another it became loose but didn’t fully come off. I didn’t want to push my luck. 😉
NOW THE HORROR STORIES FOR YOUR EDUCATION AND AMUSEMENT! (In each method listed below I note the process, time elapsed, and the result.)
 2. THE GOO-GONE PROCESS – fail!:
Method: full immersion
Temperature: normal room temp.
Time: 1 hour
Results: NONE
Adverse effects on plastic: NONE VISIBLE
Adverse effects on print: NONE VISIBLE
 3. THE VINEGAR PROCESS – fail!:
Method: full immersion
Temperature: normal room temp.
Time: 1 hour
Results: NONE
Adverse effects on plastic: NONE VISIBLE
Adverse effects on print: NONE VISIBLE
 4. THE ALCOHOL PROCESS – fail!:
(Isopropyl Alcohol 50% by Volume)
Method: full immersion
Temperature: normal room
Time: 1 hour
Results: NONE
Adverse effects on plastic: NONE VISIBLE
Adverse effects on print: NONE VISIBLE
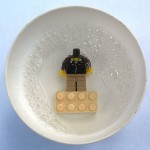 5. THE SOAPY WATER PROCESS – fail!:
Method: full immersion
Temperature: warm water
Time: overnight (8 hours)
Results: NONE
Adverse effects on plastic: NONE VISIBLE
Adverse effects on print: NONE VISIBLE
6.  THE MINERAL OIL PROCESS – fail!:
(Baby Oil)
Method: full immersion
Temperature: normal room
Time: 1 hour
Results: NONE
Adverse effects on plastic: NONE VISIBLE
Adverse effects on print: NONE VISIBLE
 7. THE LEMON-JUICE PROCESS – fail!:
Method: full immersion
Temperature: normal room
Time: 1 hour
Results: NONE
Adverse effects on plastic: NONE VISIBLE
Adverse effects on print: NONE VISIBLE
 8. THE EUCALYPTUS OIL PROCESS – fail!:
Method: full immersion
Temperature: normal room
Time: 1 hour
Results: NONE
Adverse effects on plastic: NONE VISIBLE
Adverse effects on print: NONE VISIBLE
 9. THE WD-40 PROCESS – fail!:
Method: full immersion
Temperature: normal room
Time: 1 hour
Results: NONE
Adverse effects on plastic: NONE VISIBLE
Adverse effects on print: NONE VISIBLE
10.  THE ACETONE PROCESS – badly fail!:
(Regular Nail Polish Remover by Equate)
Method: full immersion
Temperature: normal room
Results: PLASTIC MELTED, BUT MINIFIG/MAGNET SEAL INTACT
Adverse effects on plastic: MELTED
Adverse effects on print: MELTED/CAME OFF (See below:)

In summary, I would hope that LEGO will come up with another solution besides fusing minifigs to magnets to meet licensing regulations. In the meantime you can give your minifigs a nice hot bath! And if you come up with something better feel free to share it here! Oh, and while you are at it, you may also want to read about removing LEGO minifigs from keychains.
I have also written a guide with a list of all glued and non-glued magnet sets to help shoppers identify them easier. Read here: Guide to Glued & Non-Glued Magnet Minifigs! Hope this helps! 😉


