(Written by William)
Ever since LEGO released the #10244 LEGO Fairground Mixer in 2014, I’ve been in love with the LEGO Creator Expert Fairground sets, and also have been fortunate to receive review copies (honestly, I don’t know how I could afford them otherwise). They are a perfect blend of the detail work we see from LEGO System sets and the technical functionality of the LEGO Technic line.
Then, when the #10261 LEGO Roller Coaster was released back in 2018, I couldn’t imagine a better model. It was my favorite set of all time and, believe me, I have built quite a few models even beyond the fairground sets. So, when LEGO announced the #10303 LEGO Loop Coaster, I wasn’t expecting that it was going to be better than the Roller Coaster. But in fact, it is! Everything is more dynamic in its presentation. It fills both the vertical and horizontal space exquisitely. And the lift mechanisms alone left me speechless.
In every sense of the word, this is the best LEGO set I’ve built! It seems like LEGO designers learned quite a bit from the previous model and made it even better. The track pieces are used in new ways. New track pieces now exist. And they built the tall tower sideways so builders don’t run into odd track separation that happens with the previous model. All in all, this is one set that I hope most LEGO fans can experience in some way. Now, let’s look at some of the finer points of just how the lift system on this coaster works.
ADVANCED COUNTERWEIGHT SYSTEM WITH LEGO
Counterweights in LEGO models are usually fairly basic. They tend to be a dense cluster of parts to offset the weight of something that hangs out like a crane. But this concept can go much further. Thankfully, we see a rather advanced use of one in the LEGO Loop Coaster.
Before getting to how this counterweight works and why it’s a good idea, let me explain what the coaster is trying to achieve. Essentially, the cars need a good deal of force in order to traverse two inverted loops. In order to do this, the cars of the coaster drop down from a rather high point. Making an incline up to this high point would probably make the tracks six feet long which is highly impractical. Therefore, the model uses an elevator platform to raise the cars up to the high point. It is this platform that requires the counterweight.
In the most basic version of a counterweight, it is all about achieving balance. But in this case, we don’t want that. Instead, we need the platform to be heavier than the counterweight so it naturally travels back to its starting point. For the Loop Coaster, the counterweight is made to accomplish two purposes.
The first goal is to make the platform lighter. Keep in mind, we don’t want it to be weightless, rather the idea is that the platform and the loaded cars put less strain on the chain that raises the entire mechanism. In this way, it acts like a partial basic counterweight by offsetting a portion of the weight it is countering.
The second goal is to reduce the speed at which the platform falls. Remember, the ride is not like the #10273 LEGO Haunted House that has a sudden drop. We want to protect the mechanism. The weight of the counterweight and the fact that it is attached to tracks creates friction that the platform must overcome. Think of it as pulling someone along and they’re dragging their feet.
Ultimately, what makes this all very satisfying is that it uses a dual pulley system to accomplish these tasks. Working with a near three-foot vertical shaft is extremely interesting to look at. In fact, I was so mesmerized by the counterweight system that I missed seeing the cars go around the loops the first few times I operated the model. Especially since this is not the only interesting technique used to make this all workable. So, let’s move on to the next technique.
RATCHETING POOL WITH LEGO
The raising platform is moved by two mechanisms. There is the chain that does all the heavy lifting and the string which supplies the connection point to the counterweight. The chain is simple; you use a specific number of links and it is a uniform length for every builder. But what about the string? How can you make everyone’s string roughly the right length every time? This is why the counterweight has a ratcheting spool.
If you’ve ever built a model with a drawbridge, you may have seen a mechanism similar to this. You have a reel that gathers in the string or chain. However, the drawbridge has some weight to it and will pull down on the string or chain as soon as you release it.
To solve this, a reel will often have something like a gear and an object – usually a lever – to rest on it and get into the teeth of the gear if it tries to go in the wrong direction. Then, you can simply lift up the lever, release the gear, and the drawbridge can fall down. But what if you never really need to release the string? That’s where the ratcheting spool comes into play.
On the back of the counterweight is a spool with one end of the string. On each side of the spool are gears that can be jammed. In order to stop these gears, you build something in the shape of an “H”. However, the middle horizontal section of the “H” is made with flexible rubbery connectors. This allows the top of the “H” to bend forward and back, but when released reforms the “H” shape.
Now, this shape is placed around the spool. The top tips of the “H” structure will constantly press on the gears connected to the spool. Turn it one way and the spool clicks with every turn, thus reeling in the extra bit of string you don’t need. Try turning it the other way and the “H” prevents the spool from moving by getting jammed on the gears’ teeth.
What we end up with is a mechanism that can handle any excess string while at the same time staying fixed wherever you leave it. It has got to be one of the smartest convenience builds I’ve seen in a LEGO model. In addition, if you reel in too much, you can lift up the top portion of the “H” frame and unwind some of the string in order to try again. But the elevator has even more tricks up its sleeves. On to the next technique.
CHAIN AS TIMING MECHANISM WITH LEGO
In the #10273 LEGO Haunted House set, designers showed us how we could throw in a tread piece among the basic links of a chain to make something happen. In that case, it was to lift the ride up an elevator shaft. In this model, we want to do the same thing, but there’s an issue. When the cars gets to the top of the tower, they will need to stay up there for a while in order to let all the cars offload.
Turns out the solution is very simple; just connect additional tread pieces in a row. To be specific the chain has 33 tread pieces connected together while the rest of the chain is made up of over 200 chain links. This 33 tread section allows the model to remain for a specific length of time, allowing the cars to leave the platform.
This becomes especially handy if you want to add a motor to the model. Unlike a hand-powered crank, the motor is constantly running. The treads on the chain are kind of like a binary program that simply says, “keep pushing up”. This makes a perfect transition at the top every time. But wait, what about the bottom? What if you take too long at the top, will the cars just fall off the tracks? To answer that, we’ll move on to the next technique!
REACTIVE STATE BREAKS WITH LEGO
I will show an example of this in the video below, in case it is hard to understand, but the cars move pretty quick around the track once they are released. This would mean they are ready to get back on the platform a little faster than you might be ready for. You could just be turning the crank slow or the motor might be running slow due to low batter power. Therefore, it is wise to have a braking system that is directly reacting to the speed at which you turn the crank and/or where the platform is at any given point. Fortunately, this model has both types of reactive state breaks.
The first of these braking systems is a tire that is connected straight to the crank. The tire will softly catch the cars as they come off the final slope. The tire turns and feeds the cars into the loading zone. But what if you are really slow and the platform is still at the top of the tower or you have a super-fast motor and your platform is halfway up the tower? That’s when the second braking system comes into play.
Right before the cars would load onto the elevator platform there is an obstruction that sticks up from under the tracks. This brings everything to a dead stop since it is a solid piece. However, what is holding it up is pressure provided by a rubber band. In order to disable this break, the platform must be in the down position. The platform catches this break, pressing it down, thus moving the blockage out of the way.
In other words, this break has two states that react to a given condition. If the platform is down, it is open and not blocking. If the platform is up, then it is in the way of stopping anything from falling into the open gap.
APPLYING WHAT YOU LEARN
Generally, all the techniques described are very simple mechanisms. They are not what makes this set so interesting. Rather, it is the logic behind how all of these techniques fit together. LEGO designers realized an elegant solution to the height issue involving an elevator, but that has its own problems.
The techniques feel like a design progression. As one obstacle is overcome, it looks to see if this will work for all methods of use. If not, what would it take to make it work? Therefore, I highly recommend anyone interested in learning this methodology of building to check out any of the LEGO Creator Expert Fairground models. They’re great examples of not only performing a task but how to reset and perform that task as many times as you wish. In the video below, I will show you the set in more detail.
If you’re interested to experience building the #10303 LEGO Loop Coaster yourself, it is available at the LEGO Icons section of the Online LEGO Shop.
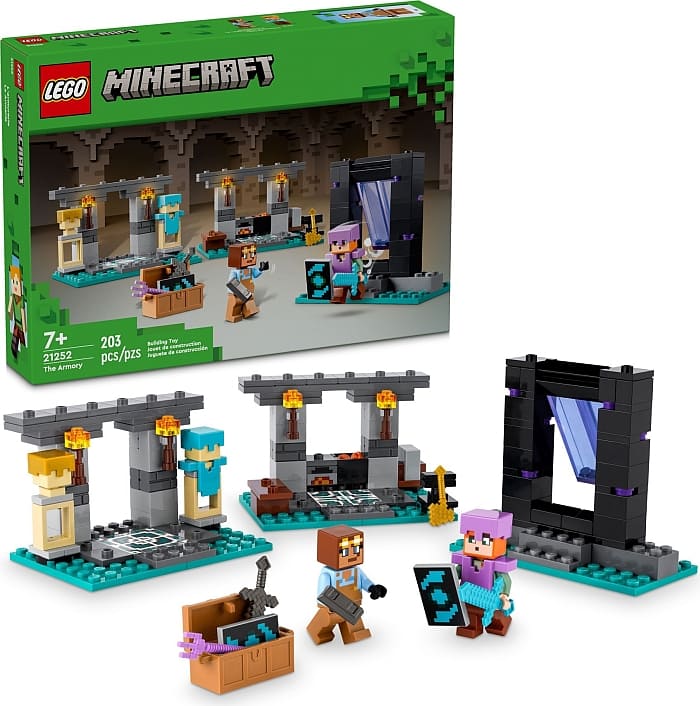
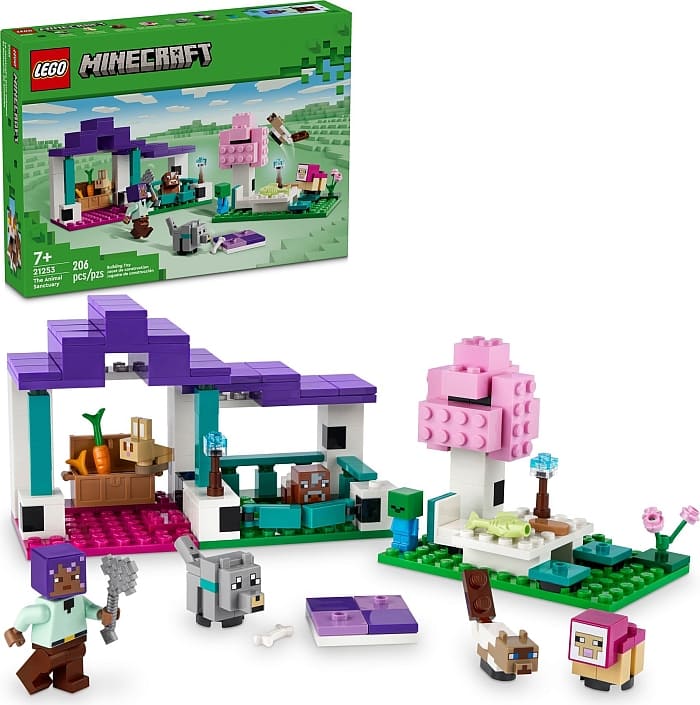
What do you think? Do you have any of the LEGO Creator Expert Fairground sets? Which one is your favorite? And how do you like the Loop Coaster and the techniques we discussed here? Feel free to share in the comment section below!
And you might also like to check out the following related posts: