Here is an interesting piece of news for LEGO fans. The LEGO Group is planning to open a new factory in the U.S. The new facility will expand the LEGO Group’s global manufacturing network, shorten the supply chain, and support long-term growth in the Americas. Below is the full press-release with all the details.
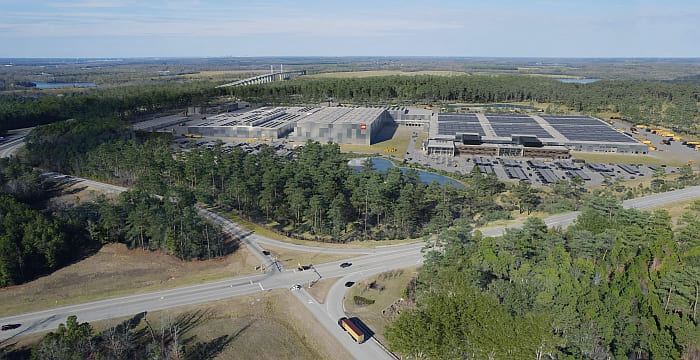
The LEGO Group today announced plans to invest more than US$1 billion to build a new factory in Chesterfield County, Virginia. Once completed, the 1.7 million square foot (160,000m2 ) facility will employ more than 1,760 people.
The factory will be designed to operate as a carbon-neutral facility. 100 percent of its day-to-day energy needs will be matched by renewable energy generated by an onsite solar park. The site will also be designed to minimize energy consumption and the use of non-renewable resources.
Niels B. Christiansen, CEO of the LEGO Group, said: “This is an exciting step for the LEGO Group. More and more families are falling in love with LEGO building and we are looking forward to making LEGO bricks in the U.S., one of our largest markets. The location in Virginia allows us to build a solar park, which supports our sustainability ambitions and provides easy links to countrywide transportation networks. We are also looking forward to creating fantastic employment opportunities for the people of Virginia.”
Construction will commence in fall 2022 with production projected to start in the second half of 2025. A temporary packaging site will open in an existing building nearby in early 2024 and create up to 500 jobs.
The Virginia factory will be the LEGO Group’s seventh factory globally and the second in the Americas. The company’s manufacturing site in Monterrey, Mexico primarily supplies the U.S. market and will be expanded and upgraded to meet the growing demand for LEGO products.
Carsten Rasmussen, Chief Operations Officer of the LEGO Group, said: “Our factories are located close to our biggest markets which shortens the distance our products have to travel. This allows us to rapidly respond to changing consumer demand and helps manage our carbon footprint. Our new factory in the U.S. and expanded capacity at our existing site in Mexico mean we will be able to best support long-term growth in the Americas. We are fortunate to find a location where we can begin construction quickly and create temporary capacity in under two years.”
The new factory in Virginia, like all LEGO facilities, will use state-of-the-art technology to mould, process, pack LEGO products, and ensure they meet the company’s rigorous safety and quality requirements.
“Our bricks are made to last for generations, so we need skilled employees trained to work with precision moulding technology. We look forward to working with the Virginia Talent Accelerator program to help build a great team who are motivated by our mission to inspire and develop the builders of tomorrow,” said Mr. Rasmussen.
LEGO factories in Europe and China are also being expanded, and in December 2021, the Group announced plans to build a factory in Vietnam to support further growth in Asia.
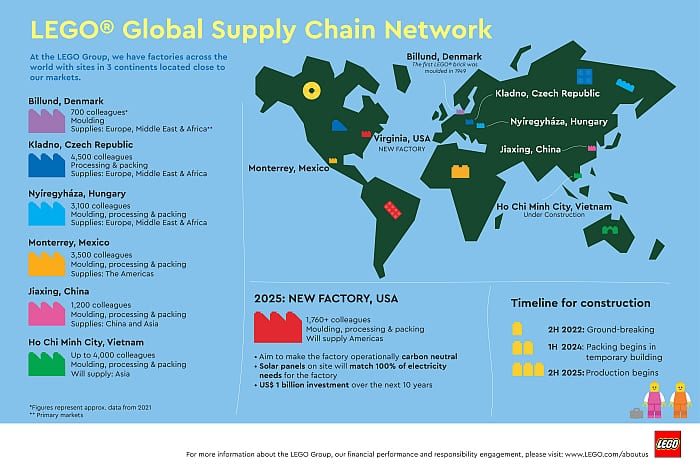
The LEGO Group currently employs approximately 2,600 people in the U.S. where it has been operating since the 1960s. Its U.S. head office is in Enfield, CT, and operates 100 LEGO branded stores across the country. Below are some facts and figures about the new facility.
- Investment: US$1 billion over 10 years
- Jobs: 1,760 positions created over 10 years
- Land: 340 acres/137 ha
- Buildings: 1.7 million sq ft / 160.000 m² which will house moulding, processing, and packing and a high bay warehouse.
- Timeline:
- 2022 Groundbreaking
- 2024 Packing in temporary building begins
- 2025, H2 Production commences, solar park completed
- Sustainability ambitions: The Virginia facility will be designed to operate as a carbon-neutral factory which means it will be a highly energy-efficient site and 100 percent of its energy needs will be matched by onsite renewable sources. It will strive to:
- Reduce energy usage: The factory buildings and manufacturing processes will be designed to minimize energy use. The aim is to secure Gold LEED (Leadership in Energy & Environmental Design) certification for the building once it’s completed.
- Increase renewable energy supply: An onsite solar park will be constructed which will match all the factory’s energy needs.
- Precision manufacturing: Each LEGO brick is moulded to the accuracy of a hair’s width (5my/0.005mm) to ensure the perfect ‘clutch power’ that holds LEGO creations together.
This opening of the new factory is exciting news for LEGO fans in North America for several reasons. It should fix the supply issues and delays we have been experiencing the past few years. And it should also offer further job opportunities for those who would like to work at the LEGO Group. I also hope that the new factory will offer tours, so we don’t have to fly all the way to Denmark to visit a LEGO factory.
What do you think? How do you like the idea of a LEGO factory in the U.S.? Feel free to share your thoughts and discuss in the comment section below!
And you might also like to check out the following related posts: