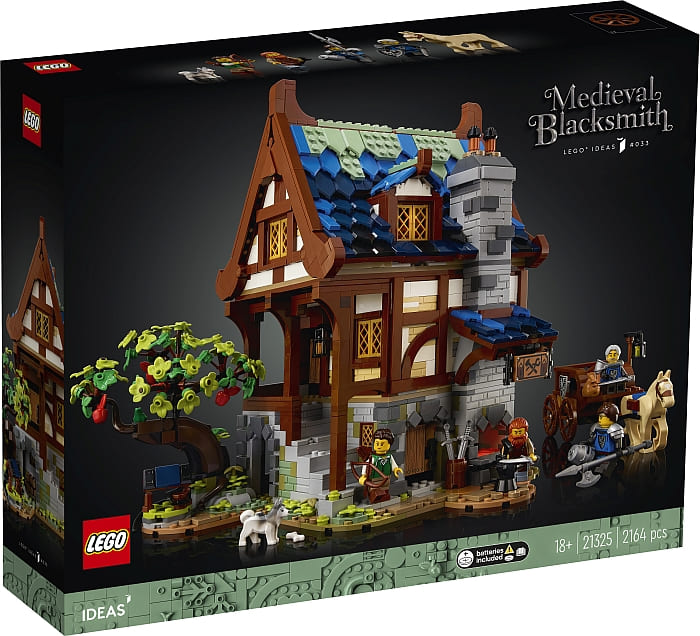
The long-awaited #21325 LEGO Ideas Medieval Blacksmith set is finally revealed! Below is the press-release with all the information about this awesome set.
LEGO Ideas has taken a leaf out of the history books with the design of its latest set, a charming medieval blacksmith’s house. The new set is based on an original design by an avid LEGO builder, which achieved over 10,000 votes from LEGO fans worldwide – giving it the green light to go into production.

LEGO super fan Clemens Fiedler originally submitted the concept to LEGO Ideas; a LEGO initiative that takes new ideas that have been imagined and voted for by fans and turns them into reality. The LEGO Ideas Medieval Blacksmith set harks back to a time when cottage industries and artisans were the cornerstone of society and was brought to life by LEGO designers Wes Talbott and Austin Carlson.
When thinking of medieval times, the focus is normally on the kings and queens, knights and ladies, their castles, and the battles between good and evil, but this new medieval set has an unexpected twist showing the unsung hero of those epic battles and adventures – the humble blacksmith.
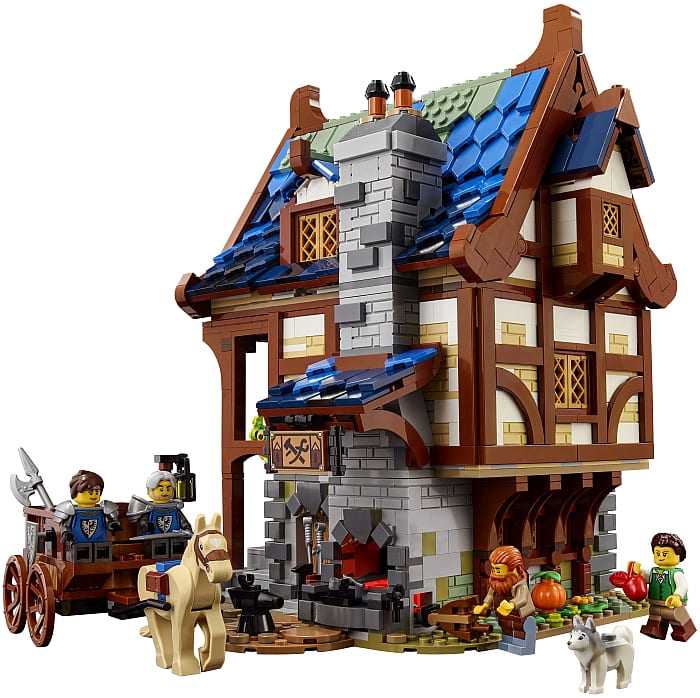
True to the era, the LEGO Ideas Medieval Blacksmith set includes bold period design features from the timber-framed walls to the gothic lattice windows, providing much intrigue and interest to fans of medieval architecture.
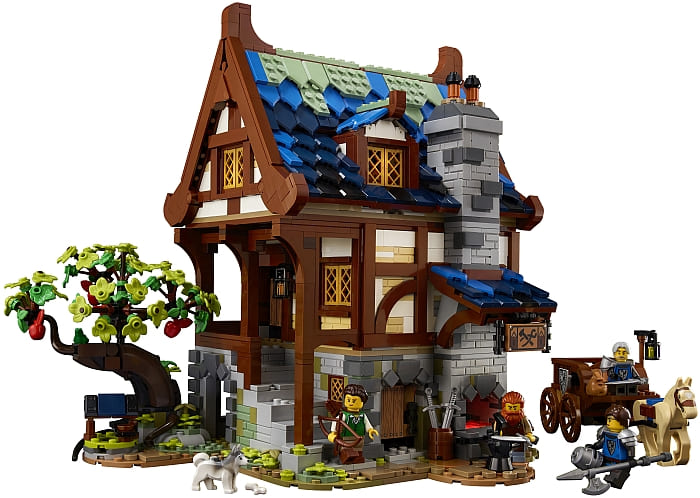
The LEGO Ideas Medieval Blacksmith set is positioned in enchanting grounds, featuring a well-stocked cottage-style garden complete with squash patch and a gnarly apple tree, while the brickwork is tinged with moss for added realism.

The inside is set over three separate floors, which are fully furnished and equipped with everything a medieval blacksmith would need. Interior items include stocks of raw materials, coal to keep the furnace hot, and a bellows complete with a light-brick to make the coals glow. The roof and top two levels can be removed for easy viewing of the inside.

Further setting the scene, the LEGO Ideas Medieval Blacksmith set is completed with the inclusion of four minifigures: a blacksmith, an archer, and two Black Falcon Knights with four swords, three shields, and a halberd. Several animals can be found at the grounds outside the house, including a horse to pull the knight’s supply cart, a pet dog, and a small tree frog.
Clemens Fiedler commented: “I love building classical house designs and honoring all the great attention to detail you can recreate with LEGO elements – especially medieval architecture styles, colors, and design. I hope fellow LEGO fans will enjoy traveling back in time; sense the heat, sounds, and smells from the forge and anvil, and soak up the atmosphere of this classical creative craft as they build the set.”

Samuel Thomas Liltorp Johnson, Design Manager at the LEGO Group commented: “Designing the LEGO Ideas Medieval Blacksmith set has been an exciting journey, taking us back hundreds of years to celebrate one of the true heroes of the Middle Ages. Telling the story of the blacksmith caught our imagination, and the rest was history. We loved the idea of creating a small blacksmith’s house on the outskirts of the medieval world, where every knight goes for a set of shining armor. Without doubt, fans will be fascinated by the workings of the forge, the architectural details and the characters they find there when they build this set.”
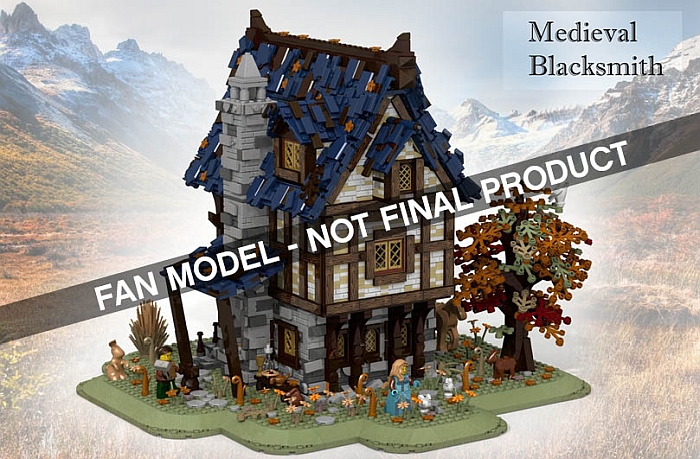
I have included the designer-video below with LEGO designer Wes Talbott, LEGO graphic designer Austin Carlson, and Jacob McCuillan from the LEGO Ideas team. They will show you the set in detail.
The #21325 LEGO Ideas Medieval Blacksmith measures 27cm/10.5 inches high, 27cm/10.5inches wide, and 21cm/8inches deep. It comes with 2,164 pieces, and recommended for ages 18+. It is the latest example of how the LEGO Group aims to inspire builders of all ages to build, rebuild, and get excited by the process of creation. The set will be available on February 1st. Prices are as follows: 149.99 USD/ 199.99 CAD 146.99 EUR / 134.99 GBP /249.99 AUD. For more information, visit the LEGO Ideas section of the Online LEGO Shop.
What do you think? How do you like the LEGO Ideas Medieval Blacksmith? Is this a set you’re planning to get next month? Feel free to share your thoughts and discuss in the comment section below!
And you might also like to check out the following related posts: