Even if you don’t have time to participate in LEGO Ideas contests, it is a good mental exercise to spend a few minutes thinking about what you would build for each of the challenges. Then, when the contests are over, and the winners are announced, you can go back to the contest page to see all the wonderfully creative builds.
You will learn a lot by seeing how others approached the task, what they built, and what the judges thought of the entries. This is especially true when you had a hard time coming up with ideas for a particular contest, and it also prepares you for participating in contests in the future.
The recent LEGO Ideas Manchester United Contest was a particularly interesting challenge, because the guidelines were so vague. It’s often easier to come up with ideas when you are given specific confinements, as you have something to start with.
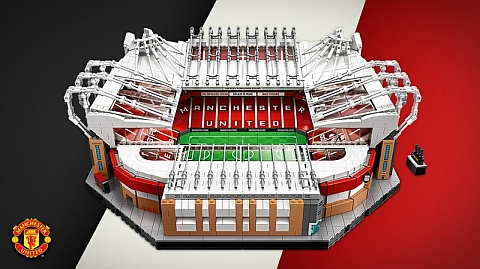
The LEGO Ideas Manchester United Contest was celebrating the release of the #10272 LEGO Creator Old Trafford – Manchester United set, and it challenged LEGO fans to build something else that’s related to Manchester United. The LEGO Ideas team gave some suggestions of what could be built (goal recreations, brick-built badges, player statues, etc.), but other than that it was up to the contestants to build whatever they wanted.
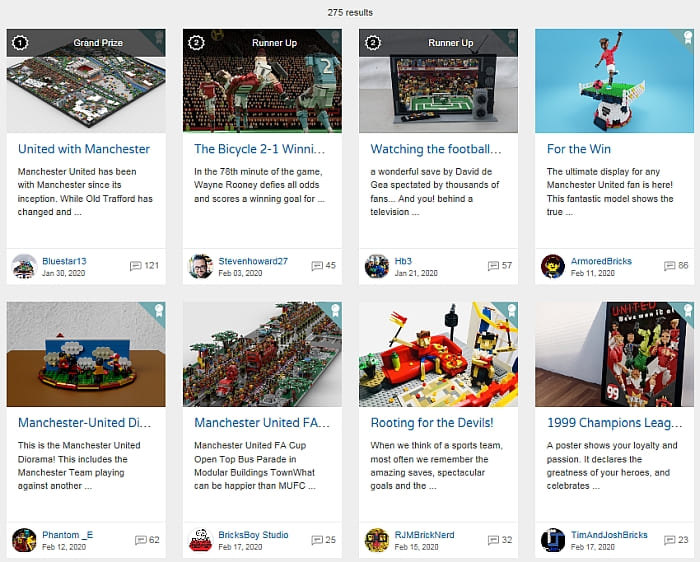
There were 275 entries to the contest, including some really excellent and creative builds. You can check them out at the contest page. What I wanted to focus on here are the three winning entries; United with Manchester by Bluestar13 was the grand prize winner, and The Bicycle 2-1 Winning Kick by Stevenhoward27 and Watching the Football Game by Hb3 were the two runner-ups.
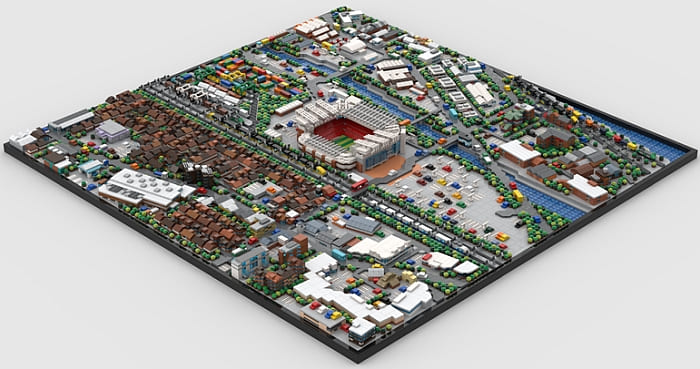
It’s interesting to note how differently the three contestants approached the subject in subject, size, and building style. Bluestar13 focused on the fact that the Manchester United football club and the Old Trafford Stadium has been part of the city’s culture for a very long time and has become a symbol of Manchester. Thus, he recreated Old Trafford and the surrounding city in a huge micro-scale cityscape using Google Maps and aerial images (around 16,500 pieces were used).
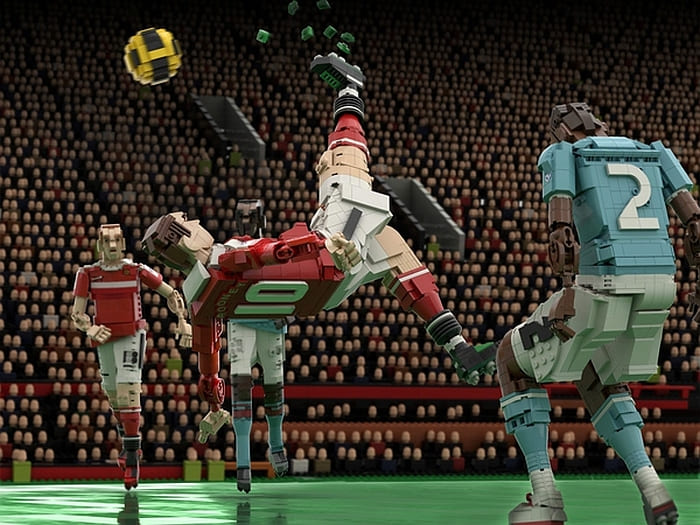
Stevenhoward27 focused on a single historic event. On February 12, 2011, in the 78th minute of the game against the Manchester City team, Wayne Rooney defies all odds and scores a winning goal for Manchester United with a kick forever written into sports history. This build uses two view points with forced perspective. The players are depicted with large brick-built figures and the crowds in the back are built using minifigures in one view and small brick built figures in the other. There are over 28,000 pieces to this build. The dynamic nature of this entry is fantastic! You can even see Wayne kicking up clumps of grass and dirt!
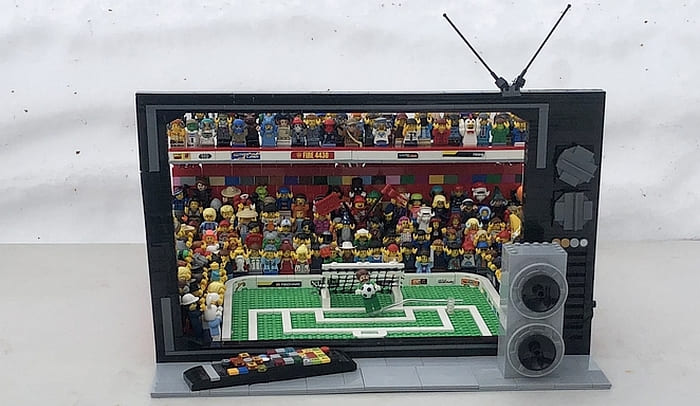
The second runner-up winner focuses on the legendary goalie of Manchester United, David de Gea Quintana, regarded to be one of the best goalkeepers in the world. This project also uses forced perspective techniques, but in a different way. From the front, it looks like you are viewing a football match on a television screen, but it’s actually just a frame with a whole scene built behind it.

What do you think? Did you enter the LEGO Ideas Manchester United Contest? Or were you thinking about entering? What did you build? Or what were you planning to build? And how do you like the winning entries? Feel free to share your thoughts and discuss in the comment section below! And if you haven’t done so already, you can check out the new the #10272 LEGO Creator Old Trafford – Manchester United set at the LEGO Creator section of the Online LEGO Shop.
And you might also like to check out the following related posts: