(Written by William)
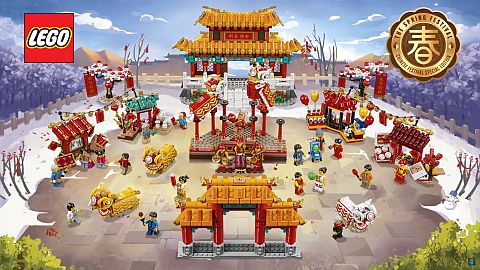
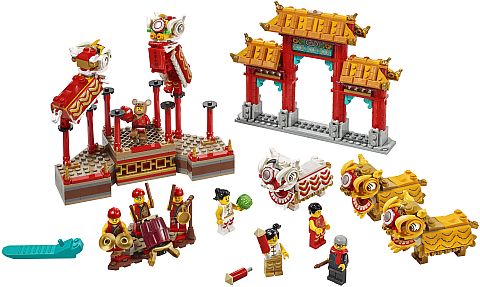
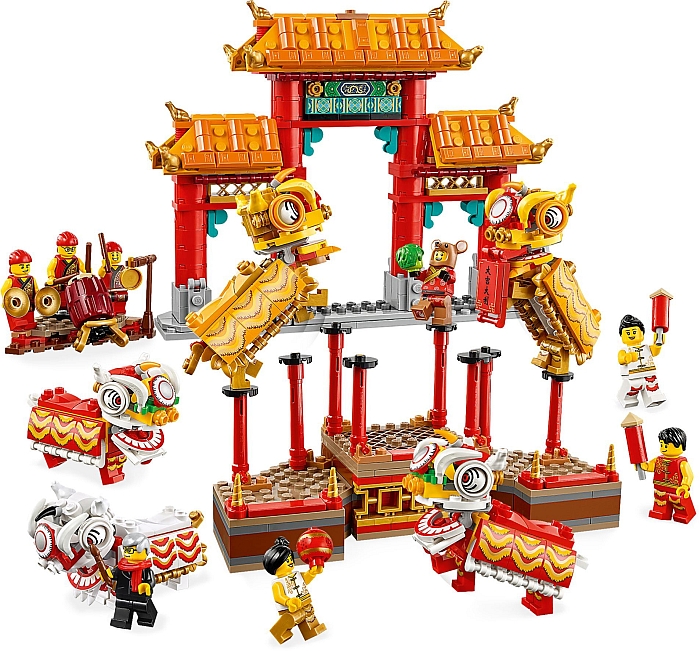
We talked about the LEGO Chinese New Year sets collection previously (see links at the end of this post), but just to recap, last year, LEGO released two sets specifically for the Chinese market; the #80101 LEGO Chinese New Year’s Eve Dinner, and the #80102 LEGO Chinese New Year Dragon Dance. Both sets feature beautiful and unique models, exclusive minifigures, and unique printed parts. There was great demand for both sets outside of China, so although it was too late to make more of the first two sets, the third set in the collection, the #80103 LEGO Chinese New Year Dragon Boat Race, was made available globally. This year, LEGO added two more sets to the collection, which are also available globally; the #80104 LEGO Chinese New Year Lion Dance, and the #80105 LEGO Chinese New Year Temple Fair. The sets are so popular they are perpetually on backorder at the Online LEGO Shop.
I’m absolutely in love with the LEGO Chinese New Year collection, and I even managed to import the first two sets. I know that for some people the bright rich colors and distinctive architecture is not to their taste, but for me it’s like a breath of fresh air. Being able to experience – at least in some small way – vibrant scenes from a culture I’m not that familiar with is exciting. In addition, the sets provide plenty of unique printed elements and parts in colors we haven’t had before. One of my personal favorites is the red pumpkin piece that makes up part of the lanterns.

Parts aside, these sets also do a remarkable job making it look like they are bursting with life. So far, every set in the collection provides plenty of characters to pose in a myriad of ways. I even got a kick out of the faux figs that make up the two-person teams in the lion costumes. Talk about a great way to increase the population without using full minifigs!
If these sets have one downside, it’s the availability and the price. The first two sets have only been available from international sellers. The third set, although it was available worldwide, is now considered sold out by LEGO, so you also to turn to private sellers to get it. The last two sets are still in production, but they are so popular that even though you can order them at the Online LEGO Shop, you will have to wait a few weeks to receive them. The last two sets are also quite large, so even though the prices are very reasonable ($80 and $120), they could be outside the budget of many LEGO fans.
In the video below, I will talk about the two 2020 LEGO Chinese New Year sets in more detail, and then we will discuss some of the interesting building techniques. This way, even if we can’t get all the Chinese New Year sets we want, we can still take part in the celebration!
UNIFYING LEGO MODELS INTO A THEME
Not every set in the LEGO Chinese New Year collection go together well, but the two 2020 sets definitely do. In fact, this is one of the reasons why I’m covering both of them together. It’s pretty obvious that LEGO wants us to pick up both sets. They even advertise them together to make one larger scene. But what helps make these sets mesh together so well?
The most obvious way to achieve this is that both sets are depicting the same celebration. This is what we can call “sharing the same context”. This is the most basic way models can relate to one another without sharing the same design elements or even the same designers. If you have been to a live LEGO convention, you may have noticed that this is how the different models are organized and displayed. Even though they were built by many different people, they come together nicely when grouped together under the same context. They are more pleasurable to experience this way.
The next point of similarity is a shared color-scheme. Sure, each set has its unique pop of color here and there, but overall you see common color usage in the underlying structures. Whether its yellows, tans and golds, or reds and browns, the colors chosen give a sense of using the same building materials and thus being in the same place.
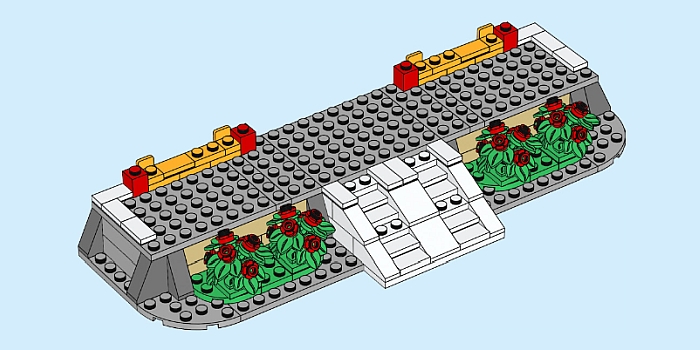
Finally, the sets share direct features with one another. Note that the curves at the top of the gate’s pillars match up with the curves at the top of the temple’s pillars. Also, the red lanterns appear in both sets.

So to recap, you can connect things by what they are, how they look, and the style in which they are made. This can be important because you could want a unified design, but might be focused too much on just one of these aspects. For instance, I’ve heard fans complain that they are not too happy with some of the Creator Expert Modular Buildings. The outlying buildings share a lot of the right context and building style features, but their overall composition is so drastically different, they can be repelling when placed
Finding a good balance of these three aspects can also come in handy when creating a collaborative model with other LEGO fans. Going through each category and discussing how things mesh can point out inconsistencies that can pose a problem with the desired outcome.
BUILDING OUTSIDE YOUR LEGO COMFORT ZONE
We tend to stick with what we like. For LEGO fans, this usually means that we specialize in particular areas of the LEGO hobby. This can be a double-edged sword. On one hand, we can become absolute experts in a given field (i.e. mechs, trains, robotics, Star Wars, etc.), on the other hand, we could end up with a bit of burn out and uninspired designs.
The LEGO Chinese New Year sets give us a perfect example of how someone can step out of their comfort zone without getting too overwhelmed. Those familiar with traditional LEGO system designs will recognize the standards of minifigure-scale play sets. However, the Chinese New Year sets are culturally very diverse from the norm. This slight shift in perspective brings a rejuvenating excitement to what might have become a routine.
And this is not the only way to shake things up. Perhaps try building in a different scale? Or you can try out a fanciful motif like making a Star Wars ship festive for the holidays. You may also try changing the time period of what you normally build by putting mechs at the turn of the 19th and 20th centuries or putting your fantasy knights far into the future.
You may not feel comfortable with significant changes to your entire layout, but you could ask yourself what you are comfortable with and how you could represent that with LEGO. Perhaps you simply add a temporary festival from another culture into your LEGO city. Or you don’t even need to be that ambitious. You can just grab a color you don’t normally build with and see what you can create with it.
Having a fresh mind for building can be just as important as sound building methods. Finding ways to keep our brains limber and flexible will often result in novel ways to interact with our LEGO bricks. So take some time and figure out what sphere you live in now, and maybe once in a while try sticking a toe out in that great unknown.
WORKING WITH LEGO COLOR FAMILIES
I mentioned color as a main contributing factor to how the LEGO Chinese New Year sets are connected. Taken at its simplest form, this could mean simply picking the same color for different models. However, the reality is much more nuanced then that. In order to have such a rich and vibrant scene as in the LEGO Chinese New Year sets, it’s necessary to have some color variance.

The concept is to use color families to provide highlights and contrast in a section that is more or less one type of color. A better way to explain color families is to say that it’s a collection of different colors that use a single common base color.
Let’s use an example of yellow as a point of reference. You could use normal yellow, bright-light-yellow, tan (which LEGO calls brick-yellow), dark-tan (which LEGO calls sand-yellow), transparent-yellow, and you can even give a yellow-ish sheen with pearl-gold and metallic-gold.
Separately, these are all fairly distinct colors. However, used together you get a much different result. Each hue brings out the similar color of its neighbors. The colors don’t change, rather it’s our perception that’s played with. Combined, these colors begin to look like parts of the same whole. Your brain tells you it’s a lighting effect, or that a particular section is more worn down than the rest.
As a building technique, this method leads to a very interesting way to get a pop of color. It’s no longer the case of having a single colored structure, but rather something with character and depth. And it has the added bonus of making your design look a whole lot more complex.
EXTENDED SIDEWAYS BUILDING
With the proliferation of new elements, it was just a matter of time to get parts that are much less complicated to use for sideways building. One of the best parts for this is the modified brick that is like a 1×1 brick but five plates high, and with two studs lined up vertically on one side. You can stack this element as high as you need, and have an instant line of studs to build off of.
Even though this is a super convenient technique, I wouldn’t rush out to build the largest sideways structure possible. It’s good to take note of what structural weaknesses arise from building this way and doing it in such an extended fashion. Pressing against such an assembly could make the entire sideways structure collapse. But it can also look spectacular, like the large windows in the LEGO Chinese New Year Temple Fair set. So what can be done about this vulnerability?
You will notice that LEGO designers added two brackets at the base of the window structure. The face of the bracket is not built upon. Instead, it’s used as a tiny stopper to help hold the window from falling backwards and out of its frame. Second, the window structure itself has a bit of sideways building. This means that when a long plate is added to lock everything in place, the window connects more firmly to the frame. Finally, there are some decorative elements in front at the top that work just like the small brackets at the back to hold the structure in the frame.
All of this combines to make a fairly sturdy design that does not give up the cool potential of building sideways. Sum it all up, you see two connection methodologies combined together. There is the incidental securing with the brackets and decorative elements, and the direct securing with the sideways stud built into the structure.
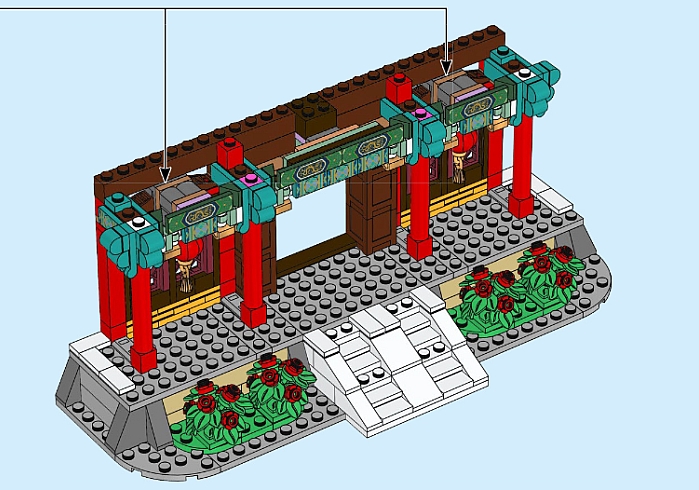
From experience, I can say that making direct connection points is difficult to do. This is due to the math involved, trying to figure out just where a stud needs to go to connect in properly. As for a more incidental securing method, you end up with a different issue. The most prevalent is; can you justify something being in the way? In the case of the temple, the decoration in front is fully justified, and it looks pretty. As for the small brackets, they stick out like sore thumbs when viewing the back of the model. The best LEGO designers could do was to use some of the smallest brackets available. I’m not sure why they didn’t just slap a tile over these bracket faces, but they do make a good illustration to my point. Not every incidental securing choice looks good.
APPLYING WHAT YOU LEARN
Having a set of questions to focus on can be invaluable when creating a big project. Perhaps you are making a space station or a cityscape. Having the ability to unify a theme will prevent your models from looking out of place even if they were built at different times. As we all know, if not on sale, LEGO is expensive. So truly massive displays can take years to assemble. So, knowing how to unify the different elements is a valuable skill in your toolbox.
Even if you’re happy with the theme and style of your building, try to open yourself up to new experiences once in a while. This can keep the LEGO hobby fresh and exciting for you and also broaden your knowledge of different styles and techniques. Granted, this may spark an interest in collecting a completely new series of sets, but you can also just download building instructions for official sets, or look at custom instructions at Rebrickable.com.
It’s a good idea to expand the colors available to you. I know many of my earliest designs were fairly monochromatic and featured some pretty plain details. By indulging in various color families, you have a whole new brush to paint with creatively. Mosaic builders are especially familiar with how important color families are, as color is typically the only thing they can work with.
And finally, it’s always a good idea to refresh your building skills as new LEGO elements become available. I have personally worked on numerous projects with sideways building techniques. They had distinct vulnerabilities, which I was able to resolve later with newly added parts. The temple windows in the LEGO Chinese New Year Temple Fair set is an excellent example of this. A good builder knows how to make something look nice, but a great builder will know all the ways to make that happen.

What do you think? How do you like the LEGO Chinese New Year sets? Do you have any of them already? And what do you think of the techniques we discussed here? Have you been using any of them in your own creations? Feel free to share and discuss in the comment section below!
And you might also like to check out the following related posts: