It looks like LEGO is bringing back the sports theme! Today, they announced a new set, the #10272 LEGO Creator Expert Old Trafford Manchester United football stadium. Below is the full press-release with all the details.
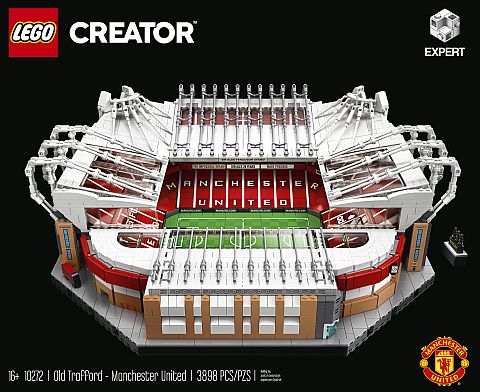
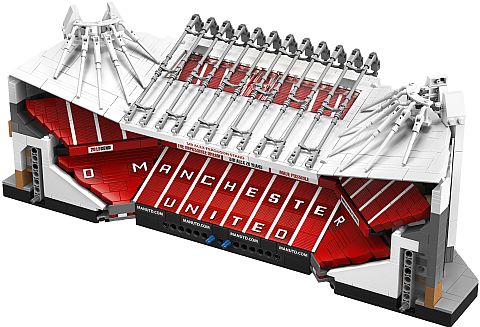
Build and display a brilliantly detailed Old Trafford model. Manchester United fans will love building this big LEGO set model of Old Trafford to show their allegiance to one of the world’s most famous football clubs. The building set for this LEGO football stadium provides a fun challenge to create a spectacular showpiece model.
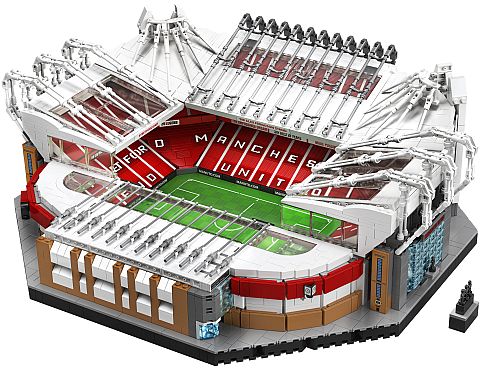
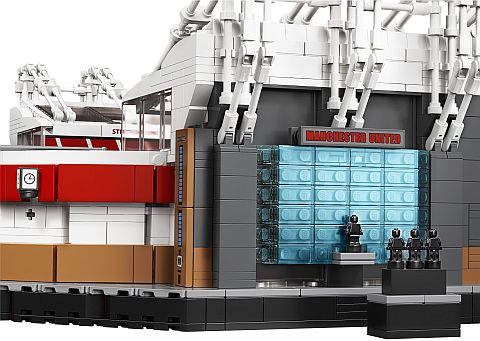
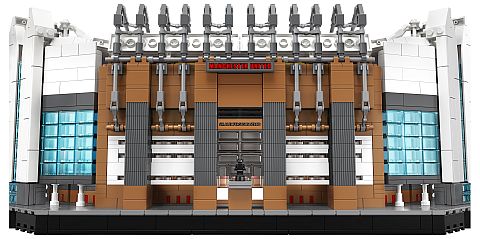
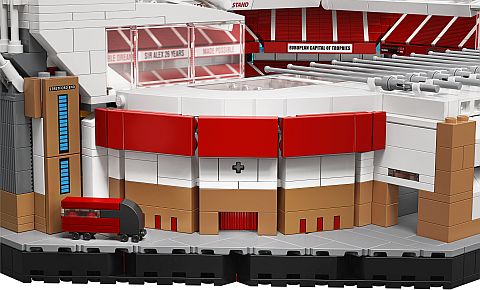
Manchester United fans can show off this Old Trafford replica at home or the office. New for February 2020, this LEGO Creator sports set coincides with the stadium’s 110th anniversary. This building kit for adults features several evocative details including the players’ tunnel and the statue of the United Trinity.

LEGO Creator Expert advanced building sets allow adults to construct models based on some of their biggest passions, including cars, buildings, and stadiums. Once the challenging and fun building experience is complete, these collector models from building bricks make an eye-catching display at home or the office.
- A spectacular building set for adults to create a detailed model of Old Trafford. The perfect Manchester United gift for fans who want to show their undying support by displaying this LEGO football stadium.
- A building kit of a 1:600 replica model of Old Trafford. This LEGO football stadium provides a fun and rewarding project and allows fans to relive their cherished memories of Manchester United with this detailed model.
- The first opportunity to construct a replica of Manchester United’s Old Trafford from building bricks. The LEGO football stadium makes for a stunning showpiece at home or the office.
- This 3,898-piece big LEGO football set for adults makes for a unique Manchester United gift. It offers escapism for builders with a long and satisfying project, and the chance to show their passion for their club.
- The LEGO Old Trafford-Manchester United football stadium measures 6.5” (18.5cm) high, 18” (47cm) long, and 15” (39cm) wide. The perfect size to feature authentic details including the players’ tunnel and a statue of Sir Alex Ferguson.
- No batteries required for this advanced building set, so the final whistle will never blow at this LEGO football stadium.
- This LEGO set provides the ultimate building experience, and for you to be guided through the rewarding process with easy-to-follow, step-by-step instructions.
- LEGO Creator Expert model advanced building sets allow adults to indulge in challenging projects to create collector toys based on some of their biggest passions including cars, buildings and stadiums.
- Recommended for ages 16+.
- Includes 3,898pieces.
The #10272 LEGO Old Trafford – Manchester United set will be available directly from official LEGO stores and the Online LEGO Shop from January 16th, 2020. Prices are as follows: US $299.99 – CA $349.99 – DE €269.99 – UK £249.99 – FR €269.99 – DK 2199DKK (Euro pricing varies by country). For further details, visit the LEGO Creator Expert section of the Online LEGO Shop.

In case you are not a football fan, but still curious about this set, I got some information from Wikipedia for you: Old Trafford is a football stadium in Old Trafford, Greater Manchester, England, and the home of Manchester United. With a capacity of 74,879, it is the largest club football stadium (and second largest football stadium overall after Wembley Stadium) in the United Kingdom, and the eleventh-largest in Europe. Nicknamed “The Theatre of Dreams”, Old Trafford has been United’s home ground since 1910. The stadium’s record attendance was recorded in 1939, when 76,962 spectators watched the FA Cup semi-final between Wolverhampton Wanderers and Grimsby Town. Old Trafford has hosted FA Cup semi-finals, England fixtures, matches at the 1966 World Cup and Euro 96 and the 2003 Champions League Final, as well as rugby league’s annual Super League Grand Final, and the final of two Rugby League World Cups. It also hosted football matches at the 2012 Summer Olympics, including women’s international football for the first time in its history.
The LEGO Old Trafford – Manchester United stadium appears to have a modular design, with LEGO Technic pins connecting larger chunks of the set.


Another interesting piece of information from this press-release is that it seems like LEGO is intending to release other sports stadiums under the LEGO Creator Expert line. This means that these sets will be focusing more on the building experience, architectural accuracy, and displayability of the sets rather than the play experience of the old LEGO Sports line from the late 1990s and early 2000s.

What do you think? How do you like the idea of LEGO releasing famous sports stadiums? And what do you think of the #10272 LEGO Creator Expert Old Trafford – Manchester United football stadium? Feel free to share your thoughts and discuss in the comment section below!
And you might also like to check out the following related posts: