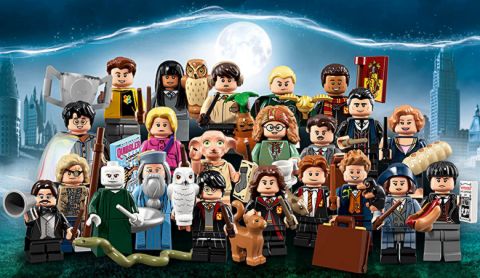
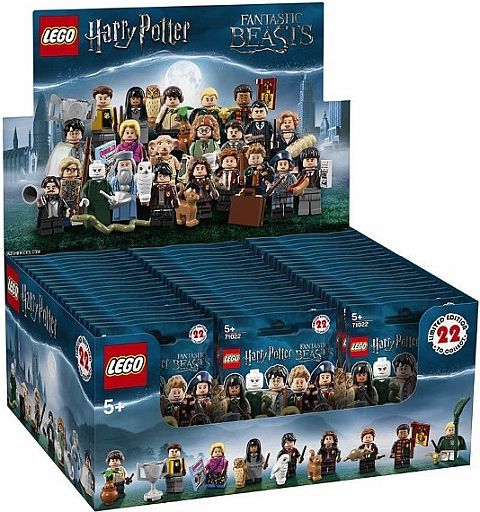
One of the most exciting releases this month is the LEGO Harry Potter & Fantastic Beasts Collectible Minifigures series, with 22 characters covering both the original Harry Potter movies and the Fantastic Beasts and Where to Find Them film. Below, we will take a look at each of the characters in more detail. 🙂
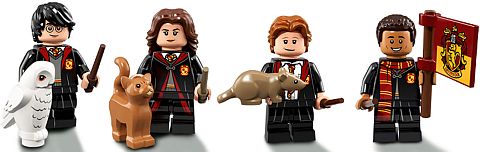
Harry Potter, Hermione Granger, Ron Weasley, and Dean Thomas all wear their school robes. Their main accessory is the new wand piece, which you will get two of still on the sprue for each of the characters. Harry Potter comes with Hedwig the owl, Hermione with Crookshanks the cat, Ron with Scabbers the rat, and Dean with a flag printed on one side. Note that each of them have different torso printing, offering a great variety. Another unique feature of these minifigs (along with some of the other characters in the series) is that they have bendable short legs. These new leg pieces make the characters shorter than regular size minifigs, but taller than traditional child minifigs with fixed short legs. The legs can bend separately at the waist just like regular minifig legs, and because of the holes at the back, they can also attach to studs in a sitting position. LEGO fans have been asking for short minifig legs for many years, so it’s nice to see that they are finally available!
Professor Trelawney is one of the most ornate minifigs in the series with an elaborate dual-moulded and printed hairpiece, and printed skirt/robe. Her accessories are a set of wands, and a really sweet teacup and printed saucer combination. I hope LEGO will use these pieces in other sets as well! Albus Dumbledore is another beautiful minifigure with subtle printing on the torso and skirt/robe piece. The hairpiece/headgear combination and the beard are both new, and perfect for wizards and medieval characters. The accessories are a set of wands and a printed plate that serves as the Pensieve.
Harry Potter in pajamas is an interesting minifig. His torso has a nice generic pajama print. His short fixed legs are dual-moulded to make it look like that he is barefoot. Notice the great new hairpiece as well. His accessories are a set of wands, and a magical cape with beautiful print on one side, and a shiny finish on the other side. Probably the most elaborate cloth piece we have ever gotten from LEGO. Neville Longbottom comes with the always useful hair/earphones combination in a new color, a set of wands, a round pot that we have seen in previous minifig series, and a brand new Mandrake (similar in design to a LEGO carrot), and a new plant stem with three leaves.

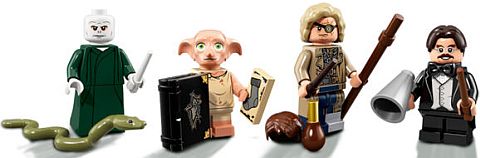
Lord Voldemort is the only character that comes with white wands. He wears the fairly new skirt/robe bottom piece, which makes him the same size as other standard minifigures. While Nagini the snake looks nicely detailed, she doesn’t fit on top or in between studs like regular LEGO snakes. Dobby has a nice facial print and fixed short legs that are dual-moulded with two colors. His accessories are a 1×2 tile with sock print, and a book beautifully printed at the front.
Mad-Eye Moody got elaborate printing on both his torso and legs. The legs are also dual-moulded with two colors. This minifig comes with two hairpieces (one new), a set of wands, a standard long staff, and a vile (which is an upside down maraca piece). I also really like both sides of his face. Could be useful for steampunk, post-apocalyptic, and similar creations. Professor Flitwick has some interesting accessories. First of all, his detailed torso print is generic enough to use in other settings. In addition, his hairpiece is new, and he wears a short cloth coattail piece. The bowtie is useful, and the large megaphone is a brand new piece, and he also has a set of wands.
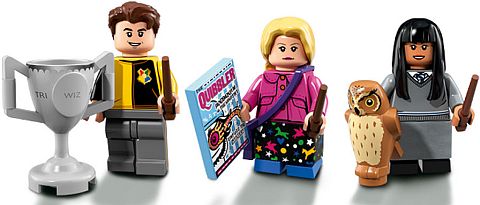
Cedric Diggory comes with a set of wands, and a large trophy. The trophy is an old piece, but the printing on it is new. While this minifig looks fairly simple from the front, notice the stripes on the side of his legs. Luna Lovegood’s torso print is almost exactly the same as the 2010 version with a bit of extra shading around some of the lines. Her original torso has been a very rare and desirable piece that goes for around $20 on the secondary market. Sadly, the new torso does not come with back printing. She wears a nicely printed but awkward looking cloth skirt over her short movable legs. Her accessories are a set of two wands, a purple shoulder bag (this color only appeared in one other set), and a printed 2×3 tile. Cho Chang also wears a cloth piece over her short movable legs. Her accessories are a set of wands, and an owl. Her darker skin tone makes her head and hands ideal for adding variety to your minifig collection.
Draco Malfoy (not pictured) is in his Quidditch robes, wearing a short cape. His accessories are a set of two wands, and a standard LEGO broom in a new color, dark-green. His legs are the short and fixed version indicating that he is intended to be younger than the previous three characters. The small ball with two wings is the Golden Snitch, which would make a nice decorative piece in other applications.
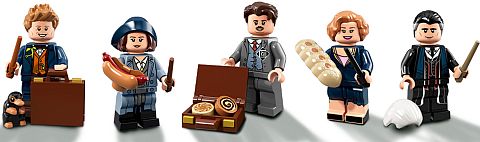
Looking at the Fantastic Beasts minifigs, the first character is Newt Scamander with an adorable little Niffler. Newt’s accessories are a pair of wands and a new type of suitcase, which is much nicer and more durable than the previous suitcase design. Tina Goldstein comes with a nice hat/hair combination we got for her before, but in a new color. Every piece of this minifigure is nicely done, but generic enough to be used in other settings. Her accessories are a pair of wands, and a hot dog in a bun.
Jacob Kowalski is another useful minifigure with great torso print, hair, and facial print. His accessories are the same new type of suitcase as Newt’s, with two new printed sweets inside! Yum! Continuing with the yumminess, Queenie Goldstein comes with a brand new large strudel piece, and a pair of wands. Her body printing is not as nice as the other minifigs’, mainly because the printed skin color is sort of off.
Credence Barebone (not pictured) is a simple minifig with not much more than nice torso printing and a printed 1×2 tile. The last minifig, Percival Graves also wears mostly black, but his printing is a lot more detailed, including print on the arms. His hair is dual-moulded, and he gets a second hairpiece and a set of wands as accessories. While pretty much all the other minifigs in this series are evenly distributed, there is only one Percival Graves in a full box, making this character exceptionally rare.
All in all, this is a really well designed minifigure series with lots of useful parts and accessories even for non-Harry Potter fans. And if you are a fan of Harry Potter, this is your chance to own all the major characters in minifig form. You can find them at various LEGO retailers and at the LEGO Harry Potter section of the Online LEGO Shop.
Also, remember that during the month of August, LEGO VIP members can earn Double VIP Points on two LEGO Harry Potter sets; the #75952 LEGO Harry Potter Newt’s Case of Magical Creatures, and the #75953 LEGO Harry Potter Hogwarts Whomping Willow. Both available at the LEGO Harry Potter section of the Online LEGO Shop.

What do you think? How do you like the LEGO Harry Potter and Fantastic Beasts collectible minifigures? Are you planning to collect some of them, or even all of them? Which ones are your favorites? Feel free to share and discuss in the comment section below! 😉
And you might also like to check out the following related posts: