(Written by William)
A couple of days ago, we took a detailed look at the #76108 LEGO Marvel Super Heroes Sanctum Sanctorum Showdown, mainly focusing on the building experience and the various play-features (see: LEGO Sanctum Santorum Review & Thoughts). Today, I would like to continue our discussion of the set, this time focusing on the building techniques. 🙂
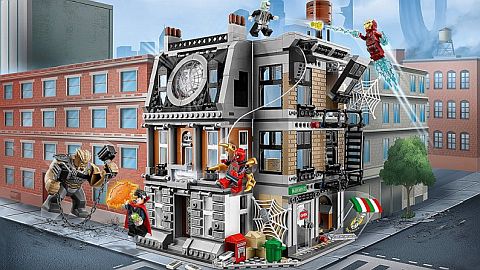
As I mentioned in my previous review, I’m a big fan of buildings in LEGO Super Hero sets. They are rare, but if done right, they can be quite impressive on display. In addition of being one of the rare LEGO Super Hero buildings, the #76108 LEGO Marvel Super Heroes Sanctum Sanctorum Showdown also managed to incorporate some clever play-features. Normally, I’d say that this is a terrible idea, as it can make a LEGO set too toy-ish, LEGO designers have done an excellent job here, blending in play-features without sacrificing the look of the building.

This set also got me thinking about some building techniques I have reviewed in the past, but haven’t discussed for a while. Sometimes I get too focused on finding new and interesting building techniques in official LEGO sets, and try to cram them into every new project I’m working on. But it is a good idea to also look at techniques that you are already familiar with, get some deeper insights, and learn to use them in new ways.
➡ UTILITY OF BREAK-AWAY WALLS IN LEGO MODELS
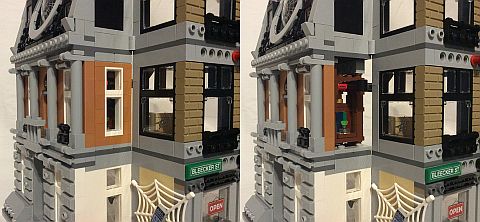
The last time I recall mentioning this technique was when we discussed an old LEGO Lone Ranger set. At that time, we only talked about how to build such a play-feature, but not so much about why LEGO uses this technique so often, and why we rarely see it in the builds of adult LEGO fans. So let’s take a look at break-away walls a bit deeper.
So why does LEGO uses break-away walls? The answer is two-fold. First of all, LEGO is making toys for children, and children like interactive play-features (especially things breaking!). Secondly, if the source material (like a movie, comic, or TV show) has things breaking, it makes sense for LEGO to incorporate that feature into the set as a play-feature.
But, if recreation is a core reason for building break-away walls, why don’t more LEGO fans use this technique in their own builds? The obvious reason is that the breaks we find in official LEGO sets are often too clean. When you think of a smashed wall, you probably imagine jagged holes and uneven surfaces. Typically, LEGO fans focus on making their models look as realistic and as close to the source-material as possible, rather than having play-features.

This leads us to a new question; if break-away walls is not a good technique for LEGO fans, why should we bother talking about it? Well, because even though the technique may not be used by LEGO fans as LEGO originally intended, it could be repurposed for other applications. For example, instead of using break-away walls to mimic an explosion, you can use them to show off the interior of a LEGO model.
The point is that by focusing on the utility of the technique instead of what it does superficially, it’s much easier to see where and how you can use it in your own creation. I recommend doing this with the majority of the techniques we discuss in this Brick Breakdown series. Sometimes I address this and other times not, but the important lesson here is that we can always look at techniques deeper than how LEGO designers use them in a set.
As a quick refresher, here are the basic tips on building a break-away wall. 1.) Typically, the base of the wall is held on by two studs, as that’s what is necessary to define a straight line. 2.) Next, have slopes of some sort on top of the wall (you want to reduce the edges that the wall can catch on). 3.) Finally, whatever is pushing the wall over, try to make it round or rounded (this will help to prevent catching, as well as scratching of the pieces). 4.) Make sure the break-away wall is solidly built to avoid making a mess when you break it away or remove it.
➡ MULTIPLE CONFIGURATIONS IN LEGO MODELS
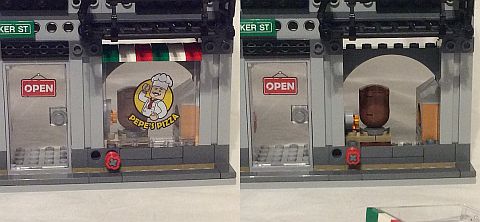
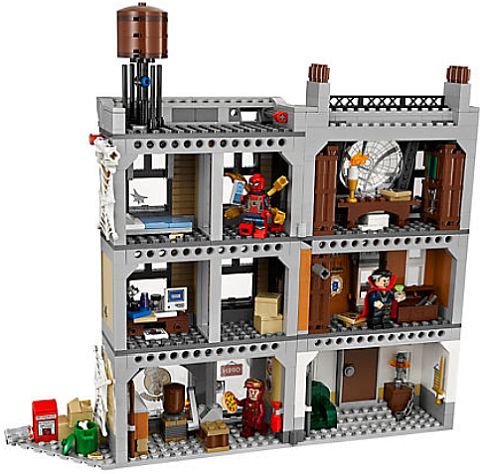
One of the biggest reasons I like the #76108 LEGO Marvel Super Heroes Sanctum Sanctorum Showdown set has to do with the sheer amount of configurations it can be placed in. It can be fully closed up to have one side clearly as the Sanctum Sanctorum, and the other side clearly as Peter Parker’s apartment and Pepe’s Pizza. The building can also open at an angle to create a nice three-dimensional corner that gives the model depth and character. Or, you can move the triangular corner section out of the way, and make a straight line with the two buildings in a row.
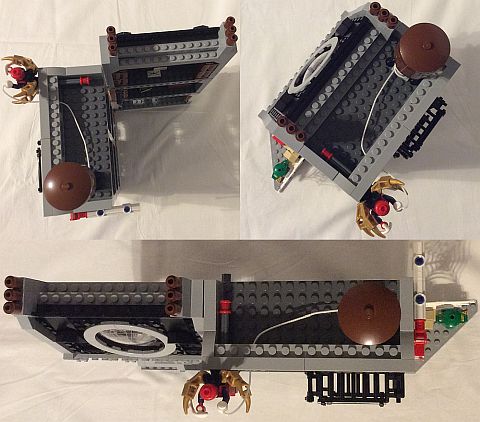
As a play set, having different configurations provides a dynamically changing stage to the stories you want to tell. And as a display piece, having several configurations allows you to display a LEGO model based on the space you have to work with. This can be a particularly helpful if you display your models at various LEGO shows and events. They often have different size and shape display areas, and to showcase your models the most effective way it is immensely helpful if you can easily and quickly put them in different configurations without taking things apart.
To utilize this technique, you usually incorporate some sort of hinge (you can even use multiple hinges for a more complex design). Then, you want to consider all the different configurations you want to incorporate. You may have two, three, or even more. Notice that LEGO designers used the removable corner section as a stopper to set the two sides of the building in an angle, and also filled in that corner gap with something that looks good. This doesn’t mean that you always have to create little inserts to block movement and fill in gaps, but you do need to consider how your where and how your hinges work, and how to make your model look the best in all configurations. Mastering this technique can take your own LEGO creations from interesting to awe-inspiring no matter where or how you display them.
➡ BUILDING FOR LATER WITH LEGO
While the #76108 LEGO Marvel Super Heroes Sanctum Sanctorum Showdown set is not on the level of some of the larger sets like the LEGO Modular Buildings in terms of details and finishing touches, it still looks very impressive on display, and could even fit with the more complex sets.
This gives us a good lesson in not getting bogged down by details too early in the building process while working on our own LEGO models. In fact, sometimes we take a lot of time on some detail, only to find out later that it doesn’t really fit into the rest of the project, or it compromises structural integrity. For these reasons, I would suggest building for later.
Building for later could mean leaving some studs and LEGO Technic pins open and available for some finishing touches. It may be a little nerve wracking to just trust that you’ll solve the “what goes there?” question later, but it really helps with the overall project. This is because when we aren’t distracted by tiny details, we can manage to get things structurally sound.
Additionally, we can better grasp the concept of scale when we go from big to small. Many LEGO fans will tell you that, if you want to create a detailed model, start with the smallest section you want to recreate and build from there. This is definitely a useful technique, as it will set the scale you wish to use, however it could also mean ending up with a lopsided model due to getting distracted by some details that you could have waited on.
The key is making an approximation of where you may need to build more stuff, then find ways to add connection points to those sections, so you can work out the details later. Hollow studs are ideal for this, since they are both a stud and can handle bar shapes. Bars are good in instances where you need some wiggle room and don’t want to be too rigid. A bar and clip connection has the ability to slide along the bar giving a much wider variety of possible positions. And, if you know you have to build something substantial, try to put in LEGO Technic pins and pinholes as those are some of the sturdiest connections.
➡ APPLYING WHAT YOU LEARN
LEGO fans are often most impressed when they see a build out of the norm. Using parts in unconventional ways typically blows our collective minds. However, techniques can work in the same way. This is especially true when a building technique is rarely used in LEGO fan creations. Always remember to ask yourself “What does this technique do?” and you will have a good idea how you might be able to incorporate it in your own creations.
In the #76108 LEGO Marvel Super Heroes Sanctum Sanctorum Showdown set we get a taste of a configurable LEGO model, and we can also see how we can easily use similar techniques in our own creations. Note that you can take this concept to a whole other level by making your model configurable vertically instead of horizontally. It would take a lot more planning, but having a tower that can pop out of a box or a flower that blooms on its own would definitely be awe-inspiring.
And finally, remember to build for later and not get bogged down by details too early in the building process. Eventually, you may build something rather large and when that time comes, having faith in yourself as a builder will do a world of good. Building stuff later can help to keep you on track, and by getting practice in early, you won’t need to go through a much harder lesson when that big project comes up.

What do you think? How do you like the #76108 LEGO Super Heroes Sanctum Sanctorum Showdown set? Are you planning to get it? Or do you have it already? And what do you think of the techniques we discussed here? Feel free to share your thoughts, reviews, and own findings of interesting techniques in the comment section below! 😉
And you might also like to check out the following related posts: