Some of the 2018 LEGO Technic sets became available last December, and the rest were released at the beginning of January. We have already discussed the two new LEGO Technic Pull-Back Racers (see: LEGO Technic Pull-Back Racers for 2018), as those are sets I have been collecting every year. Today, we will take a look at the rest of the 2018 LEGO Technic sets released so far. I will share some of my thoughts on each of the sets, but since I’m not an expert on LEGO Technic, I will also include video-reviews by both JANGBRiCKS and Sariel. 🙂
There are nine already released LEGO Technic sets for 2018, and there are five more we already know about that are coming later this year. The selection includes smaller sets that are excellent for those who are new to LEGO Technic, some very solid medium-size sets, and some large sets with over 1,000 pieces for those who like a great building challenge. And the largest of all of the 2018 sets will come later this year, two of which include around 4,000 pieces!
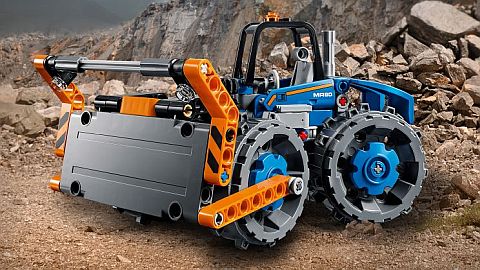
➡ SMALL 2018 LEGO TECHNIC SETS: There are four small LEGO Technic sets released so far for 2018; the #42071 LEGO Technic Dozer Compactor, the #42072 LEGO Technic WHACK!, the #42073 LEGO Technic BASH!, and the #42084 LEGO Technic Hook Loader. Small LEGO Technic sets are a great way to try out the very different and quite challenging building experience of LEGO Technic.
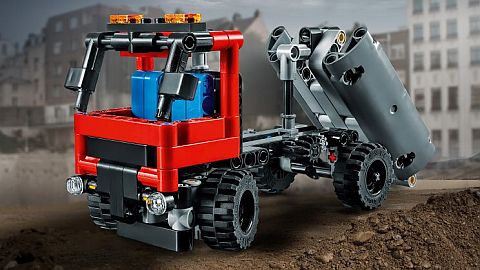
As you will see in the video-reviews below, both the dozer compactor (first picture above) and the hook loader (second picture above) works very well, demonstrating the functions of the real-life vehicles they are based on. Both sets also have an alternate model; an articulated truck for the blue and orange compactor, and an airport fire truck for the red and gray hook loader. It is interesting to note that both vehicles are pretty close to minifig-size, and could accommodate a minifigure with a bit of modification. Another interesting feature – which you will see in many of the other 2018 LEGO Technic sets – is that an unusual number of standard LEGO elements are also included in the models.

WHACK! (above) and BASH! (below) are the latest in the LEGO Technic Pull-Back Racers series (LEGO releases two each year). They are fast and fun, but the designs are not as good as the previously released sets in the collection. These two sets don’t have separate alternate models, but they can be combined to build a larger racer that uses both pull-back motors. You can find my full review here: LEGO Technic Pull-Back Racers for 2018, and I also included a video-review of both sets in the player below.
If you want to try out LEGO Technic, from the four smallest sets I would recommend the #42071 LEGO Technic Dozer Compactor. It’s a nice looking set with interesting functions, and the mechanical parts work great. For younger kids, who like to race pull-back style vehicles, WHACK! and BASH! are fun, but for older LEGO fans their design is somewhat disappointing.
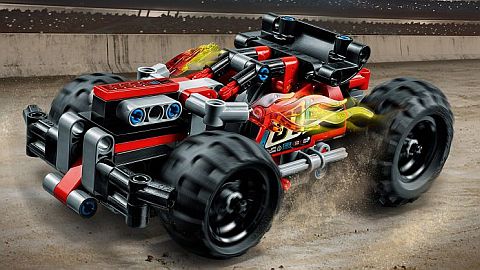
➡ MEDIUM 2018 LEGO TECHNIC SETS: The two medium-size LEGO Technic sets are the #42074 LEGO Technic Racing Yacht (the alternate model is a catamaran), and the #42075 LEGO Technic First Responder (the alternate model is a fire racer). They both demonstrate very well how far LEGO Technic has come. The whole idea of LEGO Technic is to model the mechanical components and functions of real vehicles, but in recent years LEGO also put a lot of effort to make the sets really good looking as well. This is achieved with paneling, high quality stickers, and a careful selection of colors. The racing yacht stands out as a particularly beautiful set.

While the racing yacht is quite large, most of the size is taken up by the sails, so as far as mechanical details it only has two. You can turn the ship’s wheel (or move the tiller) to operate the rudder, and wind the winches to move the sails. Interestingly, the yacht also has wheels at the bottom – something LEGO sometimes does with non-floating ships.

The #42075 LEGO Technic First Responder is a more robust vehicle, with close to 200 pieces more than the racing yacht. The shape and size allows a lot more functions, including working steering and suspension, working winch, and a raisable light tower. In addition, the driver’s cab has opening doors, and there is also a storage compartment with a selection of tool accessories. Here also, you will see LEGO incorporating some standard LEGO elements, which is quite unusual for LEGO Technic sets.
As the two sets are so different, I can’t really recommend one over the other. Perhaps I could say that if you are looking for a more traditional LEGO Technic set with the focus on mechanical functions, the first responder is a better choice. On the other hand, the racing yacht is probably the most beautiful LEGO Technic set of all time. Both sets are very reasonably priced ($40 for the yacht, and $50 for the first responder), and I don’t think you can go wrong with either.
➡ LARGE 2018 LEGO TECHNIC SETS: We also got three large LEGO Technic sets for 2018, the #42076 LEGO Technic Hovercraft, and the #42077 LEGO Technic Rally Car (both with right around 1,000 pieces), and the #42078 LEGO Technic Mack Anthem with 2,595 pieces. From the three, the most talked about set is the very impressive Mack truck and trailer, so we will discuss that first.
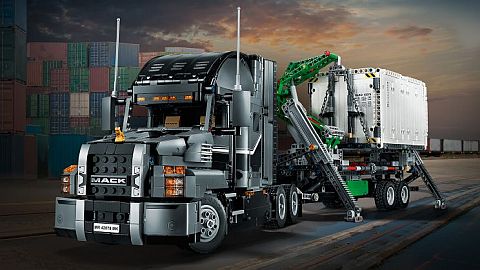
The #42078 LEGO Technic Mack Anthem was developed in partnership with Mack Trucks Inc., and it features an array of realistic technical details and functions. This includes front-axle steering, rear wheel drive, and a 6-cylinder straight engine with working pistons and spinning radiator fan. In addition, the detachable trailer has extendable outriggers, working landing legs, synchronized crane arms with side loading capability, and a loadable container with lockable doors. The accessible driver’s cab has opening doors, adjustable seats, detailed dashboard, steering wheel, sun visors and a bunk bed. The truck and trailer with crane boom and landing legs extended measures over 10” (27cm) high, 32” (83cm) long and 7” (18cm) wide, and over 8” (22cm) high and 5” (15cm) wide with the crane boom and landing legs retracted. The Mack LR garbage truck measures over 7” (19cm) high, 22” (58cm) long and 6” (17cm) wide with forks and container lowered, and over 12” (33cm) high with forks and container raised. This truck is a beauty! Also, notice the unique bulldog hood ornament!
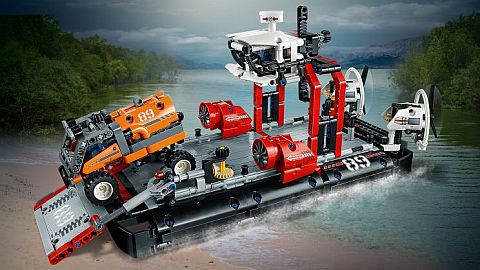
The #42076 LEGO Technic Hovercraft features a working crane with operator’s cab and a raisable loading platform. The set also includes a small expedition truck a detachable cargo container. The secondary model is an equally impressive jet boat and small helicopter.
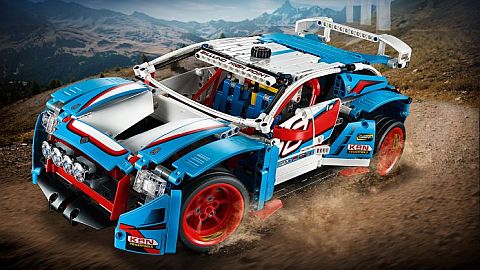
One thing you will notice right away about the #42077 LEGO Technic Rally Car is how large it is! This is both a good thing and a bad thing. On the good side, the vehicle looks very impressive on display, and the large size can also accommodate lots of interesting details and moving components. This includes working steering and suspension, opening hood, 2-fan engine cooling system, opening rear hatch, V6 engine with moving pistons and a well-equipped cockpit with opening doors. The large size also makes it easy to motorize the set. On the bad side, the vehicle appears quite gappy from certain angles. I would recommend watching the video-review below to see what I mean. The secondary model for this set is a buggy, which I actually like better than the main model.
Other LEGO Technic sets that will be released later this year are the #42079 LEGO Technic Forklift Truck, the #42080 LEGO Technic Forest Harvester, the #42081 LEGO Technic Volvo Autonomous Loader, the #42082 LEGO Technic Rough Terrain Crane (which is reported to be the largest LEGO Technic set to date with over 4,000 pieces – that’s even larger than the enormous #42055 LEGO Technic Bucket Wheel Excavator released in 2016!), and the #42083 LEGO Technic Bugatti Chiron (another huge set with close to 4,000 pieces!). There are no pictures of these sets yet, but they should be revealed soon.
Building LEGO Technic sets is interesting and challenging, and I highly recommend trying out at least some of the small to medium sets. Even if LEGO Technic doesn’t become your favorite LEGO theme, building LEGO Technic sets can greatly enhance your building skills, particularly when dealing with stability, load-bearing, and incorporating mechanical components. And with all the beautiful and impressive LEGO Technic sets currently available, it wouldn’t be surprising if building LEGO Technic become your primary hobby. You can find all the currently available sets under the LEGO Technic section of the Online LEGO Shop.

What do you think? How do you like the 2018 LEGO Technic sets released so far? Do you have any of the sets already? Which one is your favorite? Feel free to share your thoughts and own review in the comment section below! 😉
And you might also like to check out the following related posts: