 LEGO magnet-sets have been a wonderful way to acquire minifigs without having to buy a whole expensive set. Unfortunately the good times are over. From 2011 all magnet sets are being glued! 🙁
The minifig’s legs are glued to the magnet base. In addition, the torso/legs assembly is glued to the torso. The minifig’s heads are removable from the torso, and any crown, hair or other headgear is also removable. Weapons and other accessories are separate and removable. Because the figs are glued to the magnet-base they are no longer useful for much more than as refrigerator décor.
The LEGO Ambassador for Bricklink contacted LEGO about this and she received the following reply from a LEGO-rep:
 “All Extended Line minifigure magnet sets will as of Jan 1st 2011 be glued. Based on new requirements, the magnet base and the minifigures will have to be permanently fixed together on LEGO Star Wars magnet sets.
To ensure a consistent consumer experience across all LEGO minifigure magnet sets we have chosen to permanently fix the minifigure to the magnet base on all magnet sets moving forward from Jan 1st 2011 (incl. Pharaoh’s Quest launching Dec 1st).
This decision has been carefully considered and was not taken easily as we know that many consumers will obviously not like this change.”
Of course LEGO-fans are not at all happy about this change and have been trying to rescue their figs from their magnet shackles. So far I have seen people trying to pry off figs with a hobby-knife or chisel. This method will separate the minifig from the magnet base, but unfortunately it also tends to break the back of the legs.
I decided to spend a bit of time myself trying to find a solution that is both safe for the minifig and the person using the method. (Please read our Tutorials Disclaimer for your safety here.) I will start with the process that I found working, and below that I will list my failed attempts for your further amusement (and horror!). 😉
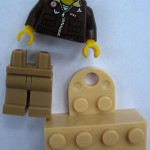 1. THE HOT WATER PROCESS – this works!: Originally I thought LEGO is using some kind of strong glue, like Superglue, and tried methods that I knew could work for glue. However none of these worked. (See failed attempts.) Then I did a little research on the methods LEGO used to glue parts.
I have discovered that LEGO is not using glue at all, but a solvent, that actually loosens the surface of the ABS plastic and allows the molecules to combine. Once the solvent evaporates, it leaves behind a cleanly fused surface with no residue at all.
Reading further on the subject, I found that LEGO has been using two types of solvents. One is called MEK (methyl-ethyl-ketone) and at some point they switched to GBL (gamma-butyrolactone). I’m no chemist, so I had no idea what these are, but I read that both of them are water soluble at certain temperatures. So, I thought to try loosening the seal between the minifig and the magnet by hot water.
The challenge is that ABS plastic itself has a melting point, which is 176 Fahrenheit (80 Celsius). So, I had to make sure I don’t cross over that temperature.
 TOOLS NEEDED:
• Stove
• Medium size pot with water (for heating)
• Strainer
• Cooking Thermometer
• Cold water (for cooling)
• Watch (for measuring time)
• Kitchen mitts or cloth (to keep your hands from burning)
 PREPARE MINIFIG:
Remove minifig accessories (tools/weapons, headgear and head)
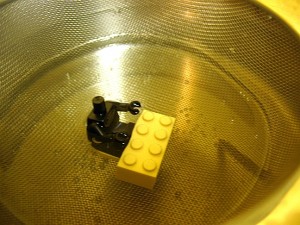
Bend minifig at the waist so it is in a sitting position (this gives the best angle for the hot bath, and also helps to lift it out of the water)
Lift minifigs hands up, like it is reaching out for something (this also assures the correct angle)
PROCESS:
1. Fill pot with water
2. Place strainer on top of the pot
3. Make sure the water level is above the strainer by about an inch
4. Place Cooking Thermometer in pot
5. Heat water to 160 Fahrenheit (71 Celsius) (I found this to be a perfect temperature for the process. Not too hot to damage the plastic, but hot enough to loosen the seal.)
6. Turn off heat (if you have an electric stove, it is best to take the pot off the burner)
7. Place minifig in hot water and leave it there for 5 minutes
8. Remove minifig from hot water (just grabbing it by the neck-stud works great; the water is really not that hot)
 9. Hold minifig/magnet assembly in kitchen-mitts with one hand and bend the torso straight back as much as you can (but gently!) to see if the seal is starting to loosen. WARNING! Do not try to wiggle the torso left and right! This will loosen the leg-pins and you will have a fig with very loose legs! ONLY bend the torso straight back!
10. As you bend the torso backwards against the extension plate on the magnet you will see the seal getting loose. At this point the fig may pop right off.
11. If it doesn’t, DO NOT force the fig to come off! Just put it back in the hot water and leave it there for another couple of minutes.
12. Take the fig out again and bend the torso backwards. By this time the fig should either pop right off, or the seal should be very loose.
 13. If the fig doesn’t pop off, but the seal is very loose, gently insert a kitchen-knife in the gap between the back of the fig’s legs and the magnet-base. (The fig is fused ONLY at the back of the legs to the studs on the magnet. NOT at the bottom of the feet.)
14. Once the fig is off, run it under cold water to cool it off. WARNING! Don’t move the legs and arms until the fig is completely cooled! You can damage the joints and they will become very loose!
15. DONE! 🙂
NOTES:
• This method DOES NOT damage the plastic, as we are staying below its melting point. It also won’t damage the print on the minifig.
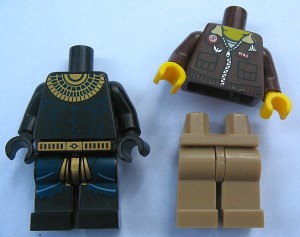
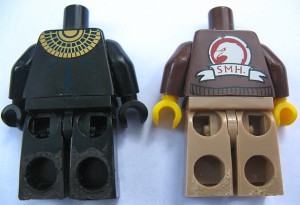
• Once the minifig is off, on the back of the legs you will see where the fig was fused to the magnet is kind of rough. There is not much we can do about that. But at least we have rescued the minifig from its bondage! (I would not recommend sanding this area to smooth it as I have read that the fusing process makes the ABS plastic more brittle. The back of the legs are already very thin, so smoothing them down may weaken them further.)
• This process may also release the bond between the torso and the leg-assembly. On one of my figs the torso just slipped right off. On another it became loose but didn’t fully come off. I didn’t want to push my luck. 😉
NOW THE HORROR STORIES FOR YOUR EDUCATION AND AMUSEMENT! (In each method listed below I note the process, time elapsed, and the result.)
 2. THE GOO-GONE PROCESS – fail!:
Method: full immersion
Temperature: normal room temp.
Time: 1 hour
Results: NONE
Adverse effects on plastic: NONE VISIBLE
Adverse effects on print: NONE VISIBLE
 3. THE VINEGAR PROCESS – fail!:
Method: full immersion
Temperature: normal room temp.
Time: 1 hour
Results: NONE
Adverse effects on plastic: NONE VISIBLE
Adverse effects on print: NONE VISIBLE
 4. THE ALCOHOL PROCESS – fail!:
(Isopropyl Alcohol 50% by Volume)
Method: full immersion
Temperature: normal room
Time: 1 hour
Results: NONE
Adverse effects on plastic: NONE VISIBLE
Adverse effects on print: NONE VISIBLE
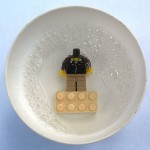 5. THE SOAPY WATER PROCESS – fail!:
Method: full immersion
Temperature: warm water
Time: overnight (8 hours)
Results: NONE
Adverse effects on plastic: NONE VISIBLE
Adverse effects on print: NONE VISIBLE
6.  THE MINERAL OIL PROCESS – fail!:
(Baby Oil)
Method: full immersion
Temperature: normal room
Time: 1 hour
Results: NONE
Adverse effects on plastic: NONE VISIBLE
Adverse effects on print: NONE VISIBLE
 7. THE LEMON-JUICE PROCESS – fail!:
Method: full immersion
Temperature: normal room
Time: 1 hour
Results: NONE
Adverse effects on plastic: NONE VISIBLE
Adverse effects on print: NONE VISIBLE
 8. THE EUCALYPTUS OIL PROCESS – fail!:
Method: full immersion
Temperature: normal room
Time: 1 hour
Results: NONE
Adverse effects on plastic: NONE VISIBLE
Adverse effects on print: NONE VISIBLE
 9. THE WD-40 PROCESS – fail!:
Method: full immersion
Temperature: normal room
Time: 1 hour
Results: NONE
Adverse effects on plastic: NONE VISIBLE
Adverse effects on print: NONE VISIBLE
10.  THE ACETONE PROCESS – badly fail!:
(Regular Nail Polish Remover by Equate)
Method: full immersion
Temperature: normal room
Results: PLASTIC MELTED, BUT MINIFIG/MAGNET SEAL INTACT
Adverse effects on plastic: MELTED
Adverse effects on print: MELTED/CAME OFF (See below:)

In summary, I would hope that LEGO will come up with another solution besides fusing minifigs to magnets to meet licensing regulations. In the meantime you can give your minifigs a nice hot bath! And if you come up with something better feel free to share it here! Oh, and while you are at it, you may also want to read about removing LEGO minifigs from keychains.
I have also written a guide with a list of all glued and non-glued magnet sets to help shoppers identify them easier. Read here: Guide to Glued & Non-Glued Magnet Minifigs! Hope this helps! 😉


Very cool idea and easy to do as well.
The new magnets have a backplate. Have you tried to remove these ones? I’d love to see a post about it. Thanks!
Carlie, if you look at previous comments just a bit ealier we have discussed those here as well. The methods to remove them are not a whole lot different, but you are right; I should do a new tutorial. I’m putting it on my to-do list right now. 😉
This worked perfectly! I used it on both the old type and new type of magnetic legos.
Tina, I’m glad it worked for you. Have fun with your freed minifigs! 😛
Hey admin, sorry if this has been asked before. I don’t think I see mineral spirit on your list of failed methods. Have you tried it? I just saw the Lego Movie and I hope it didn’t mislead audiences like myself.
Hm… that’s a good question. I should give it a try. Please note though that the dad in The LEGO Movie was using superglue. The magnet minifigs are technically not glued but fused together with a solvent, so the process to unglue them would be different. I guess whatever would remove superglue would work – of course the question is will the plastic survive. 😈
Hi admin,
Great tutorial! Quick question: I want to separate the torso from the legs, replacing the legs with new shiny ones 🙂 From your experience, would new legs fits nicely to the torso or it would be loose?
Andri, removing the legs from the torso is iffy as there are so many delicate connection-points inside the torso. I’m fine when it happends, but when it doesn’t I don’t force it as the thin inside supports of the torso can easily get damaged. It really depends on how much solvent got in there and how it distributed.
So to answer your question, sometimes the legs just easily come off, there is no damage at all, and you can replace the legs just fine. At other times it is best not to force it. The main goal of this method is to remove them minifigs from the magnets. The legs becoming removable is just a plus. 😉
Hi,
I tried this method and unlike anyone else who posted positive results this method was an epic failure for me. I even tried playing with the temperature range and time but nothing worked and attempted this on 12 different mag figs…
Any other ideas?
Jason, sounds like something is off, but it is hard to help with something like this over the Internet without seeing exaclty what you are doing and where could be a problem. What I would suggest is that you take the cheapest, most undesirable minifig from the magnet figs you have, and you take it under some serious experimentation. Consider this kind of like a fun science project. 🙂
How I would do it is to slowly and gradually increase the temperature, and try removing the minifig every 5 minutes from the water and see if the magnet can be pried off as described in the tutorial. If not, put it back in the water and continue raising the temperature. I would also take notes throught the process, noting the temperature and the time as I go.
A simple thing like elevation or the hardness of the water could make a difference on what the right temperature needs to be, so having precise notes about your own experiment could be the key to solve your mystery. I would continue raising the temperature until the magnet comes off. Make sure you note the temperature at this point. Then let the minifigure cool off and examine it. Did it get warped by the higher than recommended temperature? If not, you can use your own temperature and time needs listed in your notes for removing your other magnet minifigs. If there is warping, you can continue to experiment to work out the right balance. Hope this helps some. 😉
Get lego to just sell minfigure packs without magnets would be the best solution
Bob, LEGO can’t sell minifigure packs of licensed product lines. It is part of their contract. This is because the license-holder usually have a contract with another company for action figures.
Hello fellow Lego lovers –
I have a bit of a predicament: I recently purchased 11 minifigures off eBay that were previously on display at a store. The minifigures are in perfect condition EXCEPT For one leg on each has some glue and a piece of plastic attached. I was wondering if you think this glue removal trick will work on just the leg? Please help! On the bottom is a link that will take you to the picture I hope. https://www.ebay.com/itm?itemId=261617751572
Jesse, nice find of display figures! What LEGO is using there is regular glue, NOT the solvent that is used on magnet figures. Personally I would try something less involved first. Can’t you just pop off the glue from the plastic? They shouldn’t be fused together as on the magnets. If they don’t come off easily, you can try warm water, but do not heat it to as high as in the method mentioned in the article, so you do not get as close to boiling point. Just hot enough that you can put your hand in it and still melt the glue. I think that should work, but I never tried to remove this kind of glue before. LEt me knwo how that goes. I’m curious about this too! 😉
Hi,
I was just at Legoland Florida and I bought a magnet minifigure but the magnet was attached to the figure with a metal stud. One end of the stud was embedded into the back of the figure and the other end was attached to a large plastic circle with magnet glued to it. It was easy to remove the magnet and cut away the plastic but there was no way to remove the stud without damaging the figure. The best I could do was to use a wire cutter to cut the stud off as close to the base as I could. There is still a little bump but it can be removed with some careful grinding.
I did a little better with some minifigure key chains that were on sale for $1.50. Again there was a stud embedded into the the neck of the figure that went through a hole in the head and and ended with a small ring that attached to the key chain. After removing the key chain from the ring, it was easy to clip off the small ring at the end of the stud. This allowed the head to be removed so you could cut the stud off below the level of the head. Unfortunately this leaves a small hole in the head of the figure but my son did not mind.
Anthony, thanks for sharing! For metal studs I personally use a soldering iron. I wrote about this in an other article. And your method is a viable solution too. But yeah, the removed pin leaves a hole. Kids don’t seem to mind though. 😉
Hi Admin,
Does this method work on the minifigs as well as I got a classic Futron space fig I got it free as it was a mistake purchase (not by me) the helmet is stuck onto the head and so is the visor and hips and legs (the legs move).
Dave, it’s a bit iffy if it would work or not. It really depends on how much glue was used to attach the parts. Some minifigs got more than others, and it also depends on how the glue flowed inside the part. For the magnet minifigs, some easily came apart, while others didn’t. The issue is that if you heat the minifigs up too high, or keep them in the hot water too long, the joints start to get effected and can become loose. They are small parts, so they react to the hot water more.
My suggestion would be to perhaps give it a try one time. Just follow the directions for the temperature and the time requirements, and don’t keep the minifigs in the hot water longer than necessary. You might luck out and the parts may come apart easily. If not, don’t insist so as not to damage the joints. If the minifigs looks nice otherwise, and none of the parts are damaged, there is really no reason to take it apart. Hope this helps some. Anything else, fell free to comment again. 🙂
Thanks Admin 😀
You’re very welcome. 🙂
Hi admin,
I bought an original exhibition Lego set from an user but some or almost all the parts of bricks Seem glued …..
Do you know some advice before you try method of hot water?
Thanks
Cheers
Hmmm… are you talking about one of those LEGO display-models in acrylic display cases that they have at TRU, Target and other stores? Those are always glued. I wouldn’t recommend trying to take them apart. The fusing method LEGO uses is meant to be permanent.
Using hot water to separate the pieces can work on small items (like the magnets), because the pieces are tiny, and the fusing agent doesn’t have much to grab on to. But in larger models where there is a lot of surface area to fuse together, the bond is going to be permanent.
Also, the fusing agent LEGO uses damages the surface of the parts (marring the surface like this and “melting” the plastic together is what creates the permanent bond). So, even if you could take some of the parts off, they wouldn’t be as good as new. It is not so visible on the magnet minifigs, as they are only bonded to the magnet bricks at the back of their legs, but on larger pieces it would definitely be very noticeable.
To summarize, I wouldn’t recommend trying to take full sets apart glued by LEGO themselves, as the bonding agent they use is meant to be permanent. However, you might be able to take off some of the smaller pieces, simply because they don’t have that much surface area. The minifigs in those display cases are usually attached using regular glue, and they should come off fairly easy. (You will see a milky glob around their feet to indicate this.) As this is regular glue, not a fusing agent, the minifigs should be fine.
Yes,
i don’t have an assurance but i think it’s like did you decribe….from the beginning at the end 🙁
I disassembled manually the half part of the bricks but there is a small with trace of dry glue near every brick (above all coloured)….
However I want to prove the hot water method…..only to understand 😉
I let you know in the next days…
Cheers
Sounds like an interesting science project! Good luck, and let me know how it goes! 🙂
Bonjour votre méthode fonctionne t’elle avec les minifigurine collé dans les PLV .
Bonne journée à tous
Hey, Yoyo, I don’t speak French, and I don’t know what PLV means. Would you please clarify?
Would this work for the lego batman magnets, where the figures aren’t glued to a base, but rather, they have magnets in their legs, and their torso, head, hair, and legs are glued together. Could this method be used to separate the head, torso, hair, and legs?
I did try this with magnet minifigs and found that the hair and head are pretty easy to remove because it’s just one fairly simple connection. I was able to remove them consistently without any damage to the parts.
However, the legs from the torso are a different story. They are connected by two long studs and there are also those little ridges within the torso. So there is a lot of places for the glue to get stuck. Depending on how much glue was used and how it flowed between parts, I was able to separate the legs and torso sometimes, but not always. When I noticed there was too much resistance, I just aborted the procedure as the chance of damaging the parts was too high.
So, in summary, hairpieces and heads yes, torso from legs, you can try, but it may not be successful with every piece.