

(Written by William & photos by Sarah)
It’s been ten years since the #10179 LEGO Star Wars Ultimate Collector’s Series (UCS) Millennium Falcon was released, and LEGO fans have been hoping for a re-release ever since the set was retired. It was the largest LEGO set in its time and a wonderful representation of the iconic ship from the Star Wars universe. And now, thanks to the LEGO Group and Disney listening to fans, we finally got an updated version in the form of the #75192 LEGO Star Wars UCS Millennium Falcon.
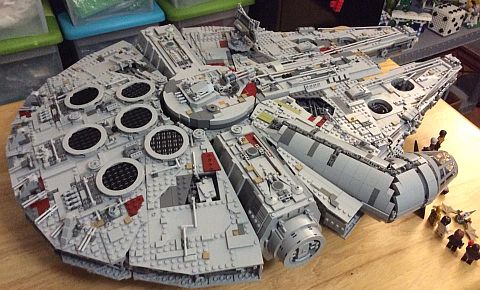
The new Falcon is the same size as the original, however, it comes with roughly 2,300 more pieces – all going into adding even more details to an already elaborate model. The larger piece count also means a higher price tag; the original set sold for $500 and was lowered to $400 near the end of its run, while the new set is $800. However consider that besides the significantly greater number of pieces, the new set is also technically a two-in-one model representing two versions of the ship.
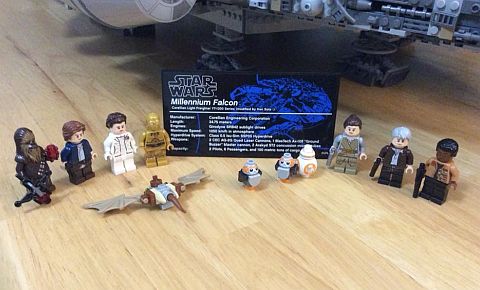
In the original Star Wars films, the Falcon plays a major role, and it also returns in the latest movies – albeit aged and somewhat modified. This is symbolized in the set by a different radar dish for the old and new version of the ship, and a few other minor modifications. And, you also get both the old and the new crew. Young Han Solo, Princess Leia, Chewbacca, and C-3PO represent the old crew, while Finn, Rey, old Han Solo, BB-8, and a couple of Porgs are from the new films. Technically, Chewbacca can serve as both old and new crew, as he hasn’t changed all that much.
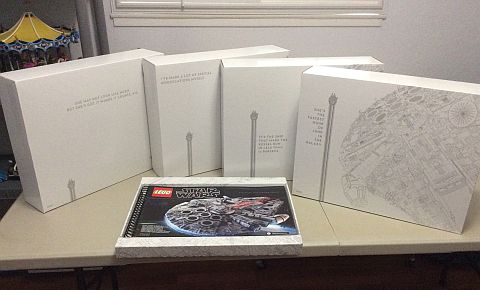
As you probably know already from our previous discussions, the #75192 LEGO Star Wars UCS Millennium Falcon comes in a humongous box, which is super exciting in itself. Inside the outer box, there are four nicely designed inner boxes, and a large tray that holds the manual and the stickers. Based on the artwork on the inner boxes, I was hoping that the set would be pre-sorted in a logical way in between the boxes, so you don’t have to open all of them at the same time. Unfortunately, this is not the case. Mixed between all four boxes are 17 sets of numbered bags, as well as 4 unnumbered bags. To make this overview easier, I’ll break down and talk about each bagged stage, along with the approximate building time, what was built, and any comments I think are worth mentioning about the step. Keep in mind, the time stated is pure building time and does not include any sorting you might want to do.
LEGO STAR WARS UCS MILLENNIUM FALCON – BAG #1
- Number of Bags: 6
- Build Time: 149 minutes (2 hours, 29 minutes)
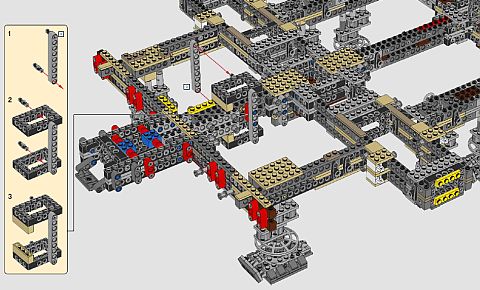
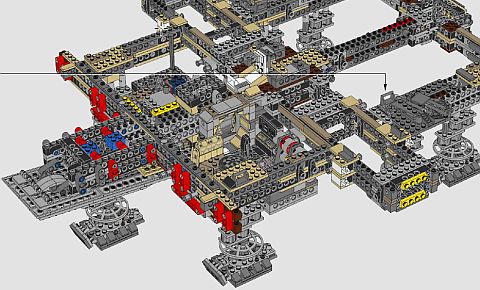
- What Is Built: Inner structure of the ship, front middle to the back of the ship.

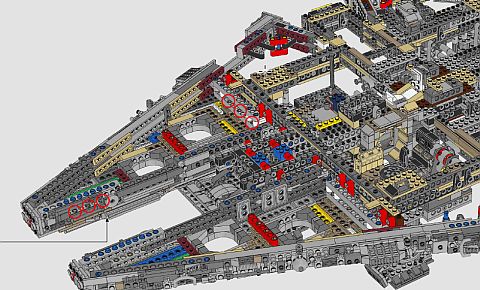
The interesting part of this phase is that while putting together the framework, you have to essentially double all the layers. I’ve never seen a LEGO model so massive that it was necessary to do this to handle so much weight. It was also interesting to see all the open connections that were left for parts of the model that come later on. It was like watching a chess master think fifty moves ahead. Another thing that struck me after completing the model is that, at the time of building the initial stages, I was marveling at the size of the ship based on the rough frame everything was going to be mounted to. However, the extra shaping that is added to the outside of this frame later on drastically increases the overall size at later stages. So, the set paces itself well in how it continues to amaze the builder.
LEGO STAR WARS UCS MILLENNIUM FALCON – BAG #2
- Number of Bags: 3
- Build Time: 37 minutes
- What Is Built: The landing gear for the ship, as well as two hinged platforms.
What struck me as peculiar about the landing gear was how high up they are located. Later, I discovered that it was necessary to help connect some stages of the ship. Extensive paneling is added later to the underside of the vessel, so the height is very much needed. This is another testament to the actual scale of the ship that gets revealed over time.
LEGO STAR WARS UCS MILLENNIUM FALCON – BAG #3
- Number of Bags: 5
- Build Time: 174 minutes (2 hours, 54 Minutes)
- What Is Built: Two inner hull sections, the final landing gear foot, and a bottom panel that goes around the front central landing hear.
- Minifigs Included: Chewbacca, C-3PO, and two Porgs.
One of the inner hulls contains an action element that is only accessible from the outside once the model is done; a hatch that drops an anti-boarding gun. The other hull section is one of the decorated areas with a holo-chess board, some fancy seats, one of the illusionary doorways, and some random interior ship decorations. Upon later reflection, if you want any of the minifigures posed in this first decorated area, it is best to do it before moving on in the build. The reason is, this area has a number of connection points that aren’t that strong and can get knocked about really easily. This is probably the reason why some of the characters were included in these bags.
LEGO STAR WARS UCS MILLENNIUM FALCON – BAG #4
- Number of Bags: 4
- Build Time: 118 minutes (1 hour, 58 minutes)
- What Is Built: Two more interior hull sections and two angled frames that start to define the back left and back right edges of the ship.
- Minifigs Included: Younger Han Solo, and Princess Leia.
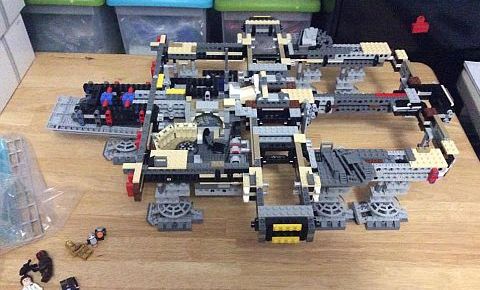
The interior hulls are very different in what they offer. One hull is an empty chamber. This can make sense since the ship is designed to carry freight, but it is mostly built as a place for you to put your hand under the ship and pick it up. The other inner hull is the engineering section with the hyperdrive and escape pod hatches. There are two illusionary doorways in this section as well as a 2×4 LEGO Technic plate that simulates a panel that can lift out of the floor. The angled frames show a tremendous amount of detailing. It is fascinating to see all the obviously open lift-arms added into these sections to prepare for later additions to the model. Again, this is a good time to begin posing minifigures into the engineering section since it is essentially finished.
LEGO STAR WARS UCS MILLENNIUM FALCON – BAG #5
- Number of Bags: 4
- Build Time: 104 minutes (1 hour 44 minutes)
- What Is Built: Back underside panels and thrusters.
Building the major out-ship panels is quite time-consuming, and also feels precariously attached to the rest of the ship. It felt strange that there are very few sturdy contact points, especially considering the heavily reinforced superstructure of the model. However, it turned out not to be a problem, so the odd feelings I had while building this stage was based on seeing the differences between two different building styles.
LEGO STAR WARS UCS MILLENNIUM FALCON – BAG #6
- Number of Bags: 4
- Build Time: 128 minutes (2 hours and 8 minutes)
- What Is Built: The side frames for the two triangular points of the ship.
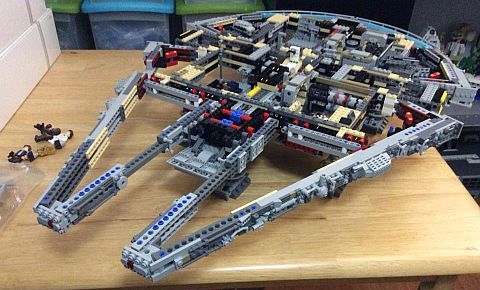
After getting through the initial superstructure, the model goes into a style of compartmentalization. Meaning, that each section – apart from how it connects into the model – can generally stand on its own. This is a great way to construct massive models since it allows for much easier adapting later down the line. Say, one side is too heavy, then just remove that section and find ways to lighten it. The trick is remembering to give the appropriate amount of connection points to each section so that it can connect with the rest of the model securely. This is why frames are always built first, and this model has some really large frames. Along with their incredible size and unusual shape, they are actually very sturdy and even have a hinged section at the tips.
LEGO STAR WARS UCS MILLENNIUM FALCON – BAG #7
- Number of Bags: 3
- Build Time: 65 minutes (1 hour 5 minutes)
- What Is Built: Two triangular panels for the front underside of the ship.
It still strikes me with awe just how much detail is on the underside of the ship. Then again, with 2,300 more elements to work with, it makes sense this area of the ship would get fleshed out with a high degree of detail. This is also the first time in the building process where the true size of the ship starts to sink in. While building the frame in the previous steps does give you an idea, seeing much of the empty space of the frame filled in, gives you a whole different level of appreciation. It’s like seeing a coloring book page actually getting colored!
LEGO STAR WARS UCS MILLENNIUM FALCON – BAG #8
- Number of Bags: 3
- Build Time: 87 minutes (1 hour 27 minutes)
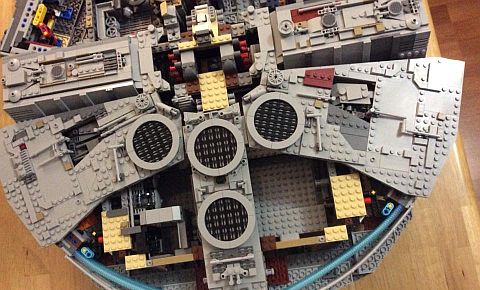
- What Is Built: Panels on the underside of the ship and greeble inserts for the holes in the front of the ship.
This is probably the dullest section of the building process. The panels are smartly done with precise angles, but compared to the rest of the procedure, it is a rather dry building experience. Although I did find it interesting to build small little wall sections with decorations that are then framed by circular holes in pre-existing paneling.
LEGO STAR WARS UCS MILLENNIUM FALCON – BAG #9
- Number of Bags: 3
- Build Time: 110 minutes (1 hour 50 minutes)
- What Is Built: Top triangular panels of the ship with a few other small connections added behind them.
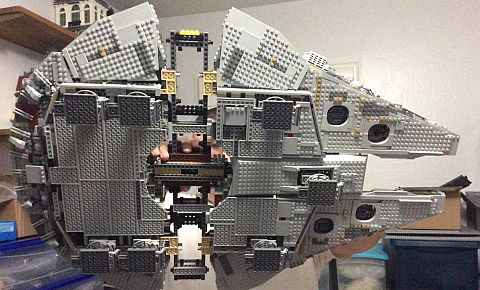
It is a testament to how much detail work there is in this model that it takes nearly two hours to build and attach two panel sections. Speaking of attaching, this is both one of the scariest and most satisfying attachments I found in the model. It is so terrifying because you can’t see exactly how things line up and you’re afraid to give it too much pressure. And, it is satisfying because when you hear that snap and feel how solid the ship is, it is very gratifying. This stage also represents the first time you can take a picture that looks halfway decent, rather than a massive mess of connected bricks.
LEGO STAR WARS UCS MILLENNIUM FALCON – BAG #10
- Number of Bags: 5
- Build Time: 105 minutes (1 hour 45 minutes)
- What Is Built: The rest of the underside of the ship, including the left and right sections, a boarding ramp play element, and a massive central circular section with a gun.
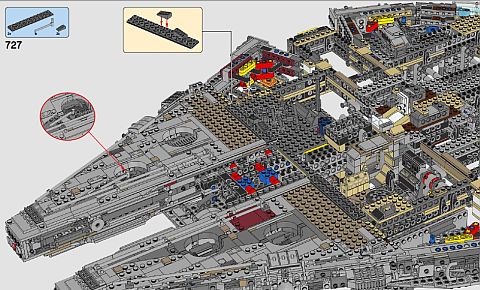
The left and right sections are very easy to attach. The central one, on the other hand, was the first time I was glad I wasn’t building the set alone. By this point, the model was rather heavy what felt like at around 20 pounds. Generally, this is not an insurmountable weight, but trying to lift it one-handed when you can’t touch the center and can’t rest it on an edge, starts getting tricky. The goal of this step is to work four lift-arms up through the middle of the ship to connect the central panel. It’s kind of like trying to plug a giant electrical prong in at an awkward angle.
LEGO STAR WARS UCS MILLENNIUM FALCON – BAG #11
- Number of Bags: 3
- Build Time: 65 minutes (1 hour 5 minutes)
- What Is Built: The top left and right central panels of the ship.

This was one of the fastest sections to build since much of the panels mirrored the underside of the ship. The top side panels do contain a bit more detail work, but the overall structure is similar and is built quicker.
LEGO STAR WARS UCS MILLENNIUM FALCON – BAG #12
- Number of Bags: 4
- Build Time: 141 minutes (2 hours 21 minutes)
- What Is Built: Three top panels.
- Minifigs Included: Finn, and BB-8.
This phase has a couple of interesting details. First, the two side panels are guided in with loose axles on hinges. These panels are resting with the barest hint of guidance from these hinged axles. Additionally, one of the side panels has a whole section that is loosely held in place with half-pin half-axles stuck into some pinholes. I later found out this was to make it easier to get to the play area of the ship. However, while building, this very wobbly setup can get a little irritating. On the bright side, there are some massive circular vents on all the panels. By utilizing the new large quarter-circle tiles and a mess of grill plates, these are some very cool vents. Also, it is interesting to make some odd holes in the side panels. This is in order to frame some detail work done way back when we were still adding to the superstructure. Lastly, I put Finn in the gunner chair since I liked that spot in the movie.
LEGO STAR WARS UCS MILLENNIUM FALCON – BAG #13
- Number of Bags: 2
- Build Time: 89 minutes (1 hour 29 minutes)
- What Is Built: Two back top panels.

These two panels fill in the corners that were still missing. Both panels connect into the central middle panel. This helps keep the correct angle of the ship, but one side uses clips and bars while the other side uses ball-joints. Unlike the panel that uses axles to guide it, one of these panels only uses gravity and the shape of the piece itself to be held in place. It is interesting to see two different ways to do the same thing. Both the panel that is easily removed in the previous step and this new sit-in panel, allow access to the decorated engineering section. Design-wise, you could make both these panels as one piece, but that might ruin the shape of the ship. This is one of the first times I’ve seen the use of open cracks as a way for panels to flex and contour themselves around the shape designers wanted to achieve.
LEGO STAR WARS UCS MILLENNIUM FALCON – BAG #14
- Number of Bags: 2
- Build Time: 81 minutes (1 hour 21 minutes)
- What Is Built: Top panel for the front middle, which extends to the front left and front right.
This is probably the first and only time in the building process where it is just plain hard to see where a panel is supposed to attach. In the end, I figured out that it went on the hinged platform we made all the way back in the steps from bag #2. The oddest part of this section is how there is just a big open hole in front of the ship. The weird thing is that it doesn’t really distract the eye or anything, but if you look straight on at the ship, right between the two triangular wedges, there is just a rectangular hole. Even more bizarre is that the bottom panel has hinge tops attached close to the front, but nothing is attached to them. It’s the only part of the ship that feels just a little unfinished, however, I don’t find myself dwelling on it.
LEGO STAR WARS UCS MILLENNIUM FALCON – BAG #15
- Number of Bags: 3
- Build Time: 74 minutes (1 hour 14 minutes)
- What Is Built: Two round docking ports on the left and right, as well as top paneling for the front right decorated interior room.
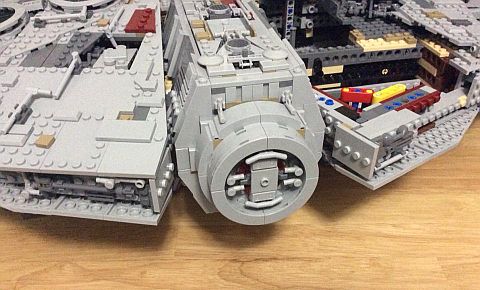
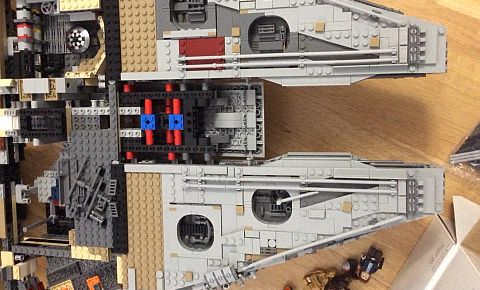
Building the docking ports was probably the first time I felt I was just using standard LEGO building techniques. The rest of the ship is filled with LEGO Technic elements just for stability and added strength – both necessary to hold the model together. However, building with the two systems throughout the process, and then only working with one, is an odd sensation. I guess, the best way I can explain it, is that it felt like nostalgia. Kind of like taking a break from the challenging 16+ skill-level, and dropping back to a less challenging build.
LEGO STAR WARS UCS MILLENNIUM FALCON – BAG #16
- Number of Bags: 4
- Build Time: 130 minutes (2 hours 10 minutes)
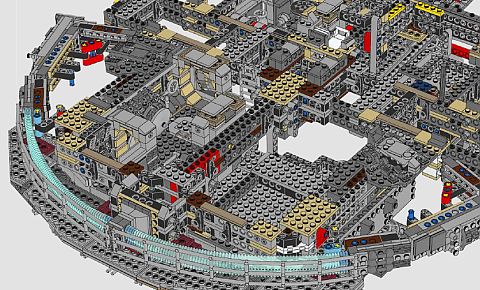
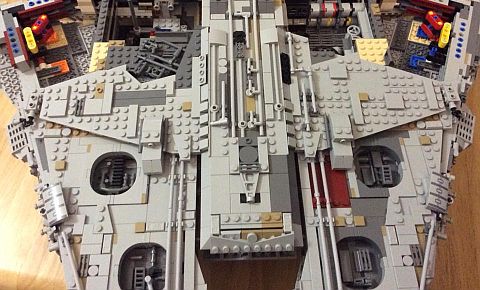
- What Is Built: Cockpit and paneling that looks like a tubular hallway.
- Minifigs Included: Old Han Solo, and Rey.

The most surprising thing I found in this phase is how it uses a secondary strut as a place to rest and guide the rounded hallway. During the building of the cockpit, an arm attaches into the ship’s superstructure, then, a thin hinge-arm is added for extra support. The top of this arm is tiled with a single slope. Construction-wise, this additional thin arm is a sound technique, but when the hallway panel was rested on it, my mind was blown. Throw in some seamless-looking joints and this is easily one of my favorite parts of the model, with some of the best curving panel-work I’ve seen since building the #21309 LEGO Ideas NASA Apollo Saturn V set. Everything goes together in a very slick way.
LEGO STAR WARS UCS MILLENNIUM FALCON – BAG #17
- Number of Bags: 4
- Build Time: 110 minutes (1 hour 50 minutes)
- What Is Built: Triangular panels for either side of the tube shaft, the top round panel for the middle of the ship, the two options for dishes to go on the right side of the ship, and a small display plaque.
- Characters Included: a Mynock.

Just like the central under-panel, the top round section is an interesting double layer of slopes and arches. Unlike the bottom, however, this only has two lift-arms, which slide in place and don’t fully snap on to anything. As for the dishes, they can be a little tricky to center on the large turntable, but each looks really nice. At this point, I was just happy everything seemed to fit right. And then, I decided it was time to add some figures, only to find out it was a headache. Even though there are dedicated openings in the ship, that doesn’t mean your hand will fit in. I also found the curved bench seat in the recreation area a terrible place for minifigures. The backs of those seats can easily fall off, and they’re a pain to put back on. Plus, I almost lost Rey’s hair when it fell off and dropped inside the ship. After removing some large sections, my wife managed to retrieve the hair with a special grabbing tool and lots of luck. This is why I said earlier that my advice is to add minifigs while you are building the ship.
LEGO STAR WARS UCS FALCON – FINAL THOUGHTS
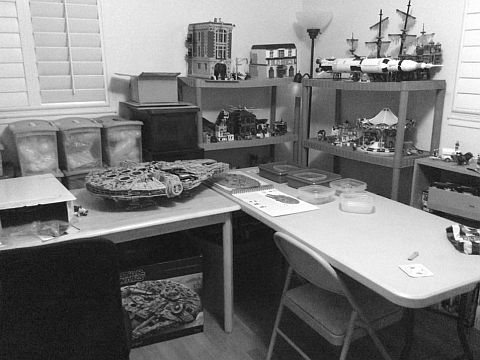
I know that some people build much faster than I do, and others build much slower. So, I simply cut out the time it took for me to sort the pieces, and figured that gives a reasonable average building time for this model. So, the grand total for just building time was 1,765 minutes (1 day 5 hours 25 minutes). Since most people can’t go that long building straight, I suggest setting up two tables to build on. In this way, my wife and I put the model together over 7 weeks, with building sessions lasting between half an hour and two hours. Now if that sounds exciting to you, I suggest saving up, since this is one set that will break the bank and most flimsy tables…
I will be writing more about the Falcon covering interesting building techniques and other aspects of the set, but first I wanted to share this basic overview of the building process. I hope it gives you a glimpse of what to expect. While the set still shows as out of stock, hopefully, LEGO will be able to make more before the holidays. You can check the status at the LEGO Star Wars section of the Online LEGO Shop.

What do you think? Are you excited about the re-release of the Falcon? Do you have it already, or are you planning to get it? If you do have it, are there any other pointers you would like to discuss the building process? Feel free to share your thoughts and own review in the comment section below so we can further discuss this monster!
And you might also like to check out the following related posts:


Holy cow… And they say money can’t buy happiness.
Only rich people say that who forgot (or never experienced) being poor. While money can’t make someone happy, it can certainly help to alleviate anxiety over basic survival, and thus leave more opportunities for contentment and happiness. 🙂
Adding to this comment, I think what most people miss is the ability to appreciate what you have. Sure the reduction of stress and anxiety helps, but if money holds no barrier it can mean a diminished sense of value.
With that said, if one is inclined to save up for this set, you will definitely get your moneys worth out of it.
Man, this took a very philosophical turn. I agree though.
Yeah, up to a point. If you have a steady income enough to avoid serious economic concerns, you could double or triple your income without any particular impact on your general happiness.
Yes, that’s a perfect way to put it. 🙂
Just, wow! Building this is a massive undertaking! I like how you broke up the process by bags. Makes it more digestible. But still, I don’t know if I would want to build something that takes up so much time. Where are you going to put it?
So I have a LEGO room in my house and a table that I usually build on. That table is now the dedicated spot for displaying the Falcon.
I can still build models in another room and then bring them in to the LEGO room for display purposes. Although, I’ll still need to figure something out when I do MOCs.
Will
So huge!!!!
Great review! It really got me in the mood of building the Falcon, even though I don’t have it. One day, maybe, one day……..
That’s pretty much my stance on the Falcon too. I enjoy reading reviews and appreciating it from a safe distance. No money or space for this monster. 😀
To bad it can’t Really fly. It would’ve been awesome. Don’t want it even if I had the money. It just takes up to much space. …….LEGO brings you happiness and it’s done it for years . If I’m not mistaken , isn’t that’s how it started. The family wanted something to make children happy during a war? ( it originally started to be wooden toys).
I don’t blame you. Even if you hang this from the ceiling you better make sure your hooks are in studs otherwise you might ruin your ceiling.
I did talk with one friend and he said there have been people you made a coffee table with a glass cover so that the old Millennium Falcon is incased and displayed in it. That’s probably the best way to deal with a set this size and still enjoy it in some way.
Still, given its price tag this is just one massive luxury item.
Yes, of course, LEGO is to make people happy. But that can mean different things to different people. Some people like building, some collecting, some like big sets, small sets, minifigs, building alone, building with friends… there are so many ways to enjoy this hobby. And yes, LEGO should have made the Falcon fly! 😀
I do want to add that this set was a very intense build. I even developed a pinched nerve in my left shoulder from the repeated motion of building and being slightly hunched over.
It’s not hard to imagine others suffering similarly when they build such a large set.
I do have a friend who has a Twitch channel who plans to build this set in a single day. However, he has to get the set first. He’ll be doing it at the same time as another channel on Twitch also builds this set. Perhaps as that date gets close I can write something up to give you all a realtime experience in what this set takes to be built!
Will
Boy, your friend better fuel up on caffeine before attempting such a building marathon! 😀
Hey Will, long time no hear. As for your comment earlier , I am trying the ” appreciate what you have” concept for A while now. It’s hard , because I relied on Lego as my happiness and kind of a loneliness hobby. As you know I stopped going to the Brick builders meetings for A while now. I moved a year a go ( in. the Carmichael area) and it’s harder for me to get to the meetings . So, that’s why I call it my loneliness hobby . The people I can talk to about it is here , the Lego store and sometimes the Five star bricks store. On a happier note, I have a large lego room now. It used to be a garage but was made into an extra room. So, also Focus on what I can afford and if Lego keeps getting more and more expensive I’m gonna have to quit collecting. So the “appreciate of what you have “would be a good thing to practice.
You guys know each other? Like from real life? I didn’t know that. 😀
A Couple of years a go. I originally lived in West Sarcramento and I remember meeting Will . I don’t know if he remembers me . I wasn’t there very long . I do remember one of his creations it was a old west tavern out of a lot of brown bricks.
Well, that’s really cool! I will make sure he sees your comment. 🙂
When will the set go back on sale again? Been waiting a looooong time. 🙁
James, on the Ambassador Forum we were told that a new stock was ready at the beginning of November, however the priority is to fulfill previously placed orders. Whatever is leftover from that stock should be available for new sales both online and at LEGO stores. If there is no leftover, then we are going to have to wait more. Personally, I believe that we will probably not see a restock until January. I hope I’m wrong, but that’s my hunch.
It’s December now and I check daily. Nothing available… 🙁
James, there is hope though… Europe and Australia got a new stock, so hopefully we won’t be behind too much longer.
Thanks for this detailed review. It’s very helpfull during my own build, which I’m on right now. I just finished bag 11 and i noticed, that you probably swapped the top left and right central panels. Or maybe, my instruction is different at this poin. I think the one with red elements should be on the right side and I see yours on the left. 🙂
I will let William know, in case he doesn’t see your comment. 🙂
Great write up on this build. I have been procrastinating over this for a while for all the same reasons as most of us. The price is more daunting here in Oz… Like $1300 Au. Takes quite leap of faith to get past those numbers. Still, it must be done… Punch it Chewy..
Gosh, my heart goes out to you guys down there! The prices you have to pay for LEGO is crazy! Wishing you lots of fun with the Falcon! 😀
After reading this review, its made me want to build it now, just waiting for it to arrive so I can get stuck in 🙂
Have fun! 😀
Thanks, good news is that it has now arrived, downside is I have still got half a day at work to get through before getting stuck into it 🙁
Just bring it to work! I’m sure your boss would approve! 🙄
I’m doing the build alone and I’m stuck trying to mount the central turret underneath on phase 10.
Any advice is welcome. Trying to elevate with books right now.
Ian, I forwarded your question to William, he should be responding soon.
Nevermind. My solution worked!
2 volumes of encyclopedias under each back landing gear and the central landing gear gave me enough clearance to get that turret in.
Loving this build, but mounting the modules takes assistance and/or a steady hand.
That’s a great solution!
When I had to build that portion I did call in my wife to help. Honestly, it’s that initial feed of the long liftarms that’s the issue.
For another solution it is safe to hold the flat section of the four quadrants, which they don’t tell you until the end of the build. So it is possible to lay the turret down with liftarms up and pick up the model and try to thread them in.
But honestly the encyclopedia option sounds safer and easier if you don’t have another pair of hands. 😀
Honestly, that is the toughest part of the build to do on your own. There are a few tricky top panels to line up with axles and pins, but nothing you’d need another person for. Good luck!
Thanks for the response, Will. I’m taking the build slowly and savoring all of it. I’m on week 4 and I know I’ll be sad when I get to the mynock.
I’m one of those guys who was there in the theater on May 25, 1977.
Awww! It must be an amazing experience for you to build this set! 😀
I built my Falcon alone and I don’t remember how I mounted the turret in part 10! I loved your solution though! 😎
How does the part above the chess board attach (finished section in step 1134)? It just falls in, and I’m very careful to double check each assembled part? Please help!
Helen, I’m going to forward your question to William. Please stand by. 🙂
That completed panel does not attach to anything.
It’s one of the panels that is meant to be a way to access the interior of the ship.
There should be obvious ledges on the closer to the front, the interior, and maybe the exterior of the ship.
Between these ledges and the shape of the hole it should just rest in place.
The two back to back 1×2 panels on the top of this section are used as finger grips to grab the panel to move it around.
Unfortunately, for this model you’ll have a number of hull plates that will more or less rest in place and don’t have firm connections.
Another thing that sort of helps keep the panel in place is much later on you’ll attach one of two satelite dishes on the 4×4 round brick next to it. The overlap of the dish will sort of help keep this panel in place.
But to state again, there is no solid connection for that panel.
Thanks very much, hopefully the satellite dish will keep it in place. I was expecting some way of it balancing it or attaching, and the though that I’d done something wrong early in the build was a bit worrying to say the least! Thanks again, I am very grateful for your help.
Step 1269 – can you help ? I have rechecked construction of the panel up to step 1268 and it is correct, but I cannot get that panel to sit flush when I place it on the Falcon. I assume that the yellow pin should slide down the black hole but then the hint hits …
Damn autocorrect! Hint= hinge
So, the triangular panels on this model are probably the least fun thing about the set.
Yes, the Technic axle does need to slide into the hole. This is meant to roughly keep it in position. Thing is none of these triangular panels really sit flush with the model. They are there to aproximate these odd slants.
I kept having the issue of the hinges folding up on me and not even getting into the hole.
So you are not building it wrong. This is just the case where they did not make the panel to be exact.
The only advice I can give is once it is in place you can try swiveling it around a little. One to make sure it is in the hole and two, to see if there is an angle you prefer.
Eachtime I messed with the ship I always found myself messing with that exact panel.
And if you are certain the underside of the panel is built correctly then be assured you aren’t missing anything
I found I felt a little better about it once I had all thepanels attached since each of them have their own issues, but because of that they kind of balance everything out.
So just to be clear.
Nothing will snap or click into place. It won’t sit perfectly flat, it will feel a little unfinished. Sadly, htat is the right way to build it.
I also felt weird about the front of the ship too. The middle front of the ship has you add hinge tops. Then you never attach anything to them. I think they had it as a small bit of detail work, but it feels super odd from a build stand point.
I think it has to do with how they had to break up the panels. It is the least structurally sound thing in the entire model.
For bag #14 where the central part of the ship is attached, is it only supposed to attach to the hinged part that is made in the very beginning? I felt it was a little odd but I presume it can’t attach itself to the mandibles so the extended parts that come from the center don’t really attach to anything?
I finally bought a house with enough space to have a designated office and one of the first things I wanted to decorate the space was this ship.
I’ve been building this for about a week now, but with a baby and the animals it’s quite difficult to complete an entire phase in one evening. On the flipside though, it’s so refreshing to have something on my mind that isn’t about work and all the other things going on – As an engineer myself, during the day I end up thinking about how incredibly well designed the structure is and how creatively they engineered the unit as a whole. It’s been probably 15 years since I’ve assembled a Lego kit and it’s just so different: things are substantially more complex and detail dependent than when I was a kid.
The structure was a bit challenging but with each phase I seem to get better at building and my organization / brick finding skills become more refined. It’s very cool to observe myself getting back into the “groove” of lego building.
One thing I find quite impressive is the fact that section builds are detailed but appear to be more approximate when you go to snap the section into the bigger picture, but once you do, it really makes you respect much effort it took for the designer to design this, work in the parts then go back and make sure things fit well, look perfect, but also contribute to the soundness of the structure.
Something else that’s interesting is to build something like this from a documentation perspective and ensuring that the person assembling the kit can assemble the kit without having a reasonable amount of frustration or confusion.
The whole execution from a production standpoint is just baffling. Mad respect to Lego for making something so well designed and accurate but also buildable.
great article… can i suggest now being as we’re a fair point into the 21st century…. that you can get cameras now that have a greater than 480 pixel horizontal resolution
I loved this article. You had some of the exact same concerns I had during my build. I’ve been in love with the Falcon since May 25, 1977. I had put off buying the UCS Lego Falcon because of cost and inability to display it. Those problems were solved this year, and my Falcon now docks above my fireplace. It took me 44.5h, but I’m a slow builder. There were moments when I was putting it together when I was overwhelmed with joy. I also took some time to make mini video fly-bys of the build in progress. 😂 I also had John Williams’ scores playing the whole time. It was such a rewarding process.
One thing I wish they had done was put a hinge on the cockpit so you could add or remove minifigs easier. I also wish the instruction manual told you where you could safely press to attach certain parts. I had some difficulty attaching some sections because I was pressing against the wrong areas.
I’m really glad I found this article. Thanks for posting it!
Nice post! Has anyone found a resource that shows what pieces are in which bags? I have finished building mine the second time and have extra pieces that I missed and not sure where they go obviously.
Got my Falcon done these days, and already mounted on the wall. Looks so so so great.
But what I’m wondering, is there a proper way to secure all the top loose panels as the Falcon is mounted that way that they appear to fall off.
Do you have any solution how to fix them properly on the body? Appreciate that.
Incredible build and I love the way you went over each bag assembly. I was wondering if you had an inventory of each bag content? I had to disassemble mine and I am about to built it again. This time my two boys want to help and it would be cool if they could do it bag by bag instead of just searching forever of parts.
Don, unfortunately, we don’t have a bag-by-bag breakdown of parts. That would be a huge undertaking, especially for such a large set. But it is a great idea!
This is by far the best guide I’ve found to help with my build, I’ve just finished everything from bags 4 but I have a small amount of extra parts, is this normal??
Geoff, yes, it is normal to have extra parts. LEGO always adds a few of the smallest parts for each set of bags in case they get lost or misplaced. Have fun building!
Just finished the Falcon build, this is the first Lego I’ve built since a child so it was a challenge, the instructions are great and this blog helped a lot. It is expensive but absolutely worth every penny, the detail in it is amazing and it’s huge, gonna get a coffee table made to display it in. Next up I’ll be buying the AT-AT
Geoff, it’s great to hear you had an awesome time with the set! It looks like you got the LEGO Star Wars bug! Have fun with the AT-AT and your display table! 🙂
I just finished the build in about 42 hours spread out over about 7 days. I wish I’d found this page before I started because a few times I was convinced I was missing pieces, only to realise I didn’t have all the bags I needed. Sifting through the box for the bags could be a pain. I only had two meltdowns during the build where I was convinced I’d ruined it but thankfully my wife calmed me down, got me to take a break and revisit it at a later date. Easily the most challenging build I’ve made and I can’t stop admiring it.