

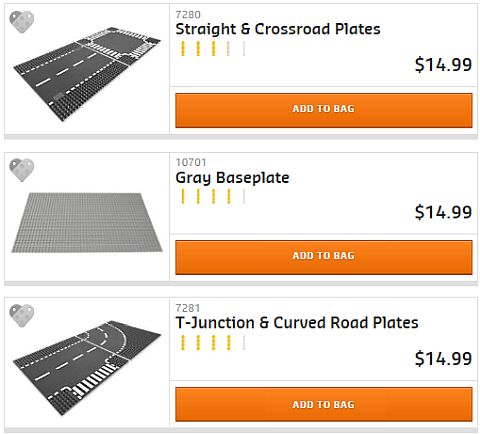
If you like building LEGO cities, you know that roads have great importance. They provide a solid surface for your buildings and vehicles, and they also make your city feel more tied together and realistic. LEGO offers a selection of thin baseplate road-plates with straight sections, 90-degree curved sections, T-intersections, and crossroads. These are quite suitable for a basic LEGO city, however if the road-plates don’t work with the layout you have in mind, or you want to build more complex roads, you will need to build them with standard LEGO pieces. Most LEGO fans who want to upgrade from basic road-plates will use sideways building techniques with LEGO bricks and plates to create straight road sections. This allows building the road as wide or as narrow as necessary, add white and yellow lines, crosswalks, sidewalks, etc. just where you need them, and you can also choose the color of your roads based on the kind of look you want to achieve. 🙂
Building straight roads with sideways building techniques is easy; you just stack up bricks and plates laying on their sides, incorporate the various white and yellow lines using one stud wide plates, and your road is ready for all the LEGO city traffic. You can even incorporate T-intersections and crossroads quite easily. But what about curves? How do you build curved roads with rectangular LEGO bricks? That is a difficult challenge LEGO fans will usually avoid by simply using straight brick-built road sections, or incorporate a standard LEGO road-plate wherever needed.
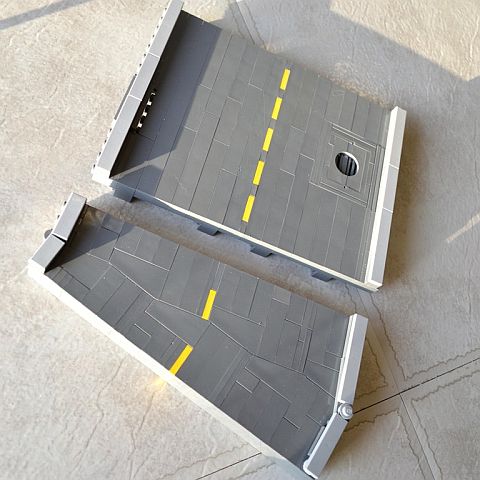
LEGO fan Mr_Studs loves playing with LEGO geometry and trying to figure out all of the hidden secrets of how LEGO pieces fit together. He recently challenged himself to come up with a curved road section using standard LEGO pieces. Playing around with LEGO bricks, plates, and slopes, he was able to build a road section curving to the left at a 16-degree angle (first image above). Notice the jagged edge where the slopes come together. That’s art and science impressively combined! In the video below, Mr_Studs will explain how the curved road was built.
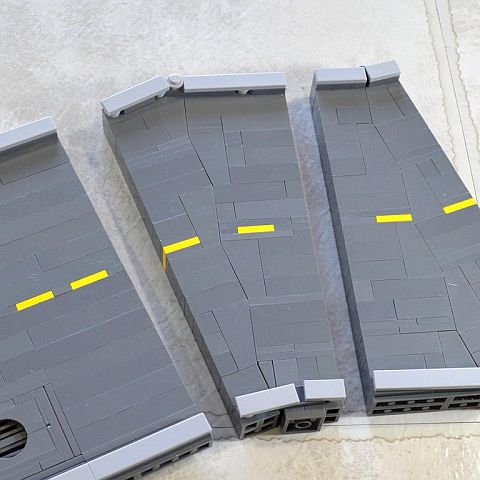
The curved road section is designed to be modular, so straight sections and other curved sections can be added next to it to build a longer road. But what about if you want to curve the road to the right? You would think that you could just flip around the left curved section, however, this would mean that the studs at the edge won’t be on the same side (meaning, the road sections can’t lock together). In addition, the yellow lines on the road don’t line up properly due to the geometry of LEGO elements. To build a right curve that lines up with the straight section and the left curve section properly, Mr_Studs had to rebuild the right curve using inverted slopes instead of regular slopes. However, because there is a very slight difference between the geometry of regular slopes and inverted slopes, the entire right curve road section had to be designed differently. In the video below, Mr_Studs will talk about the challenges he ran into building a right curve, and how he handled them (also, see second image above).
Besides all the wizardry things Mr_Studs has done to build a left and right curve to the road, you might notice that there is also some very intricate building going on around the sewer drain on the straight road section, which is another very nice build. In the following video, Mr_Studs explains how the drain was built and incorporated into the road.
Being able to build curved road sections with sideways building techniques opens up a lot of possibilities for those who prefer to build their own roads instead of using LEGO road-plates. Mr_Studs plans to work on the system some more to come up with the best way to put together a 90-degree turn as well, so stay tuned for further videos. I also recommend checking out Mr_Studs’ YouTube channel, as he shares many more interesting building tips and techniques.
What do you think? Do you like using LEGO road-plates, or prefer to build your own roads? What is your preferred technique for road-building? And what do you think of the curved road techniques discussed here? Feel free to share your thoughts and discuss in the comment section below! 😉
And you might also like to check out the following related posts:


Right now I’m partial to the Lego street plates, but they do have their limitations. In this case the city worker replacing the light has to park on the sidewalk to get the work done. Eventually I’d like to expand my city with two lanes going one way and a second half of the street on the other side of the elevated train track. https://robbhunter.deviantart.com/art/Lego-street-741139690
Impressive city! Service vehicles often do their job on the sidewalk so your display is fine. Do you have more pictures?
Thanks! I have several on my deviant art account, but here is a direct link:
https://robbhunter.deviantart.com/art/Lego-City-2-0-East-View-697283262
Ahhh, you put it under the ceiling! Nice! I always liked those displays! 😀
Thanks! I personally like how the texture on the ceiling looks like ripply white clouds. The only snag with my set-up was that I based the position of the shelf on the Emporium making the assumption it would be about as high as the buildings would go. Then came long the Town Hall… hence why the bell tower is missing. It’s sitting on the shelf off to the side.
Hm… yeah, the Town Hall got an unusually high tower. But I think it’s cool how you have it. The top of the tower is covered by the ceiling clouds, which is totally reasonable. 😉
Those curved road pieces are crazy impressive. And it’s even more impressive that it had to be done twice.
Thanks! The right hand is not as clean as the left so I am planning on revisiting that one and fixing up the design.
This is like a complex Lego mosaic. And building this way also makes the roads more realistic. I would add some potholes too. LOL. Very parts intensive technique though.
Yes, some potholes would be great. They seem to be easy enough to do. 😀
Yup, pot holes are easy enough. A few people have also asked for variants in road types, which I plan on work on.
While I appreciate the effort that went into this, I’m on a budget and rather spend money on making cars and buildings rather than the road. But seeing how the geometry works is very interesting.
Oh, yes, regular road plates would be find for most of us. However, if your display has an unusual layout, then brick-built roads are the next level. And yes, they do require a hefty investment of time and money.
So the reason the curved road had to be rebuilt instead of turned around is because of the studs on the sides? How about using clips to connect them? The two sides of a clip can be turned either way.
Give it a try and let me know how it turns out! The plates connect very firm, but if clips work better that maybe the way to go.
” Where we’re going, there are no roads”. Doc. Brown to Marty. My problem is that the base plate roads take up to much space .
Brick-built roads don’t really seem to take up less space, and the road plates are rather easy to store.
As for me, I’ve found a bunch of early cheap road plates on thrift stores and such, so if I find the time and space to build some city, I’d probably use those. (Gen1 is semi-compatible with Gen2 and Gen3, if you soften the edges.)
http://www.suave.net/~dave/images/tmp/road_plate_comp.png
Or, as I see it Gen1-Gen3 lasted from 1978 to 2001, and Gen4 and Gen5 has lasted from 2002 to currently. (Some of these generations are mostly based on whether the base color is gray or green so they are sort of overlapping…
/H
I like those earlier plates with the green. I think they were really nice.
I classify them as “Gen3”, although I guess they kinda overlap with “Gen2” (and maybe even “Gen1”), to be honest…
To clarify my classification.
I classify the roadplates shown in the image as
Gen1 – Gen2 – Gen4
Gen3 – Gen5 – Gen1
Gen2 – Gen4 – Gen3
Wow! I am blown away! Thanks so much for the great write up! My whole mission is to inspire others to be more creative with their Lego, and you have definitely inspired me to keep doing so!
Sincerely Jason (Mr. Studs)
Hey, Jason, nice to have you over! I will be definitely keeping an eye on your channel. So many interesting techniques! Keep up the awesome work, and feel free to share your findings! 🙂
I will keep these videos for reference. I can see them being very useful for my future city. Roadplates work in standard straight roads, but when you need to do weird curves you have to build your own road. One question, do the lines on the custom road match up with the lines on roadplates?
Weird curves are pretty hard to construct as brick-built, as, well.
The original roads I made did line up with the road plates, you can see and earlier video here of how they work https://youtu.be/Yf62F8jalm4
Actually this project started as a easy way to make brick built roads to replace road plates, then turned into making more detailed and interesting road sections.