

Those of you have been around here for a while know that I’m very fond of LEGO trees and treehouses, and wrote several articles on my favorite designs as well as sharing tutorials with various tree and treehouse building techniques. Thus, I was greatly elated when the #21318 LEGO Ideas Treehouse was announced (see: LEGO Ideas Treehouse Press-Release). I have spent the last three nights building the set, and below I will share my thoughts on it. So, let’s begin building this awesome treehouse!
➡ LEGO TREEHOUSE DESIGNERS: The person behind the original treehouse design is Kevin Freeser, a hairdresser and LEGO fan from France. Not just creative by profession, Kevin is an avid lover of design, architecture, and nature, all of which merges together in his awesome treehouse creation he submitted to LEGO Ideas back in October of 2017. The project achieved the required 10,000 supporters by mid-February of 2018 and was selected by LEGO to become an official set in October of 2018 – so just about a year from the original submission.
As I mentioned in yesterday’s press-release article, Kevin shared that the idea for building a LEGO treehouse emerged during spending a weekend with friends in Robinson Crusoé-style treehouses. This prompted me to look up “treehouse rental” in Google Images, and sure enough, I found many examples of treehouses similar to Kevin’s original submission and the final set design. I’m bringing this up because I read some criticism that the set is too cheerful and modern compared to the LEGO Ideas submission, which is darker and appears to be more survival-based. However, if you compare external and internal details, you will see that they are almost identical in the two models. It is mainly the colors and some accessories that differentiate them. In any case, I’m sure a Robinson Crusoé-type castaway would be very happy to live in either of the treehouses and so is a family who is just renting a treehouse experience through Airbnb.

The LEGO designer who picked up the original LEGO Ideas submission and adapted it to match the quality standards of the LEGO brand was Cesar Carvalhosa Soares. Cesar mostly works on LEGO Star Wars sets (you can see his portfolio here), but he shares that he loved treehouses ever since he was a kid, and he even had a couple of treehouse builds when he applied for a job at LEGO. He really rooted for Kevin’s treehouse project and was elated when it was chosen to be a set and he was given the opportunity to work on it. Kevin visited Cesar at LEGO’s HQ in Billund, Denmark, and they had a chance to collaborate closely on the project.

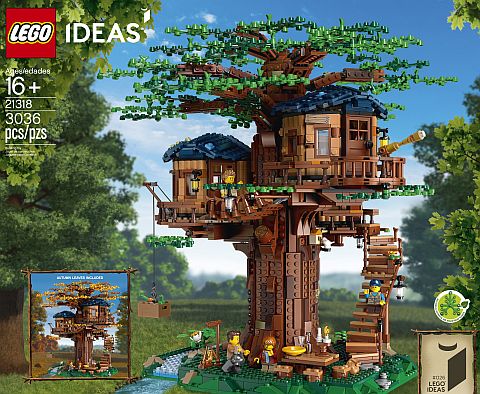
➡ LEGO TREEHOUSE PACKAGING: The #21318 LEGO Ideas Treehouse comes with 3,036 pieces, which means it requires a big box. The outer box is almost 23x19x5 inches, and there is also an inner, plain box inside, which contains half of the pieces (LEGO uses an inner box with large sets so they don’t shift around unevenly).
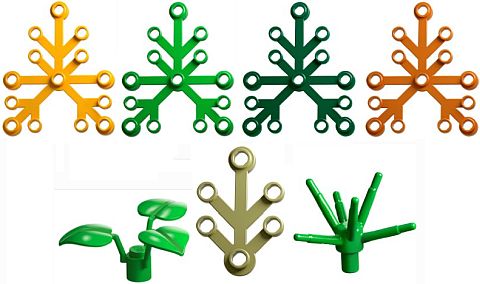
In the press-release, LEGO heavily emphasized that the set includes over 180 botanical elements made from plant-based polyethylene plastic using sustainably sourced sugarcane. They also emphasize this on the box with the Plants from Plants logo, and by showing how many of each botanical pieces are included in the set.

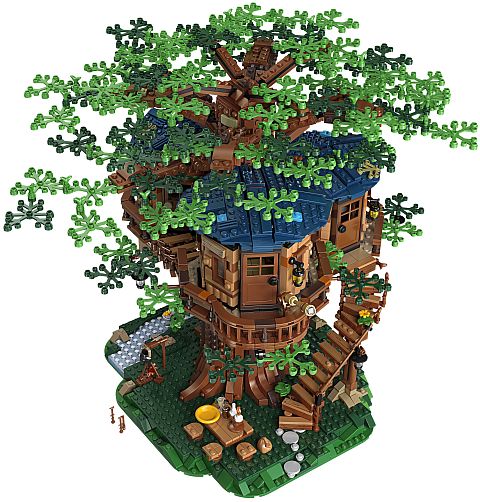
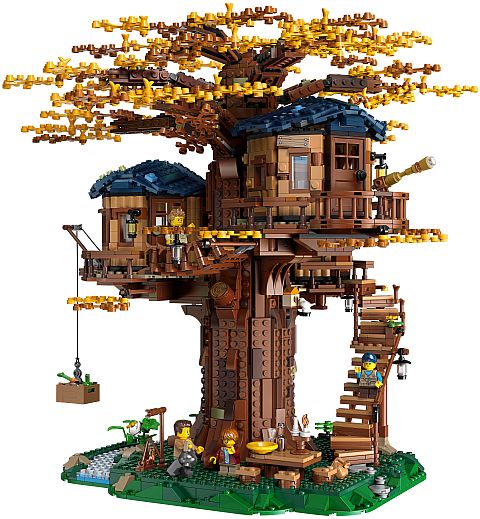
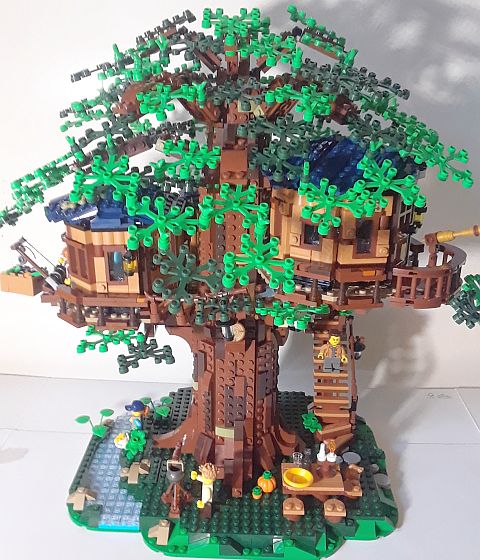
Interestingly the box image of the actual set itself doesn’t really showcase the beauty of the botanical pieces. In fact, the straight-on views of the treehouse – both at the front and back of the box – are not doing this set any favors. They make the tree look like a baobab with a thick trunk, and sparse, horizontally placed leaves. The actual treehouse is far more beautiful than what you see on the pictures with a stunning, large canopy.
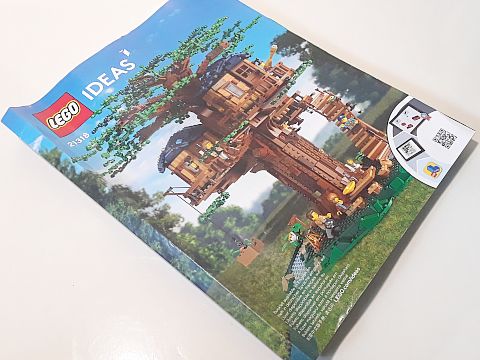
The instruction book is massive, with over 420 pages. It starts with some information about the Plants from Plants initiative, the fan designer, the LEGO designer, and then it’s time to build! There are 19 sets of baggies for the parts, as well as 5 baggies of each of the green foliage pieces and the orange foliage pieces (these are not numbered). I will walk you through the building process as I went through it while building the set.
➡ LEGO TREEHOUSE BAGS 1 & 2: The first two sets of baggies let you build the base of the massive treehouse. This begins by building a LEGO Technic frame, which is going to be very important in the structural integrity of the set (I will say this right now; the stability of this set is incredible). All the LEGO Technic stuff gets hidden with lovely landscaping built with mostly dark-green plates and green slopes, and a little stream made with dark-turquoise and clear elements. We will come back to the landscaping at the very end to add some additional vegetation and other details.
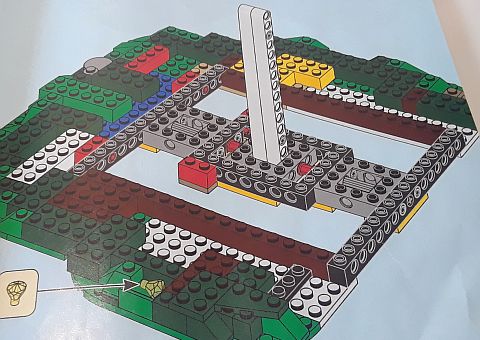
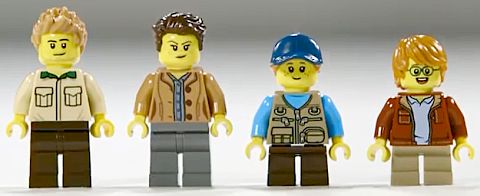
The base has a nicely rounded shape, but it’s not exactly symmetrical. It is 34×30 studs at its widest or about 10.5×9 inches. (Please note that the tree canopy is much larger. Depending on how you angle the branches, the entire tree can easily take up a 15x15x15 inch space.) Bag #1 also includes our first minifig; the dad figure. He comes with both a hairpiece and a hat.
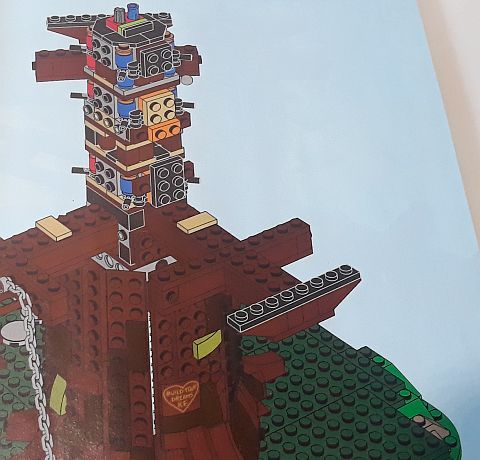
➡ LEGO TREEHOUSE BAGS 3 & 4: Now that the foundation is finished, we begin to build the first stage of the tree trunk. The pieces in bag #3 build a 4×4 stud core with studs and short bars facing to the sides. This is also the first time we get introduced to color-coding, which will be crucial during the construction of the set. With all the brown and dark-brown pieces going in every direction, it can be very hard to follow the instructions. Color-coding with bright pieces, like the red bricks in this step, makes it much easier to orient yourself amongst the maze of tree branches. From the pieces in bag #4, we cover up the core with brown and dark-brown pieces to create the bark of the tree. There is some nice shaping going on here with clever techniques to make the trunk round. The roots are also very nicely shaped. It is interesting to note that the roots are not attached to the dark-green base directly.

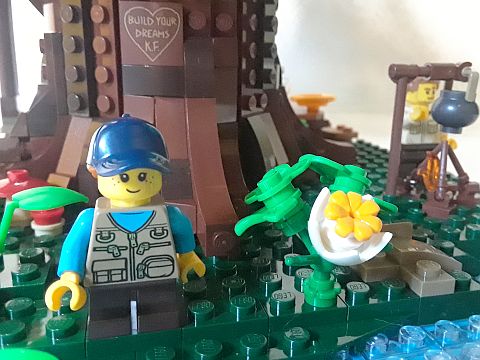
The entire first stage of the tree trunk slips over the shaft made with white LEGO Technic lift-arms and gets locked in with a LEGO Technic axle. The shaft is locked in both above and below the base, so it isn’t going anywhere. This is an incredibly strong construction. Bag #4 also includes a printed piece unique to this set; a 2×2 round slope with “Build Your Dreams” and Kevin Freeser’s initials in a carved heart. Lovely! And this is how far I went during the first building session. To this point everything went together very well, I was very impressed by the stability of the set, and was never bored or frustrated during building. And I was curious about what comes next…
➡ LEGO IDEAS TREEHOUSE BAG 5 & 6: Bag #5 contains pieces for building three big tree limbs (that will later support the treehouse rooms), the swing, and the second stage of the tree trunk. I was very curious to see how the first and second stages of the tree trunk get locked together. It mainly involves sideways building techniques with plates from all sides. The two lower branches also create extra surface to make sure everything gets locked together for maximum stability. (The third brick branch will be added further up at corner angle). Then, it’s time to build the second tree trunk core. Here, again, we are dealing with a 4×4 construction that uses color-coding to help you orient yourself when you will cover the core with tree bark and other details.
The pieces in bag #6 cover the second stage of the core with tree bark. Even with the red and blue 1×1 round bricks to help with orientation, I found this stage of the building process quite challenging. You really have to pay attention to where things go, as we are dealing with eight different angles (four sides and four corners). If you ever get lost, go back to orienting yourself with the bright colors, and the tree’s features (like the location of the swing, the printed 2×2 slope, and the printed 2×2 round tile). You also build a birdhouse during this stage with a cute little birdy, which also ends up being a good reference point for orientation.
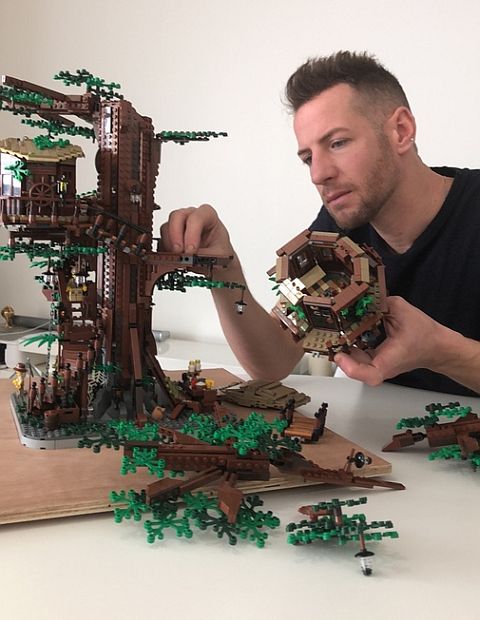
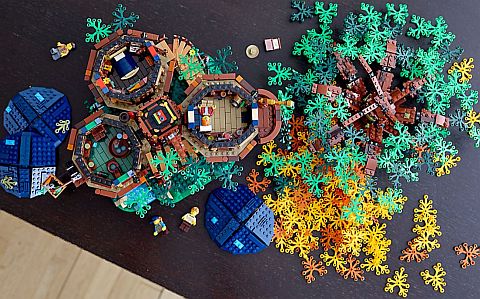
➡ LEGO IDEAS TREEHOUSE BAG 7-12: Now that we are done with the first two stages of the tree trunk (out of three stages in total), it’s time to build the treehouse rooms! It’s worth noting that the treehouse rooms can be built separately, as their attachment to the tree branches is very simple. In fact, up to five people could work on this set at the same time; one building the tree trunk, three people building the three rooms, and one person the branches with the canopy (these are attached to the trunk with simple ratcheted clips).
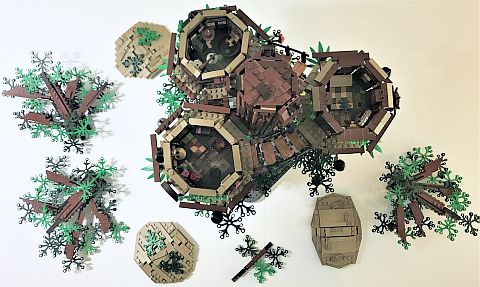
The three rooms are arranged in an upward spiraling fashion. They are all built using the same basic patterns and techniques on 14×14 stud octagonal platforms, with the walls held together with hinge plates. The details in the rooms are lovely and very clever. There are so many delightful little builds!
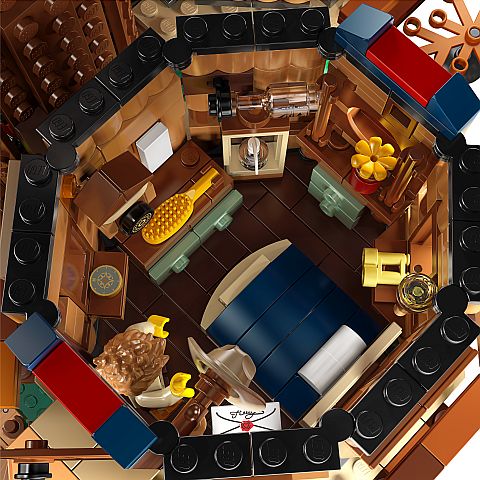
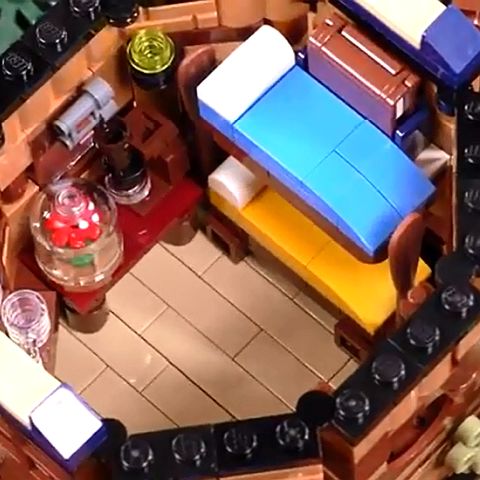
The first room is the parent’s bedroom, which you build from bags #7 and #8. It has a double bed (technically can’t really fit two minifigs), a dresser and some other accessories. I especially like the cuckoo clock, the ship-in-the-bottle display, and how the round window comes together with upside-down building techniques. There is also a shiny silver 1×2 tile that serves as a mirror. Oh, and there are a pair of scissors hiding under the bed – a reference to the original designer’s job as a hairdresser. Once you finished building, you simply fit the groove at the bottom of the structure to the lowest tree branch and attach the studs. We also encounter the second minifig of the set; the mom. She comes with a double-sided head with two facial expressions (winking and a smirk). I took a break here and continued the following day.

Pieces from bags #9 and #10 build the bathroom. This is another nicely detailed area with a sink, shower, toilet, and bathroom cabinets. I’m not entirely sure how the plumbing works, but maybe it’s best not to ask too many questions. The toilet paper is dark-green. Maybe made of leaves? Outside the bathroom, there is a winch for hauling up supplies. And you also build a rickety-looking bridge between the bathroom and the kids’ room, which is actually very sturdy.
The third and final room is the kids’ room, built from bags #11 and #12. This room lies highest up on the tree trunk and even includes a balcony. The inside of the room is filled with fantastic little details, including a bunk bed, a microscope, a micro-scale medieval house toy, a treasure map that may or may not lead to real treasure, and another round window built with upside-down techniques. And we also get the little girl, the third minifig in the set.
➡ LEGO IDEAS TREE HOUSE BAG 13: This bag includes the pieces for all three roofs. They achieve their slightly rounded shape by using LEGO Mixels joints and dark-red shields with studs. The three roofs are slightly different, thus they are color-coded (red, green, and tan) that matches the color-codes on the top layer of the rooms.
Here is a tip for attaching the roofs that I learned from personal experience. Instead of curving them before attaching them to the rooms as it shows in the instructions, keep them as flat as possible, and once they are attached to the top of the rooms, slightly cup them with your hand to mould them into the right shape. This will make them fit significantly better.
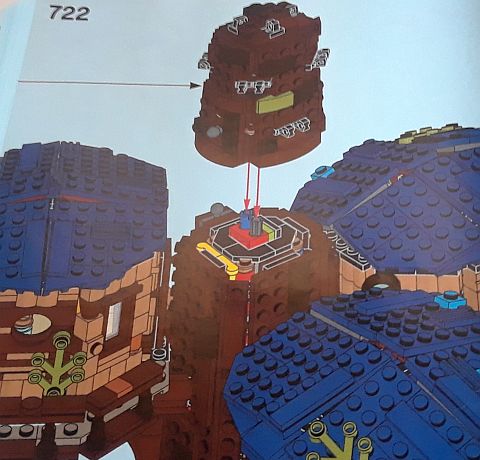
➡ LEGO IDEAS TREEHOUSE 14-16: Bag #14 is for constructing the third and final stage of the tree trunk. While the previous tree trunk sections got locked together and are solidly rooted to the base like a proper tree, the third stage remains removable and is only attached with a LEGO Technic pin and a short LEGO Technic axle. This allows the entire tree canopy to be removable and provide better access to the three rooms. Frankly, I don’t think I will ever use this feature, as it is easy to just fold the tree branches out of the way if I want more access to the rooms. It’s still a nice feature to have and could be useful for people with bigger hands.

The third stage of the tree trunk is also based on a 4×4 core but with the addition of a turntable to offer more angles for attached branches. As we have seen before, color-coding is used to help you orient the bark covering in the correct way and also to help orient the third stage to the rest of the tree trunk.
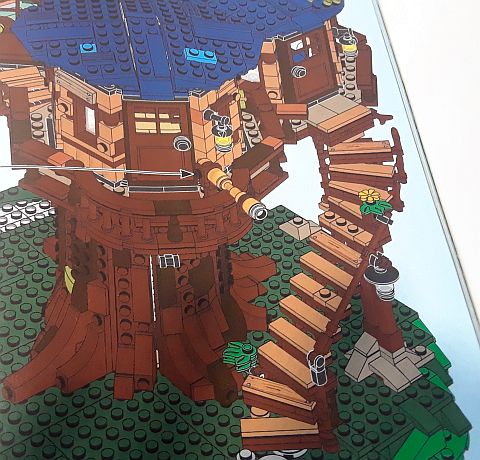
Bag #15 adds the steps that lead to the parent’s room. This is a very nice and sturdy construction as well. A detail of the treehouse that I found funny is that the parents have no easy access to the kids’ room. The parents’ and the kids’ rooms sit the furthest apart from each other, and there is no bridge between them. The parents have easy access from the ground to their room via the steps. They also have fairly easy access to the bathroom next door via a skip and a jump (although I wouldn’t recommend them trying this at night). However, to make it to the kids’ room, they would have to to keep going past the bathroom, through the bridge to finally reach the kids. Hm… I wonder who designed this treehouse.

Pieces for the final landscaping steps are found in bag #16. And we also get our final minifig, the little boy. Some things to build here is the telescope that goes to the balcony of the kids’ room, the picnic table with seating and accessories, the campfire (clever build!), the mushrooms, the big blooming flower near the creek, and the crate to haul stuff up to the rooms via the winch. There are many lovely details here that are a pleasure to build.
➡ LEGO IDEAS TREEHOUSE BAGS 17-19: These three bags work together with the unnumbered bags containing the botanical elements. The numbered bags contain pieces to build the branches, and there are two sets of unnumbered bags; one for the spring version of the tree, and the other for the autumn version. The conversion from spring to autumn is quite straightforward, and you can pick to work with either or change them later. There are 55 light-green and 55 light-orange lief pieces, and 35 dark-green and 35 dark-orange lief pieces. So, you are basically just swapping out light-green to light-orange, and dark-green to dark-orange if you want to have an autumn tree. There are also matching short bars (also called carrot tops) for each set of leaves (light-green or light-orange) in the unnumbered bags. These are used to lock the leaves together.
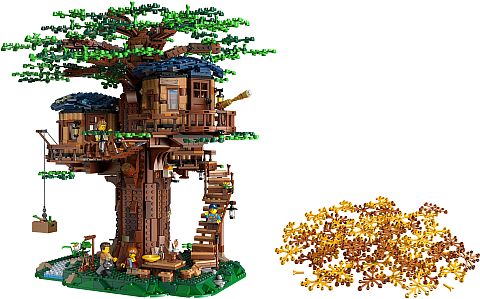
There are seven big branches that are all built in the same way except for some minor cosmetic differences. They all have two sets of ratcheting hinges as well as a set of leaves attached to them. They lock to the tree trunk via the hinges quite easily and can be positioned in various ways. There are also four small branches with leaves that attach to the top of the tree. In addition, there are a couple of extra branches with leaves that fill up some empty spaces, but basically the entire tree canopy is attached to the removable top level of the tree trunk. The rest of the leaves are attached with simple clips and bars as small details at lower levels. From the 90 large leaf pieces in the green batch, 88 are used in the set. I just added the extra two in some random places.
➡ LEGO IDEAS TREEHOUSE CANOPY: I would like to dedicate a separate section of working with the tree canopy, as you can do a lot with it to drastically change the look of your tree. The feature that LEGO advertises is that you can replace the leaves from spring to autumn colors. This can be done fairly easily, especially if you preassemble the leaf connections. All you have to do is pry out the leaves from between the plates of the branches and replace them with the other set of leaves in the same configuration. You could do this by removing the branches from the tree, but frankly, I found it easier to just do it on the tree itself.

An unadvertised feature of the tree is that the branches are movable due to the ratcheting hinges. As I mentioned at the beginning of this review, in almost all the pictures of the advertising materials the instructions, and the box, the tree is posed with the branches all horizontal. This makes the canopy look much smaller than it is except when viewed from above. By adjusting the angle of the branches, you can make a much fuller looking tree with a beautiful and very large crown. This makes the rooms more well hidden, but I think it also makes the tree and treehouse assembly better balanced. And, if you need access to the rooms, you can either remove the entire crown, or just adjust the angle of the branches. And, of course, if you like your leaves flat, or even facing upwards, you can do that too! Just adjust the branches and leaves. It’s that easy.
Also, don’t limit yourself to just spring and autumn leaves. Consider adding flowers, fruits, or both to the leaves to make the tree more colorful. There are also leaves in shades of pink and purple, which you can use for an enchanted tree, or white leaves (a little hard to find) for a snowy tree. You could also mix the spring and autumn colors for a tree that is just going through seasonal transitions. Something else you might think about is that the rooms are very easy to remove. This means that you can easily get back to an ordinary (but beautiful) tree that you can use in many other applications.
➡ LEGO IDEAS TREEHOUSE PARTS SELECTION: The colors in this set are lovely! We get pieces in six shades of brown to build the tree and the tree house rooms; tan, dark-tan, brown, dark-brown, nougat, and dark-orange. I think they come together beautifully, and although I liked the colors of the original LEGO Ideas submission, I like the final set even better. This set also contains the largest assembly of botanical elements in four different colors (plus a few extra botanical elements in olive-green). Light orange is a new color for the big leaves. The printed pieces are also very nice, especially the wooden planks (there are no stickers in this set). Personally, I would have liked to see a few more animals besides the one bird and one fish (dead or alive – you decide). A puppy for the kids to play with, some bunnies, more birds, and owl would have been nice. Or, go with a more spooky vibe with a spider web, rat, snake, and other creepy crawlies. But, this is a customization that can be done easily. Here is picture of the extra parts leftover after building the set.

➡ FINAL THOUGHTS ON THE LEGO IDEAS TREEHOUSE: I was a big fan of the original LEGO Ideas submission, but I like the final set even more. However, I wasn’t too sure about the small tree canopy shown on the pictures. It turns out that this tree actually has an amazingly large and lush canopy, but LEGO failed to feature it. Also, this tree looks good from every side, not just from one angle. You can look at it from any way, and it is full of delightful details. And, as I mentioned several times in this review, all parts of this tree are solid. You can pick up the entire thing without having to worry that pieces will fall off. There is also plenty of room to play around the tree, as well is in the treehouse rooms, and there are options for customization. The building experience was enjoyable, and the final set is both a beautiful display piece as well as fun play-set.
There are a couple of negatives I found that I will also include for the sake of completeness. One is that the small black clips are surprisingly loose. Only nine of them are included, they are not crucial to the set, plus they are easily replicable, but I was surprised to see this. I suspect that the mould is worn out. There is only one section of the set that has a tendency to fall off; the balcony railings around the tree house rooms. They are made of two dark-brown monoculars with a plate and some tiles over them. The monoculars are not that strong to grip the studs below them. Again, they are not crucial to the integrity of the set, and they are easy to put back, but I’m thinking to replace them with standard brown fence pieces.
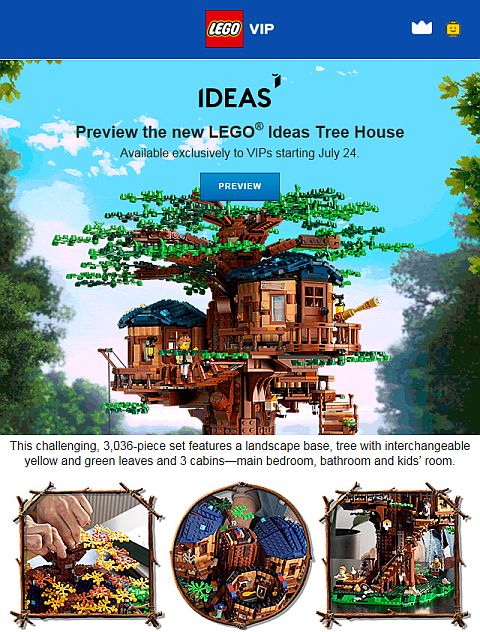
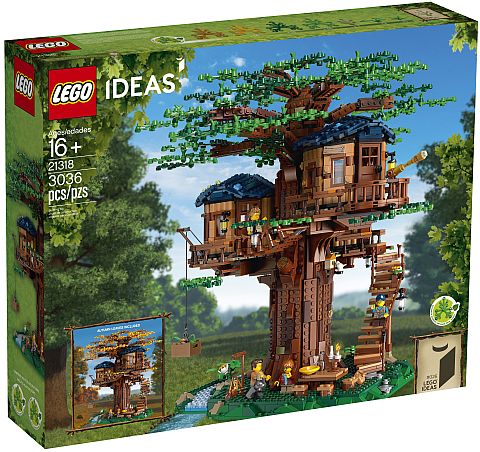
The #21318 LEGO Ideas Treehouse model is available directly from LEGO retail stores and the Online LEGO Shop exclusively for LEGO VIP members beginning today, July 24, with general public availability beginning August 1, 2019. Prices are as follows: US $199.99 – CA $269.99 – DE €199.99 – UK £179.99 FR – €199.99 – DK 1799.0DKK. For more details, and to purchase the set, visit the LEGO Ideas section of the Online LEGO Shop.

And you might also like to check out the following related posts:
- LEGO Ideas Treehouse Press-Release
- Custom LEGO Tree Houses & Tree House Sets
- Exclusive LEGO House Tree of Creativity Set
- The Expanding Color-Palette of LEGO Trees
- How to Make Beautiful LEGO Trees
- How to Build LEGO Trees – More Techniques
- How to Make a LEGO Flowering Tree – Tutorial
- Nature with Bricks: Beautiful LEGO Wild!
- Building with LEGO: Beautiful Landscaping


Amazing! Beautiful! Better than I thought! The leaves drooping makes it look so much nicer.
Look at all those extra parts! Is that normal to have so many? I like this set more and more. It sounds like a challenging build.
Not sure if they’re so many, proportionally. It is a very big set.
(Too big for my space and wallet, but it’s a pretty cool set, otherwise…)
I’m not sure if there’s that many, proportionally. It’s a very big set.
Dag in a broken bag… Took a long time for my prior post to appear so I posted it again after a while…
For some reason your original message went under moderation. Not sure why. Wordpress sometimes have its’ own mind. But I always approve posts as soon as I see them. So there is usually no need to repost. 🙂
Extra parts are by bag. So, as this set had so many bags, each had duplicates of the smallest parts. When you add them together, it ends up looking like a lot. 🙂
It reminds me of the Ewok Village and some of it had similar builds. Not as advanced by using the Technic pieces but, there are used in some parts of the Ewok village build. In fact , to have the top of the trees turn so to have access to their houses was an interesting concept. It was also a fun build.
15 by 15 by 15?? Man, that’s a big tree! I love that it comes with two sets of leaves. The only thing is that when you turn the leaves to fall colors, the ground is still going to be dark green. That’s a little weird. But I suppose those pieces can be changed out too.
The dark-green for the ground is actually a pretty neutral color because it’s so dark. You could, of course, cover it with some brown, or gray for bare ground, white for snow, or even with fallen leaves.
I’m so happy about this set. Thanks for the additional images. Now I just have to save up money for it. Wish me well. Are there any special promos coming that would be a good time to buy?
Thank you for the throughout review. I appreciate that it was done by the bags, so we can walk through the building process. Both the ideas project and the set are beautiful. I read other reviews too, and it seems that the feedback is universally positive.
Reviewing a set this big requires some structure. Doing it by the bag goes through the same flow of thought I went through while building it, so it comes naturally. I’m glad you enjoyed it. And yes, the set is well received from what I can tell.
This set is now on top of my wanted list. It’s simply beautiful. I liked the original, but this fresher, brighter design is growing on me. It’s possible that they went with these colors so as not to be too close to the colors of the Ewok Village.
That’s a good point. Yes, the original tree had similar colors to the Ewok Village. The brighter, friendlier colors also make this set more inviting. It could be placed in a LEGO city, or LEGO Friends’ Heartlake City, mix it with LEGO Elves, LEGO Lord of the Rings, or even Star Wars. It’s just a really good and versatile treehouse. 🙂
However just like the tree house , the Ewok Village leaves color can also be changed by using the extra Treehouse leaves.🤔
It appears that everyone is in love with this set. I like it too, but I think the rectangular windows make it look too modern. How hard would it be to have round windows all around?
You could always take out the glass from the windows to make them look less modern. The circular windows use some pretty advanced techniques, and it wouldn’t be possible to use them on every wall without sacrificing the stability of the rooms. I suppose you can also just take out the windows altogether and replace them with walls.
I just finished building this! Took me a long while between work and family and just other stuff going on. I LOVE this set. It has become my favorite all-time build. It is ingenuous the way everything comes together. I added some animals, frogs, bunny, eagle, owl, cats, and even a couple of spiders and snakes hiding in the tree. Took a few pics and sent it to some of the littles in the family as a seek n find game. They loved it!
Totally get your enthusiasm for this set! I enjoyed every minute building it! I also added all kinds of little animals to mine. Glad to hear that you had a good time, and even had a chance to share the fun with your family! 🙂
Great reading… Actually building the set right now…. Good tip on the canopy…. I was already thinking about modifications… As I am a bonsai hobbiest… I wanto add lots more leafes and maybe some extra branches… As I did on the Lego bonsai tree 😁
Thanks for the review I really enjoyed it
Regards
Ramon Smit
18 with 34 years of experience
Gouda, the Netherlands
Do you have a suggestion for a particular Lego fence I can order to replace the benches around the parent’s treehouse? As you noted, the benches fall off so easily. I became irritated with them and the benches now reside in a snack size baggie. This is my first Lego kit so I don’t have a stock of fence pieces laying around to substitute. Thank you for your excellent review. The bag by bag method was a great help.
Carolyn, I replaced all the fragile fences on my tree house with the standard spindled fences. They give almost the same visual effect. Please note that there is two version of this fence piece. The only difference between them is that one of them has four studs on top, and the other has two. Both of them come in brown, so you can get either. Hope this helps. 🙂
https://www.bricklink.com/v2/catalog/catalogitem.page?P=15332#T=C
https://www.bricklink.com/v2/catalog/catalogitem.page?P=30055#T=P
how big is the brickbuilt base footprint compared to a standard baseplate?
Ben, the base is 34 studs wide and 30 studs deep. So, it’s a little wider than a standard baseplate. However, because it’s just landscaping, you can definitely remove a couple of studs width if you would like to build the tree on a baseplate. 🙂