

(Written by William)
Being stuck at home has given me time to catch up on a bit of building. One series I picked up – more for the nostalgia factor – was the LEGO City Space Exploration line originally released in 2019. The collection features plenty of rockets and rovers that reminded me of the older LEGO Space sets. The main difference is that the new series is grounded slightly more in reality, which was fine with me.

Overall, the new LEGO Space Exploration sets aren’t complex to build. In fact, this is a big part of their charm. LEGO designers weren’t afraid to use chunky pieces to build up some of the sections. This gives the entire collection a durable feel that’s ready for play. And thanks to modern LEGO pieces, the sets don’t give up style for durability.

For me, building these sets was just fun building time. I didn’t plan to write up anything about the series, as I usually focus on more complex building techniques. But then, the last set I built, the #60228 LEGO Deep Space Rocket and Launch Control (see above), left me utterly surprised.
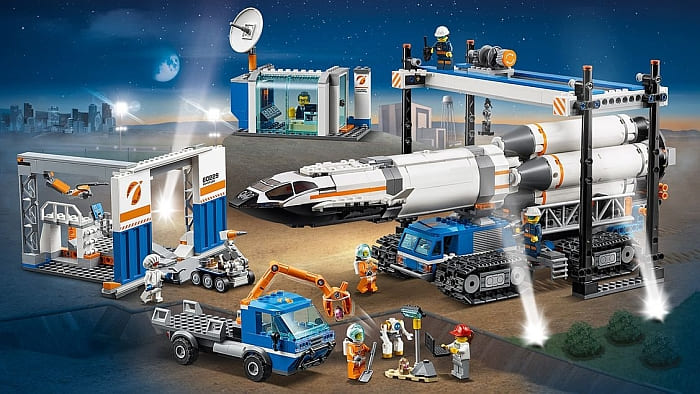
First of all, it was, by far, the most satisfying build out of all the sets in the collection. It even overshadowed the more expensive #60229 LEGO City Rocket Assembly & Transport (see above), in my opinion. It does this by staying simple, but packing in some very satisfying surprises along the way. So let’s strap in and launch into talking about the building techniques!
GUIDES AND CRADLES WITH LEGO
Sometimes, you may want to build a large object that is not attached securely to anything and removability is part of their play-feature. By building solidly, these objects can be roughly handled, so there’s no fear of them breaking. In the #60228 LEGO Deep Space Rocket and Launch Control set we have two good examples of this. The first is, of course, the rocket itself. It wouldn’t be very good if it got stuck to the launch pad and broke apart when you lifted it up. The second object is the large curved window section on the control tower. Having the windows in place looks good from the outside, but having the section removable makes play inside the building easier.
So, these are two sections that need to stay in place securely when not in use, but not too secure that they firmly attach to the rest of the model. To achieve this, we can use a couple of options; guides and cradles. (Why you would use one over the other has to do with what you want to accomplish.)

Guides, in their more basic forms, usually take the form of rails or poles. Their primary function is to guide whatever object they are interacting with in a certain direction. In the case of a pole design, increasing its length can provide additional stability. In this set, the rocket’s direction is up, so that works with the guide. But because the rocket is tall and narrow, it could use some additional stability. For this reason, LEGO created a brick-built shaft long enough to keep the rocket anchored in place. (Its curved tip makes seating the rocket easier.)
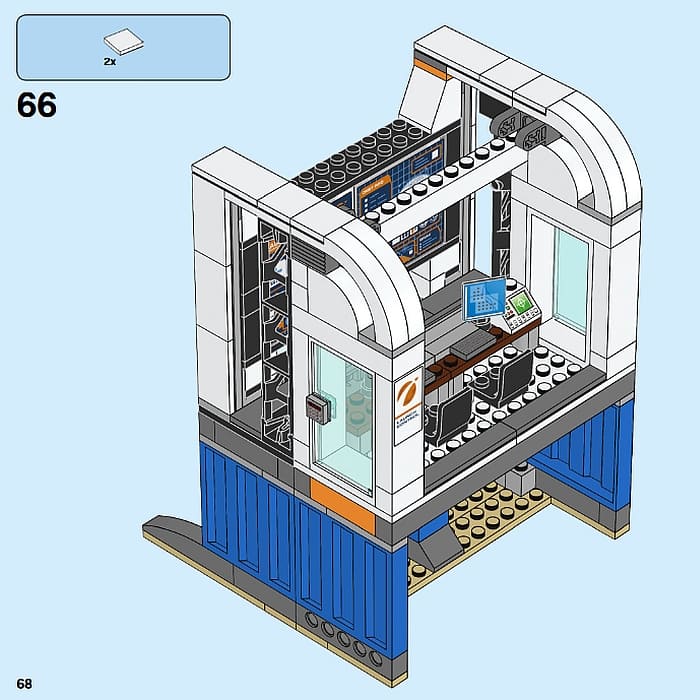

Cradles, on the other hand, are made for holding rounded objects. Any time you have a curved bottom section, they’re ideal. They are also not made for holding things upright. They typically let gravity hold sway, only preventing lateral slipping from whatever they are cradling. In this set, we have two modified Technic bricks that act as the cradle for the window. We rest some modified Technic plates with pin holds in these bricks. Since the window isn’t made to be balanced, it hangs down until it runs into something. That’s where the cleverness of the design comes in. At the base of the window are two modified plates with bars that provide a stop when they run into the building. What you end up with is a seamless panel that is devilishly easy to take off and put back on.
INCREMENTAL MOTION WITH LEGO
Remember how I mentioned this set had some surprises? Well, the best one is in the large monitors of the control tower. You start by brick-building walls with glass panels and placing stickers on the panels. The stickers have a number of see-through areas, which is what makes the next feature possible. On one half, you’ll place a round disc with its own sticker and by turning a knob you can simulate a satellite orbiting. This is a quick and easy way to make a masking effect that looks impressive.
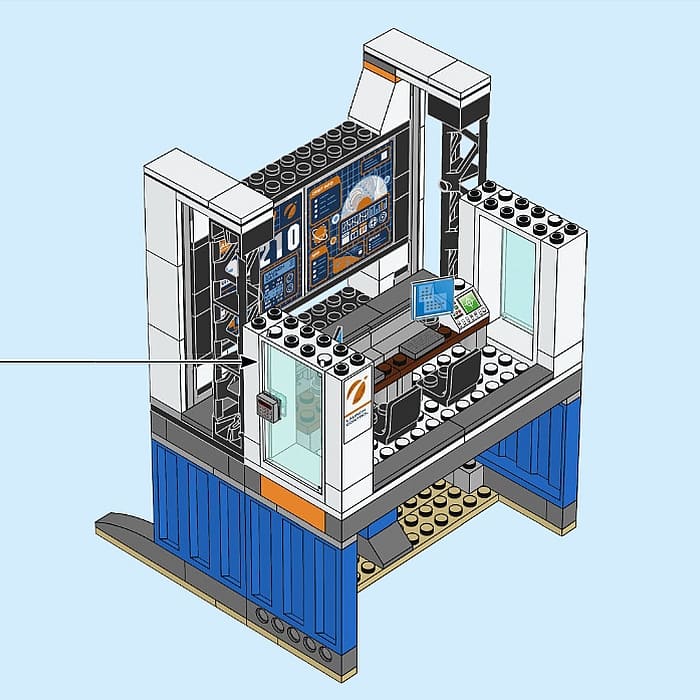
But it’s the other half that really stands out. The sticker has a series of numbers to show the countdown for the launch. In order to highlight these numbers, you will build a mechanism with a white tile. This was cool in itself as I could slide it back and forth revealing the numbers. But there is more. In order to frame the number perfectly, it would require precise positioning of the tile. In essence, you needed the motion to be broken up into regular increments. In order to do this, you build three things.
First, you need a way to represent the increments. For this, LEGO used four silver swirly tops that are often used for ice cream or ornate flourishes. They are small and rounded which were the ideal characteristics needed for this mechanism. Their small size made each increment the length of a regular stud. Their rounded shape is what prevents catching when you need to move over to the next incremented slot. It may not sound like much, but it’s all you need for the timing.
Next, you need a counter. In other words, a piece that interacts with the timing elements to treat each and every one as its own unique state. I’m sorry if that sounds long and confusing. In the roughest way possible, let’s just say you need a piece that makes the swirly tops mean something. For this, LEGO used a Technic beam. It’s rounded end fits just enough between the curves that it can make a noticeable difference.
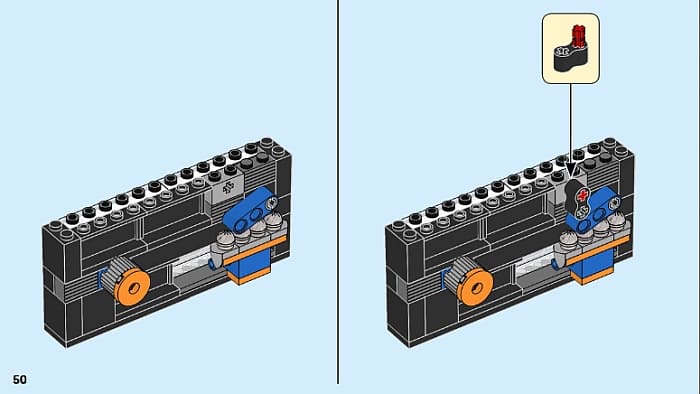
Finally, you need something to provide tension. Tension elements are not the easiest things to come up with. They often are made of some rubber material, as – along with providing tension – they tend to need to still have some give to them. Adding tension, in this case, means the counter will be able to sort of hold a position between increments. For this, LEGO designers used one of their rubbery Technic connectors. It is positioned right above the end of the Technic beam, forcing the tip of the beam down in between the rounded swirly elements.
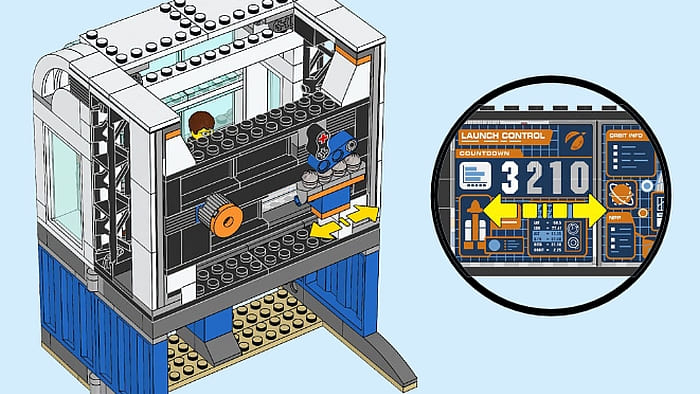
Put all this together and you get one of the most satisfying mechanism effects I can recall in recent memory. Now when you slide the control, there is an audible click. When the piece comes to rest, it is directly positioning the tile behind a specific number. All in all, it’s just plain cool!
APPLYING WHAT YOU LEARN
As a series that comes directly from LEGO City, the Space Exploration collection is great for the novice builder. It teaches fundamental building techniques that can get forgotten in the latest and greatest advanced models. So, brushing up on things like guides and cradles is a lot easier to see here than it might be in other sets.
But even the advanced builders can get something out of these sets. Harnessing incremental motion was something I wasn’t even sure was possible in LEGO until I saw it being used here. However, I will say that this set is a bit of an outlier in the series. So, if you only plan to dip your toe in outer space, this is the one I’d recommend out of the entire line. It has tons of play potential, a great look, considerable size, and some interesting building techniques thrown in for good measure. You can still find them at the LEGO City section of the Online LEGO Shop.

What do you think? How do you like the LEGO City Space Exploration sets? Do you have any of them already? Feel free to share your thoughts and discuss in the comment section below!
And you might also like to check out the following related posts:


I have the rocket assembly transport and the space station.( The space station and the new soon to be coming out ocean exploration base are using the same molds and pieces only in a different color). I’m leaning towards to getting that set to. I don’t have the deep space rocket launch station. At least not yet anyways. Very tempting though. Of course most Lego sets are very tempting. LOL!
Wow. I wasn’t aware of the countdown feature. That’s very cool. I’m thinkin about where else something like this could be used.
A traffic light is what immediately springs into my mind.
I like that idea! And now that you mention it, it should also work for rotating signs. I’m going to play with this technique when I get home. 😀
I believe another feature of this set is that you can slide in your phone and interact with an app. That could be considered a technique too, no?
It’s definitely a way to play and integrate something very different into a set.
Though most of the time using your phone to play with LEGO has often fallen flat for most LEGO fans I’ve talked to.
What turned me off from these sets is that the printing on the windshield for the rockets is completely off. How do you like the Rocket Assembly set?
I take it you are refering to the larger $140 set in the line?
I did like there were more areas to work with. The warehouse and large crane for instance makes some interesting play areas. But over all I found the $100 set, namely this one, a bit more dynamic which kept me playing with it longer.
As for things like the rockets themselves. They are all built around very similar principles, so I can’t really recommend one over any other.
I use guides when I want removable wall sections that are too big to remain stable on just a couple of studs. It’s also useful for larger vehicles when you want a removable roof. There is probably a threshold for size when it’s better to use guides over stud attachments.
I do this too. Another important point to mention is that guides can work both horizontally and vertically. It just depends on what you need.
Very good points!
It is also worth mentioning that using a combination of guides vertically/horizontally and minimal stud connections can also be useful when experimenting with different shapes.
If you aren’t certain on the geometry of a build it is much easier to remove and modify a large section that can come loose.
Just be aware that you will be giving up som structural integrity if you go this route.
Hmm, that countdown feature is actually pretty ingenuous…
I wasn’t aware that this set had such cool features. I normally ignore City sets because they’re so expensive and don’t include anything that interests me. But I’m very curious about that countdown feature.