

(Written by William)
In this Brick Breakdown series I review official LEGO sets, from the perspective of looking at interesting building techniques we can all learn from. Today we will be looking at the #10247 LEGO Creator Ferris Wheel. You can also check out the previously discussed LEGO techniques found in official LEGO sets at the end of this article. 🙂
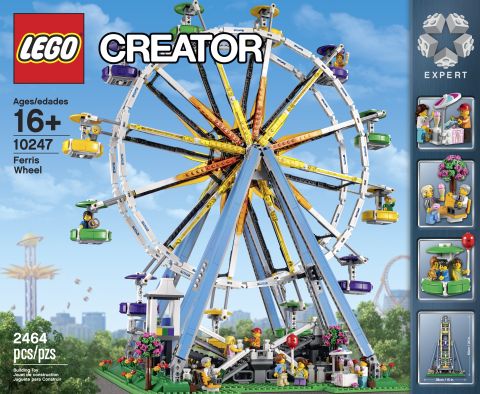
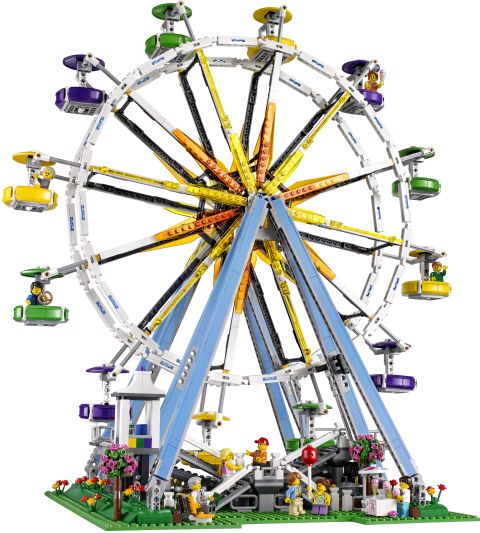
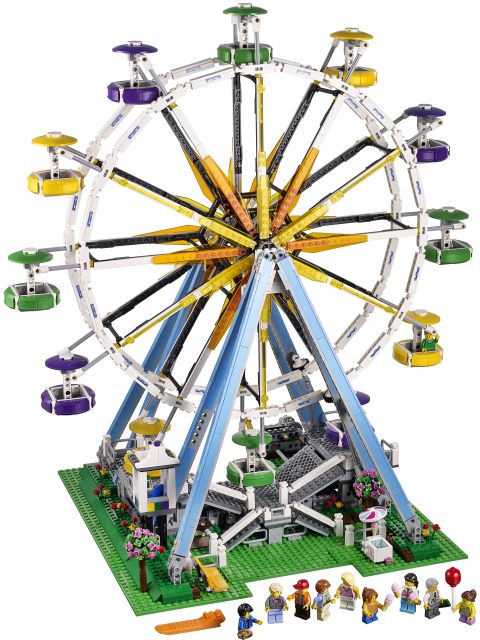
As soon as I first heard the announcement about this set I was insanely curious about the design. You see, just the year before I designed my own two feet tall LEGO Ferris wheel for a holiday display, and it gave me quite a lot of problems. So I felt compelled to see how LEGO conquered these issues. Let me spoil things a bit; they solved all the problems I ran into – in style. If only this set came out last year! Besides the brilliantly designed technical mechanisms of the Ferris wheel itself, there are a lot of other interesting details, including a new way to make flowering trees. In addition, the included 10 minifigures give the whole setup a very lively appearance – similar to the #10244 LEGO Fairground Mixer released last year. So let’s look at some of the most interesting techniques used here!
➡ MAKING AN A-FRAME WITH LEGO
It’s confession time. When I made my own LEGO Ferris wheel, I wanted to make it with an A-frame. The problem I had was that I didn’t think the elements were strong enough to hold the weight of the wheel. To my utter shame, LEGO not only built an A-frame, but the supports are made of one plate, one brick, and one tile worth of thickness. They are almost stilts. I did not give enough credit to the strength of these elements. The plate, brick, and tile stack itself represents a simple interlocking technique, which is ideal for elongating something. The brick is crucial in this instance since it provides the core strength of the frame – that is why it is in the middle of the plate and tile. Remember, a brick adds mass and mass equals strength.
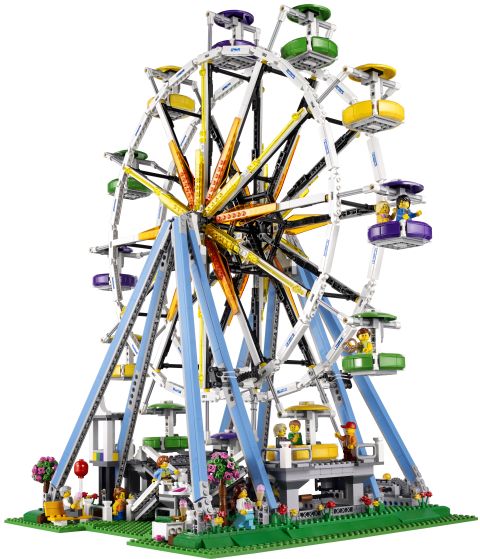
The next issue I found with A-frames was figuring out how to distribute the weight. Sure, by design an A-frame can handle shifts left and right, but how do you avoid side to side weakness? The answer used in the LEGO Creator Ferris Wheel is to build a second frame that acts like a kickstand. These are of course the outer legs of the frame. This is done with a few hinges to take care of the angles, and that’s it – simple. The four legs provide amazing support and you’ll be surprised by how much weight a thin layer of pieces can handle. The hardest part of this technique is not with understanding the concepts, but in measuring the lengths. Keep in mind that you are introducing foreign angles into a very rigid system, so even with the hinges, you may have some issues getting everything to line up.
➡ DIY LEGO SHOCKS
Another obstacle I faced in constructing my own Ferris wheel involved making the wheel rotate. I ended up powering it from the center, however I would have preferred to use wheels. The reason I didn’t was because my wheel was not entirely circular and I did not know how to make shocks that would compensate for the lack of roundness. Leave it to LEGO designers to make even this look easy!
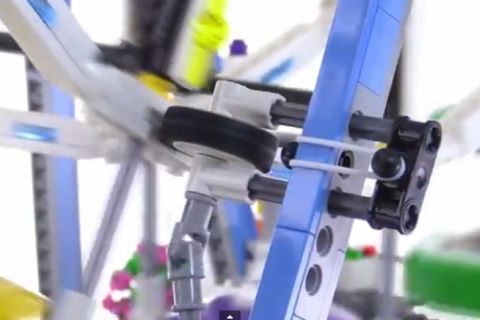
The first component is the spring – as is customary with LEGO, a rubber-band is used here. All that is necessary is that one end of the band is fixed to a stationary location, while the other is connected to the far end of the shock. Next, comes the security of the shock. This is handled by using two axles to provide a stable hold on the end mechanism. Keep in mind, this is not the only way to provide a secure and stable shock; many times all that is required is a firm point of connection. Finally, the last part of a good shock is the length. Make sure that the shock you make covers the maximum and minimum lengths you want to cover. This may involve adding spacers to restrict movement. As a final touch used in this set, the shock is angled to provide proper alignment.
➡ BUILDING A FLUID AXLE WITH LEGO
Now that a shock or two is in place, how does one operate it? The fancy answer is with a fluid axle. This is an axle that can change position by utilizing specialized hinges. The LEGO Creator Ferris Wheel uses two varieties of hinges; one is a very old style, while the other is something I’ve never seen before. Granted, I don’t build with a lot of LEGO Technic, so it could have been around for some time.
The more traditional of the hinge types is the double bush. Between these two bushes are slots that are linked like a chain. When straight, each bush has a wide range of movement, which allows axles to have slight bends or flexibility to allow for a secure connection – even if what is being turned moves about. It’s only drawback is when the angle gets too steep, and the links that once provided flexibility begin acting like a locked point. The other hinge that I’ve never seen until now is the ball-joint hinge. One end receives an axle as normal, and the other end has a ball-joint with two protrusions on opposite sides. The protrusions allow friction for the ball-joint to connect into the cup-connector that holds the ball. If it didn’t have this, the joints would simply rotate in place. The other feature of this hinge is that it limits how far the axle can angle, which prevents locking like the linked bushes.
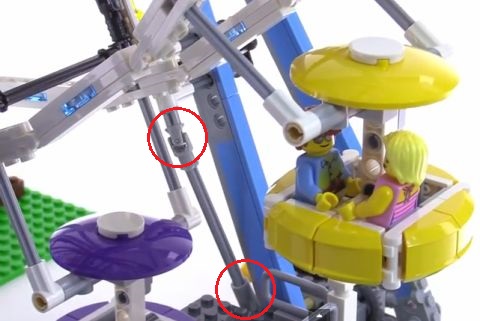
The end product is an axle that can adjust itself on the fly and keep rotation going. The issue you may run across is if the angles you have to overcome are too steep. In those cases you may need to use gears to make a 90 degree change. Additionally, a fluid gear is only as strong as its points of connection. Make sure you have hinges directed in a relatively fixed angle to optimize the use of the axle and reduce problems caused by snagging.
➡ PINCHING WITH LEGO
Anyone who has tried building a moving LEGO model has most likely run into this issue. Pinching occurs when pieces need to slide – or move pass – in some way against other pieces. The LEGO Creator Ferris Wheel gives us a wide range of mechanisms that had to handle this issue. The first way to solve this problem is by using shape. If two elements would run into one another, simply use a different shape. This is essentially what is done with the wheel and how it interacts with the loading-ramp. Put the ramp up and the wheel snags and can’t move. Change the shape of the ramp by putting it down and things move smoothly because they now no longer touch.
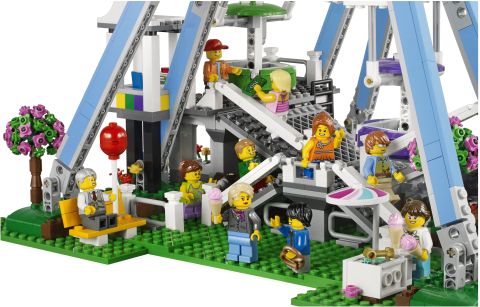
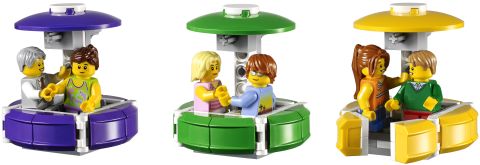
The next solution for pinching is found in the gondolas. No matter how easily a pin turns, you will run into pinching. This was something I discovered while making the seats for my own Ferris wheel. The answer to this problem is remarkably simple; use weight. As long as you are working with something that needs to work vertically, you always have the option of taking advantage of natural gravity. This means adding a bit more weight to force something through. So no matter how much the LEGO Technic pins pinch, there is something stronger than they are; the weight of gravity.
Finally we look at the ramp. There is not enough room to add more weight and it can’t change its shape from side to side because it would leave weird holes. Therefore it is forced to deal with rubbing against bricks and panels. The solution for this involves limiting the amount of things it can catch on. For example, instead of connecting a stack of bricks, use a single brick that covers the same space – because every connection point has a small gap and this gap works like a tiny friction point. Another method is to create empty space where you can. In this case panels are used and encounter the ramp sideways, which means there is less surface area for the ramp to even touch. This may not solve all your pinching problems, but it will significantly reduce them. Below is a great review-video by JANGBRiCKS that will help you see all the mechanisms in more detail.
➡ APPLYING WHAT YOU LEARN
Framing a model – especially a moving one – in general is a tricky subject. Many times the frame is only for support and needs to stay out of the way as much as possible. It is up to you to figure out what type of frame is needed. Hopefully, this example of an A-frame shows how durable LEGO pieces are and that they can be very unobtrusive. With the rigid design of so many LEGO elements, it is hard to remember that sometimes you can build creations with a little give. It is at these times a shock-absorber of some sort would be ideal. Thankfully, rubber-bands are easy to come by and serve as excellent springs. Just don’t leave them on too long or in extreme heat. Your average rubber-band can turn brittle and rather unpleasant.
A fluid axle is an amazing way to get around small bends. It can also be a way to achieve some pretty impressive angles. Not every fluid axle needs to be functional. As long as you can get your hands on the proper hinges, you can do plenty of experimentation. Whether it is as basic as a tire on a car, as long as you have a moving part you will always deal with the issue of pinching. You may have your own methods of dealing with this issue. The three outlined here are merely some of the most basic solutions. And there, of course, more creative ways to use these techniques. For example, if you don’t have room to add weight, you might substitute it for tension and use a rubber band to pull something along – which can also make the weight method work upside down or horizontally. It is good to stay focused on where the movement needs to happen. Once you solve that issue, you just need to add the finishing touches and decorations.

So what do you think? How do you like the LEGO Creator Ferris Wheel? Do you have it already? And did you learn from the interesting building techniques used in the sets? Feel free to share your own experiences and tips, or ask questions in the comment section below! 😉
And you might also like to check out the other reviews in this series:
- Brick Breakdown: LEGO Simpsons Kwik-E-Mart
- Brick Breakdown: LEGO Pirates Treasure Island
- Brick Breakdown: LEGO The Hobbit The Lonely Mountain
- Brick Breakdown: LEGO Super Heroes Green Lantern Set
- Brick Breakdown: LEGO UCS Tumbler
- Brick Breakdown: LEGO Minecraft The Cave
- Brick Breakdown: LEGO Minecraft Ender Dragon
- Brick Breakdown: LEGO Santa’s Workshop
- Brick Breakdown: LEGO Ideas Exo Suit
- Brick Breakdown: LEGO Ideas Research Institute
- Brick Breakdown: Emmet’s Contruct-O-Mech
- Brick Breakdown: LEGO Forest Animals
- Brick Breakdown: LEGO King’s Castle
- Brick Breakdown: LEGO Cinderella’s Castle
- Brick Breakdown: LEGO MetalBeard’s Sea Cow
- Brick Breakdown: LEGO MetalBeard’s Duel
- Brick Breakdown: LEGO Minecraft Sets
- Brick Breakdown: LEGO Disney Princess Sets
- Brick Breakdown: LEGO Back to the Future DeLorean
- Brick Breakdown: The LEGO Movie Ice Cream Truck
- Brick Breakdown: LEGO Parisian Restaurant
- Brick Breakdown: The LEGO Movie Flying Flusher
- Brick Breakdown: LEGO The Hobbit Dol Guldur Battle
- Brick Breakdown: LEGO Winter Village Cottage
- Brick Breakdown: LEGO Winter Village Market
- Brick Breakdown: LEGO Lord of the Rings Council of Elrond
- Brick Breakdown: LEGO Castle Dragon Mountain
- Brick Breakdown: LEGO Lord of the Rings Pirate Ship Ambush
- Brick Breakdown: LEGO Ninjago Golden Dragon
- Brick Breakdown: LEGO Superman Black Zero Escape
- Brick Breakdown: LEGO Tower of Orthanc
- Brick Breakdown: LEGO City Dump Truck
- Brick Breakdown: LEGO Monster Fighters Ghost Train
- Brick Breakdown: LEGO Lone Ranger Silver Mine Shootout
- Brick Breakdown: LEGO Lone Ranger Constitution Train Chase
- Brick Breakdown: Ninjago Temple of Light
- Brick Breakdown: LEGO Lone Ranger Colby City Showdown
- Brick Breakdown: LEGO Lone Ranger Comanche Camp
- Brick Breakdown: LEGO Lone Ranger Stagecoach
- Brick Breakdown: LEGO Star Wars AT-RT
- Brick Breakdown: LEGO Arkham Asylum Part 1
- Brick Breakdown: LEGO Arkham Asylum Part 2
- Brick Breakdown: Legends of Chima Polybags


This is an all around fantastic set, no doubt about it. Very interesting to read about how they accomplished the mechanics. Particularly the whole rotation thing is very impressive.
I have been in touch with William about his Ferris Wheel for a long time, so I know how challenging it was to build one. I wish he would have included a picture of his Ferris Wheel for comparison. I think you most appreciate the work of LEGO designers when you yourself attempt to build something similar. So yeah, the mechanics of this set can be a study on its own! 😀
Having built A frames in the past this is a rather elegant solution. The strength of a single bricks width is deceptive indeed. I built a frame 3 foot high to support a crane and it worked rather well. Mind you it was reinforced with lots of technic pins and had nowhere near rhethe movement capability of this….
I was always amazed by those giant cranes some AFOLs build! I have even seen one that didn’t even fit in a living room! Yeah, LEGO can take a surprising amount of stress if distributed properly.
Yeah mine was nowhere near that impressive compared to many I’ve seen. It was stable, but that was about it sadly. One day when I have enough space I’ll have another crack at a giant crane but not until my kids are bigger as they would wreck it at the moment!
Yeah, little kids and big cranes don’t go well together…
Huh, I never considered how difficult it is to make an A-frame. I thought the set’s was neat, but not difficult. But then I haven’t tried to build one before. I think using the Rapid Shooters at the top of the frame was interesting, though. It shows that the part has more uses than one. I like the shocks, too. Those ball/cup axle parts (called Cardan Cup and Lt Cardan Ball) are not necessarily new. The Cup first appeared in 2011, while the Ball appeared back in 2005. The Ball also got a redesign in 2011, so there’s a newer version on the Ferris Wheel.
Also, does anyone know what the US pricing for the 60098 Heavy Haul Train will be? I like the set, but I hope it won’t be more expensive than 60052, which has less pieces, but is $200. 😕
No official US pricing on the train yet, but my understanding is that it will be $150-$160. As far as building an A-frame, it is not the frame itself that is hard to build, but dealing with the forces it has to compensate for when it is holding up something large like the wheel. And not to speak of the fact that the wheel is moving!