

(Written by William)
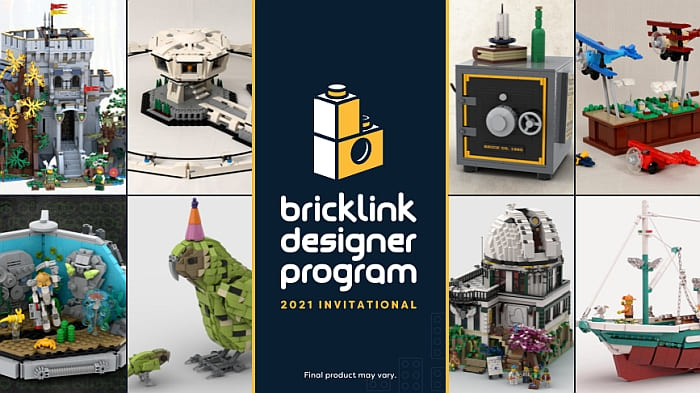
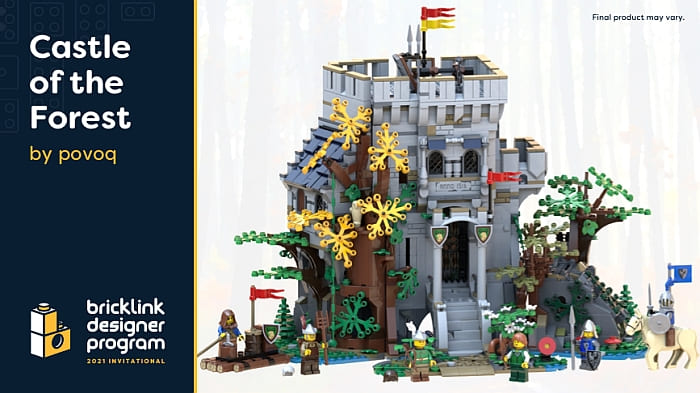
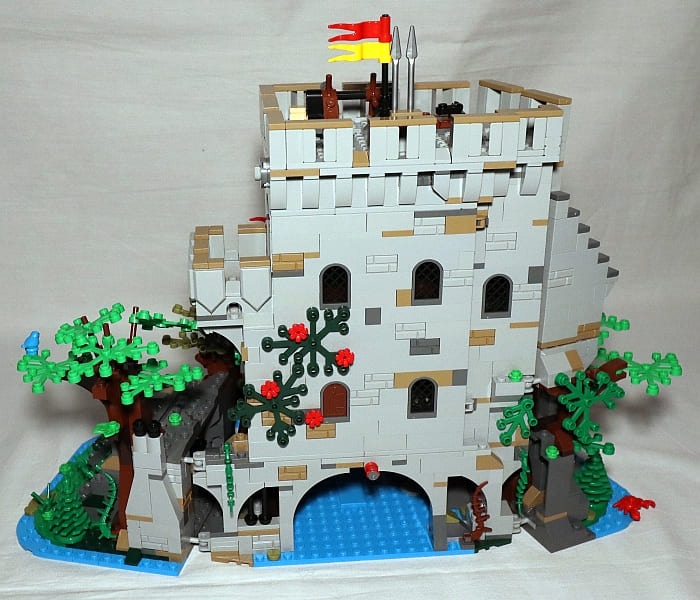
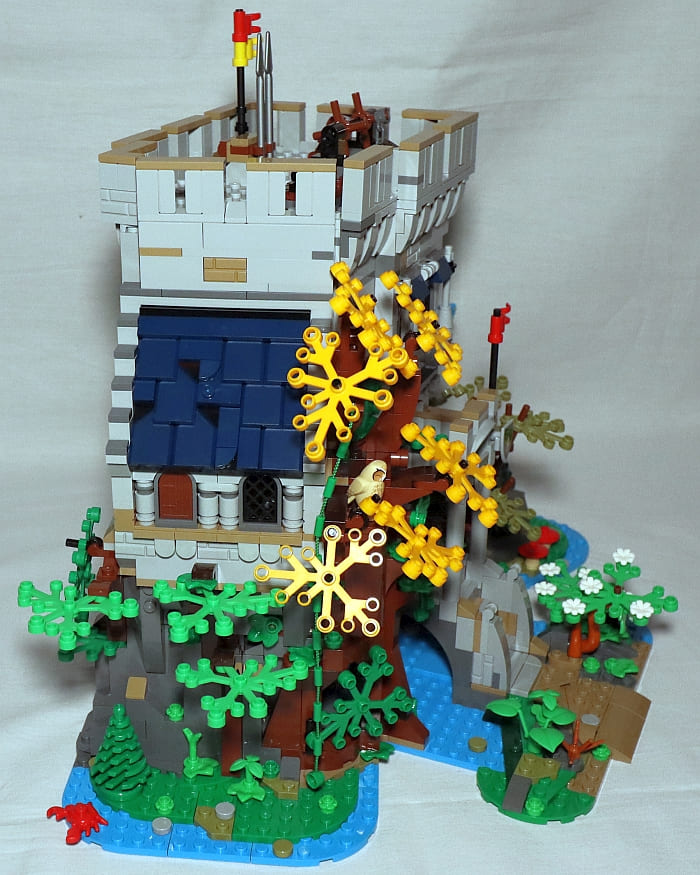
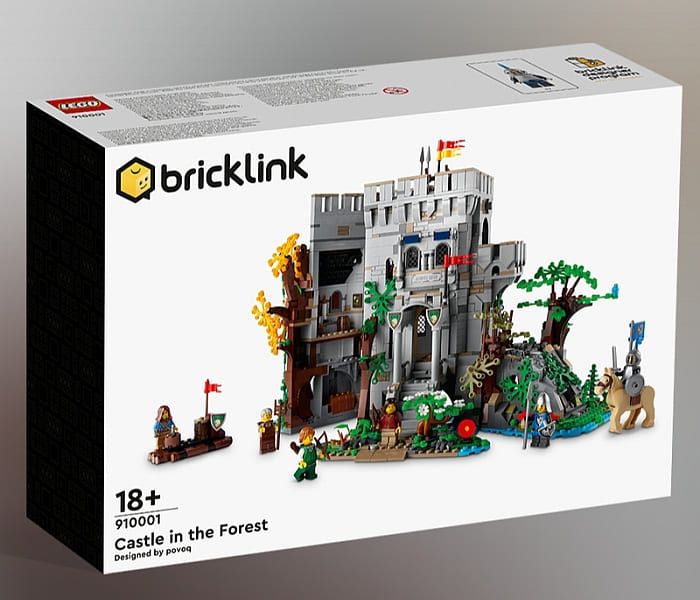
As we discussed previously, LEGO released some of the rejected LEGO Ideas projects that achieved 10k votes via the BrickLink Designed Program (you can read about the selection and crowdfunding process via the links at the end of this post). So far, we reviewed the #910016 LEGO Sheriff’s Safe designed by Il Buono (see: Brick Breakdown: LEGO BrickLink Set – Sheriff’s Safe), and the #910028 LEGO Pursuit of Flight by JKBrickWorks (see: Brick Breakdown: LEGO BrickLink Set – Pursuit of Flight). Today, we will take a look at the #910001 LEGO Castle in the Forest by povoq.
I was really looking forward to this set, so when the first round of the BrickLink Designer Program crowdfunding went live, I immediately jumped on the opportunity to get it. Sadly, many people will miss out on this set because of the very limited release. However, there are a few points I want to bring up that may put your mind at ease.
First, much of the design of this model uses colors liberally in order to achieve its weathered look. These pieces are sometimes randomly spread around for this effect. This means, that if you do choose to build this set using your own parts, it may not be as impactful if you are missing a few colors and make your own substitutions.
Second, none of the Bricklink Designer Program sets come with printed instructions. So, if you either use the LEGO Instructions app or download and print out the instructions to build the models with your own parts, you are having the same building experience as those who purchased the set.
A word of warning. Having built the model, I’m not entirely convinced that LEGO helped the original fan designer with the instructions. Don’t get me wrong, the end result is absolutely spectacular. However, the building experience was frustrating at times. Elements stayed unsecured for several steps at a time and many of the building steps felt haphazard in the order in which sections were assembled. This ultimately led to an experience that felt a bit more draining than energizing at times.

To be fair, I don’t expect a fan designer to have developed the skillset to have LEGO fans entertained during the course of building a set. That’s where I’d hope LEGO’s involvement would have been greater to give a model like this a bit more polish. Unfortunately, that doesn’t seem to be the case. Although, this did let the original fan designer add quite a bit more extra parts than we’d normally see in a standard LEGO set (I even found parts that weren’t needed in the model and I confirmed with a friend they had the same experience). The bottom line is that if you’re planning to build this model with your own parts, you may want to take the parts-list as a rough suggestion rather than a rigid list.
Okay, that’s enough preface. Let’s knuckle down and see what this set can teach us. And, without LEGO designers in the way, we can get a deep look into a true fan’s concept when it comes to building!
LEGO CASTLE IN THE FOREST – BALL-JOINTS AS HINGES
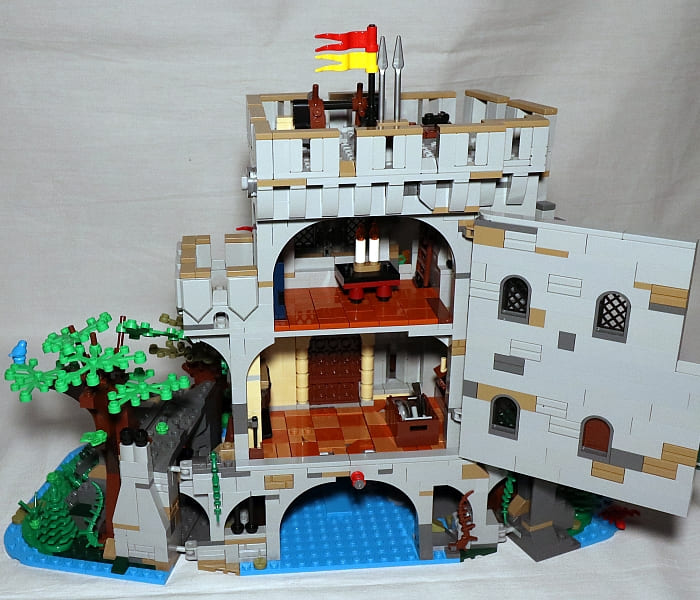
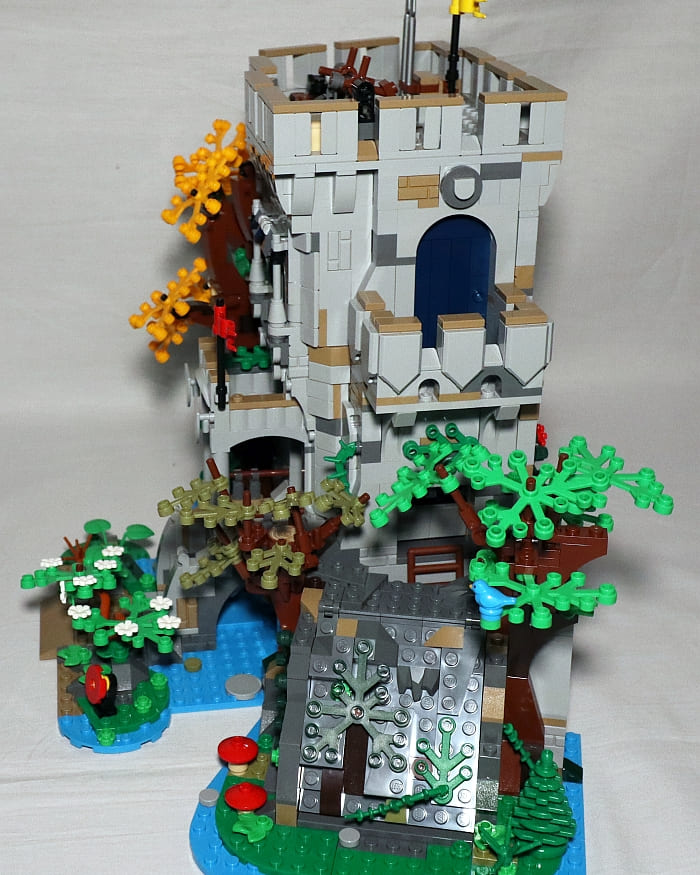
I’ve talked about using ball-joints as hinges before. In the #10274 LEGO Ghostbusters Ecto-1 set, LEGO designers made excellent choices for creating oddly angled hinges. So, you can imagine my surprise seeing them used in this model. As it is, they swivel just like normal swivel-hinges. This made me ask, why are they being used? Then it hit me… and the answer is brilliant.
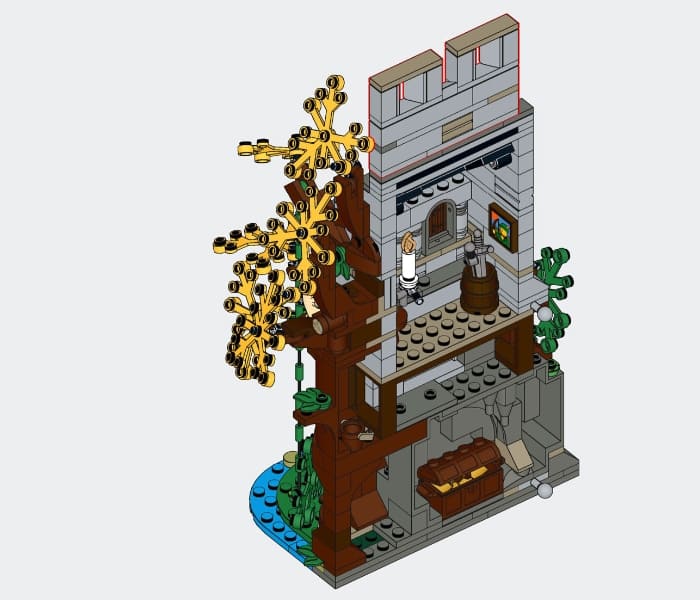
Taking a normal swivel-hinge, you are fairly locked in when it comes to options for positions. They are either open, closed, or put in a position somewhere in between. Ball-joints have the ability to swivel on another axis, giving them superior mobility. Though, once you use at least two of them for the same swivel action, that additional mobility is taken away. But, ball-joints have another feature that can make them useful; you can pull them apart.
This means, that not only can the various sections of the castle open up to give access, but they can be completely removed for additional freedom. This makes playing with the model or posing characters in the model a much easier prospect.
This technique does come with its own downsides. You must make sure the ball-joints are located at very secure points since, if they aren’t, you may tear apart your model. Additionally, given how much of an angle you want to swivel, you may end up with gaps larger than what is easily concealed. This is an issue in this set on the right side of the model when viewed from the front. The designer did a good job using trees to block sight lines, but once you see it from the back, it’s a pretty big gap to ignore. Overall, it is an easy technique to use and worth playing around with some more.
LEGO CASTLE IN THE FOREST – WEATHERING
There is one area this model excels at and that is creating a weathered look. And the designer did not use just one technique to achieve this, but rather a whole host of techniques. In order to break down this master class in weathering, we’ll need to isolate some of these techniques into smaller, more manageable sections.

For that reason, the following sections will all be considered under the weathering header. You can mix and match any or all of these techniques together to achieve a similar effect in your own creations. I’m separating them mostly to make it easier to explain some of the fundamentals.
WEATHERING: WITH COLOR
The most obvious technique is the use of color. After all, as time passes, things begin to fade and take on a distinctly mottled look. The colors you choose will depend on a couple factors. First, what did the object look like when it was new? Second, what type of environment is it in? These two factors will determine how you proceed.
By determining what the object looked like new will give you the basis for your main color family. Consider this a jumping point. An old fire truck for instance may start you with some vibrant reds. What happens to those reds will be determined by the second factor.
Where or how the object ages is crucial information. If it is being overgrown, chances are you are adding new earthy colors to your building pallet. If it is being sun-bleached, then you’re going to want to choose parts that make the colors look washed out and faded. Then again, if you decide that water damage and rust play a role, that will take you in a different direction. Perhaps paint has worn away and the underlying metal is starting to show through. The idea is that you pick the right colors for the right job.
WEATHERING: WITH IRREGULARITY
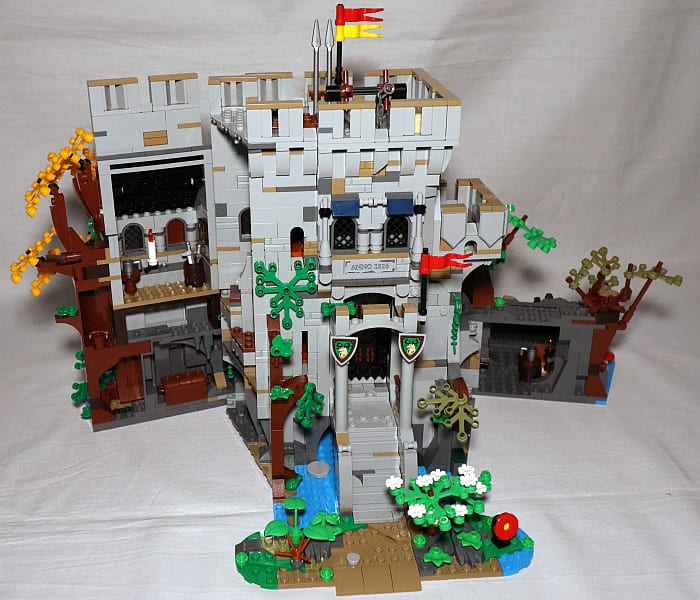
Aging rarely happens uniformly. In order to capture this, features like color need to change in irregular intervals. This is why there are so many plates in the walls of this castle. Having bricks and plates mixing together allows for colors to appear in the most random spots. Since plates are more or less a smaller version of a brick – well, at least a flatter version anyway – they give a degree of finer control.
However, a balance should be struck, otherwise, too much irregularity will look like chaos. In order to balance things out, it is often important to add uniformity to the design. The eaves under the castle’s uppermost platform, for instance, or the shingles on the roof are both good examples of how you can create a uniform pattern. Then intersperse that pattern with the irregular imperfections that come as a result of weathering.
WEATHERING: WITH SHAPE
Consistent shapes are uniform elements that you can disrupt. However, certain shapes like triangles and straight lines are very foreign to nature. And as we know, nature is what is often the driving force behind weathering.
The fan designer of this model took this to heart and used arches and slopes liberally in order to underscore the weathered look. The idea is that these shapes happen in very unexpected ways due to erosion. The trick for any builder is that the model still needs to be stable. Otherwise, it will break apart itself and create a more weathered look than what you really want.
Generally, rubble is not considered a skill that master builders really work at.
Ultimately, you will just need a wide range of angles to play with to achieve this technique. Often sideways building and adding texture to a model is a simpler way to do this than trying to build in erosion from the ground up. Fortunately, it is more a matter of taste and the builder’s preference. Just know that many different angles can lead to weathering.
WEATHERING: WITH THE FUSION OF NATURE
The last weathering technique I want to point out is the fusion of nature. Weathering occurs when two states are interacting with one another. The collision between these two states results in change – or put simply – weathering. And there are two distinct states that often oppose one another; the artificial symmetry of man-made objects and the untamed wilderness that is nature.
The end result is less of a technique and more of an advice; just build the two elements together, meshing them where and whenever it makes sense. The odd thing is there are advantages for both states when building this way. The man-made object gets the weathered effect that we are going for. And nature tends to gain greater stability in its construction.
Trees as an example can be rather fragile when built out of LEGO bricks. In order to achieve the natural fluid shapes often leads to some pretty precarious connections. However, if this same tree is built into the side of a building, it gains many of the stable properties that come from a building.
As for the weathering side of things, it will all come down to the amount of fusion you want to achieve. Are the grounds of your castle unkempt to show age? Are the plants growing onto the building itself to show extreme age? Or are the roots running through the building itself to show time has forgotten about this structure? Generally, you choose the narrative you want to be told and pick out the right transition period between the state of being just built and utter ruins.
LEGO CASTLE IN THE FOREST – FINAL THOUGHTS
I want to end this review like I did with the other Bricklink Designer Program sets. Thanks to the limited quantities produced, chances are, very few people will have the experience of building this model. Thankfully, the instructions are downloadable for free, so you can possibly build it with your spare parts. Though I would warn you that it contains a lot of pieces.
Fortunately, unlike other sets, I’d say making liberal substitutions probably won’t look too bad. The weathering of the castle makes this possible since it looks like the minifigures themselves had to make do with things not quite matching.
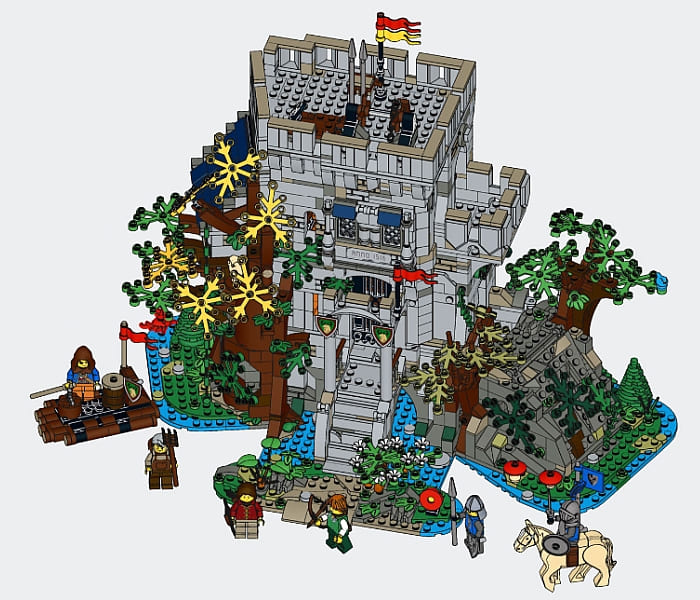
As for the decorated elements you see in the set, apart from a Black Falcon shield and the various torsos, everything else is stickers. If you’re building this set from your own parts, I’d suggest that you look at the LEGO Collectible Minifigures for a shield you like. There are some nice printings that would make good substitutes for the decorations you can’t get.
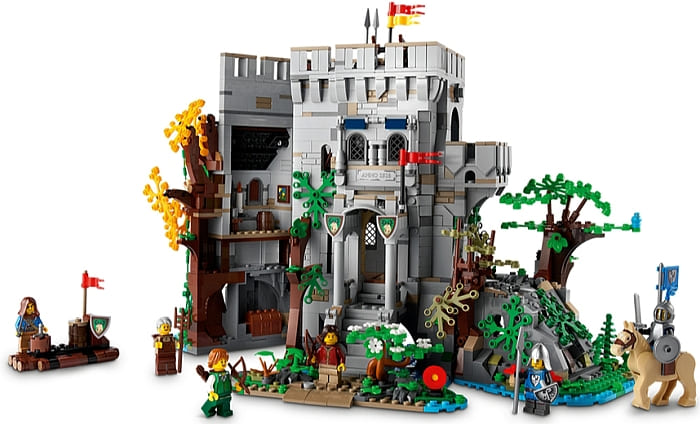
Overall, this set is a fantastic love letter to the various LEGO Castle sets over the years. It features recognizable play features from castles in the past, while still having an eye for an adult’s aesthetic sensibility. And it managed to do it without a catapult! The set is worth checking out, provided you don’t break the bank doing so. Use the LEGO Instructions app to find the set, or download (and even print out) the PDF version. You can access both via this BrickLink Designed Program page.
What do you think? Have you gotten any of the BrickLink Designer Program sets? Which one is your favorite? And what do you think of the Castle in the Forest? Feel free to share your thoughts and discuss in the comment section below!
And you might also like to check out the following related posts:
- Brick Breakdown: LEGO BrickLink Set – Sheriff’s Safe
- Brick Breakdown: LEGO BrickLink Set – Pursuit of Flight
- BrickLink Designer Program Round 1 Final Designs
- BrickLink Designer Program Crowdfunding Round
- BrickLink Designer Program Round 1 Reopens Today!
- BrickLink Designer Program – Round 1 Update
- BrickLink Designer Program First Round Funding
- BrickLink Designer Program Details Revealed
- More LEGO Ideas Projects Coming via BrickLink!


This one sold out so fast I think most of us didn’t have a chance to get it. In some ways, I like it better than the new classic castle set. The weathering and intertwining of natural and manmade elements is a nice touch.
I missed out on this too. It looks like a really nice set. I like how it opens up.
Sometimes when people use weathering techniques, their mocs end up looking too messy. How would you calculate the balance between clean design and realistic weathering?
You could look at photographs, paintings and illustrations for inspirations, I guess. And work your way up to get a good eye for it, just as for artistic skills in general. Practice makes passable! 😉
I have a pretty good brick selection from buying castles and blacksmith shops over the years. So I had a great time building this magical castle. The building techniques were fun, and there was nothing repetitive about building this castle. And this month, the Lego stores had a wizard and a soldier in the build a minifig section. The series 22 minifig bags had a minstrel. So I the castle has occupants. Wish I had all the original set, but even adulterated a bit, this build is amazing. While I’m looking forward to the 90th edition castle from Lego, I can’t imagine that it will be as challenging and satisfying to build.