(Written by William)
In this Brick Breakdown series I review official LEGO sets, from the perspective of looking at interesting building techniques we can all learn from. Today we will be looking at one of the nicest LEGO Lone Ranger sets, the #79108 LEGO Lone Ranger Stagecoach Escape. You can also check out the previously discussed LEGO building techniques found in official LEGO sets at the end of this article.

It’s time to hit the open road, and nothing says “Western” and “road” more like a good old-fashioned stagecoach. Having built the LEGO Lone Ranger Stagecoach Escape I could see that a ton of thought went into this set and its details. It has a very elegant quality to it that most other horse-drawn wagons fail to match.

I started building the smallest sets of the LEGO Lone Ranger line and have been working my way up. I’m finding each and every model has a bit more complexity when it comes to details. Sure, this is probably also due to the higher piece count, but larger sets also have more parts sections, which means more pieces have to create more things. This gives little room for detailing, but somehow you get it in spades with the LEGO Lone Ranger sets.
➡ LEGO SUSPENSION SYSTEM
The first technique I want to talk about in the LEGO Lone Ranger Stagecoach Escape is the stagecoach’s suspension-system. Now, just writing that feels weird. Most times, all we get is a single piece that the wheels connect to and we’re done. The set designer here actually gone out of their way to create a realistic suspension-system. Given the era, this is not a system that will have fancy springs or air-cushion pistons. These are wheel-axles that have been given a small amount of side-to-side motion.

In the LEGO Lone Ranger Stagecoach building such a suspension-system was achieved by the use of thin LEGO Technic struts, frictionless pin connections, and a fairly wide wheel-base. Out of all of these elements, it is the frictionless pin connections that open the way for possible movement. Everything in the design of the stagecoach is properly anchored, but it is the pin connections that provide that little bit of give that makes all the difference. The end result is wheels that will react to differing surfaces by partially contouring themselves to the ground.
The reason for all this is both clever and stylish. First, it creates a more realistic approach to the mechanics of the real-life vehicle. Second, when playing with the model it generates a noticeable sway to the coach. This extremely subtle attention to detail is, flat out, the coolest part of the model. Any time you see a recreation of an old stagecoach, it is obvious to see they were not the most comfortable things to ride in. Now LEGO has used this minor inconvenience as a signature in this set’s design. Whether you’ll need to copy this technique exactly is doubtful, but it is worth taking a close look at while you are in the process of building this set.
➡ USING A LEGO AXLE AS A GUIDE-RAIL
After putting together the suspension-system of the LEGO Lone Ranger Stagecoach, it felt odd putting it aside with an axle sticking up out of it. Following the instructions, I proceeded to construct the coach in nearly its entirety while the wheelbase was left alone. It was really no surprise why it would be a bad idea to build off the wheels. The wobbly suspension made it hard to lock studs into place. The real question though was why the axle was there at all. There was no thin pillar that needed extra support or any other obvious reason for its existence. But when it was finally time to connect the top and bottom of the stagecoach together I saw why the axle was there.
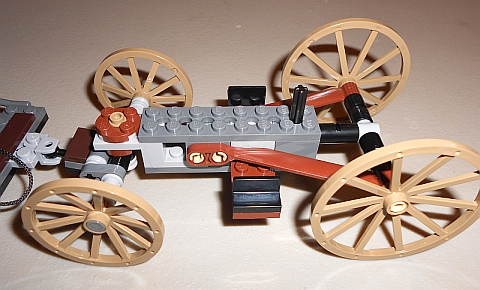
Given the odd design of the wheel-base, it would be a nightmare trying to line all those studs up. Thankfully there was the axle. Its purpose had nothing to do with extra stability. Rather, it was a plain and simple guide that directed the top of the model perfectly onto the correct studs. This is not a technique I’ve ever used in my own LEGO creations, so it was a nice surprise. Usually I’ll use LEGO axles for specific movement or to internally support something. However, this technique presents a very interesting option for building things in stages or guiding LEGO modular designs with a lot of surface area. It’s definitely something I want to experiment with in the future.
➡ APPLYING WHAT YOU LEARN
Will you need a wobbly suspension system? Chances are the answer is “No”. The truth is that it is only part of the technique we saw here. The real point is how a vehicle carries itself. Modern vehicles may need spring-loaded shocks and futuristic vehicles may require something even smoother. The idea is that you need to match the vehicle’s motion to its design. In order to nail down the correct approach you may try asking yourself a few simple questions. First, how does my vehicle move? Next, can I recreate that motion out of LEGO? Finally, if I can make it, is it worth my time? You might come to a realization that a good LEGO builder can build anything, but a great builder knows when something is not necessary.
Moving on to using axles as guide-rails, the most important thing to remember is that the axle needs to be firmly rooted for the guide to work. Also, you may want to test the measurement of the axle before waiting until the end. Nothing is as upsetting as the guide-axle punching a hole through the floor of whatever you are guiding down because the axle was too long. As I mentioned above, it is not a common LEGO technique by any stretch of the imagination. In fact, LEGO probably started using it more as an instructional aid on guiding builders through difficult to describe steps. But it does present yet another option when dealing with vertical modular building.

So what do you think? How do you like the LEGO building techniques discussed here? Have you tried making your own realistic suspension-system out of LEGO? Feel free to share in the comment section below! 😉
And you might also like to check out the other reviews in this series: