Today, the LEGO Group unveiled the latest enviable addition to its garage, a life-size replica of the Lamborghini Sián FKP 37 made from over 400,000 LEGO Technic elements. This show-stopping collaboration with Automobili Lamborghini demonstrates once again that with Technic, you can build whatever you can imagine for real.

Following the launch of the 1:8 scale LEGO Technic Lamborghini Sián FKP 37 last year, this life-size model replicates the visionary design of the limited-edition Italian super sports car on a much grander scale. Over 154 different types of LEGO elements have been used to ensure the model embodies the futuristic elegance and unmistakable silhouette of the Lamborghini Sián, down to the minutest details.

Lena Dixen, Senior Vice President of Product and Marketing at the LEGO Group said: “Our designers love a challenge, so you can imagine their delight when we tasked them to think slightly larger than normal with this model. They jumped at the chance of teaming up with our amazing designers and engineers from our model production workshop at the Kladno factory in the Czech Republic who build these impressive life-size models, and really pushing the boundaries of what can be done with LEGO Technic. The creativity that the system allows meant it was possible to really do justice to the exceptional design of the Lamborghini Sián FKP 37.”

ABOUT AUTOMOBILI LAMBORGHINI
Founded in 1963, Automobili Lamborghini is headquartered in Sant ‘Agata Bolognese, in Northern Italy. Lamborghini currently produces two super sports car models, the V12-powered Aventador, launched in 2011, and the V10-powered Huracán, launched in 2014, along with the Urus Super SUV powered by a twin-turbo V8 engine, launched in 2017. With 165 dealerships throughout the world, the company has seen global sales growth for the last nine consecutive years, with 8,205 cars delivered in 2019. Over half a century Automobili Lamborghini created a continuous series of dream cars, including the 350 GT, Miura, Espada, Countach, Diablo, Murciélago, as well as limited editions such as the Reventón, Sesto Elemento, Veneno and the Centenario. With the Lamborghini Sián FKP 37 unveiled in 2019, a few-off build of only 63 units, the company delivers unique new hybrid technologies, featuring the world-first application of a super-capacitor.

A PIONEERING DESIGN
Marking the second collaboration between the two companies’ talented designers, engineers and technicians, the model mirrors the dimensions of the Lamborghini Sián FKP 37 to the millimeter.
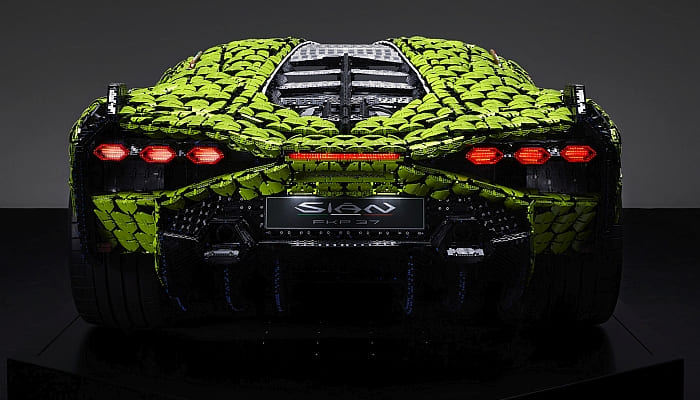
The proportion-perfect frame is covered with an intricate fabric of bespoke hexagonal LEGO Technic elements, which interconnect to form an energy-charged shell. The design plays homage to the six-sided shape that plays an integral role in Automobili Lamborghini’s design language, echoing the iconic hexagonal taillights and exhaust shape on the Italian super sports car.
Externally, the Lamborghini Sián’s design has been replicated in meticulous detail. The word Sían means “flash” or “lightning” in the Bolognese dialect so to mark this, the electrical experts from the LEGO Group ensured that the lights and sleek lightning bolt that flashes along the body reflect how the real model’s epsilon headlights and hexagonal taillights power up and down.
Inside the cockpit the detail continues, with a brick-built steering wheel emblazoned with the famous Lamborghini emblem and Italian flag, LEGO-built dashboard controls and racing seats.
This model is the first large-scale model from the LEGO Group to have a paintbrush-effect UV color coating applied to ensure the model lasts a lifetime. The color, which is a perfect match to the 1:8 scale LEGO Technic model, was applied by Automobili Lamborghini’s official paint shop to ensure a finish worthy of the super sports car.
The result: a flawless model that could be mistaken for the real super sports car, proudly created by a team of 15 people during 8,660 hours of development and painstaking construction.

LIFE-SIZED LEGO LAMBORGHINI – FACTS & FIGURES
- Over 400,000 LEGO Technic pieces used in total
- 154 different types of LEGO Technic elements used, including 20 that were moulded specifically for this model
- Total weight: 2,200kg
- 8,660 hours spent on development and construction:
- 5,370 hours of development time
- 3,290 hours of production
- Created by 15 design, engineering and building specialists from our awesome team in Kladno, Czech Republic
- An exact replica:
- The build’s dimensions are identical to the real-life model: 4,980 mm long, 2,101mm wide and 1,133mm high
- Functioning head and tail lights built entirely from LEGO Technic elements
- First-of-a-kind paintbrush-effect coating applied by Lamborghini’s official car painter

VISIONARY IN EVERY WAY
A supercar like this deserves to be ground-breaking. Here’s all our first-time achievements to honor the car’s futuristic design:
- First time a LEGO model has been painted using a paintbrush-effect coating, personally applied by Automobili Lamborghini’s official car painter
- First time the iconic design lines of a life-size model have been lit up to honor the visionary curves and futuristic shape of the real car that is so revered by supercar fans worldwide
- The first time a hexagonal shape has been used to form the outer shell of a build in honor of the design history of the Lamborghini Sián FKP 37, which is heavily inspired by this shape

GET BEHIND THE DRIVER’S SEAT FOR YOURSELF
Following the breath-taking launch of the 1:8 scale model, the life-size LEGO Technic Lamborghini Sián FKP37 has been given its own show-stopping moment deserving of the super sports car.
In a new first-of-its-kind virtual unveiling from the LEGO Group, the full-scale model has been rebuilt in a virtual LEGO workshop to give supercar fans and LEGO lovers the chance to get up close and personal with the immense model, while ensuring the safety of fans around the world.
The resulting experience is packed with suspense and emotion, making viewers’ dreams come true by giving them the chance to get behind the wheel of the 1:8 scale model before they are ‘transformed’ along with the model into the full-scale replica revealed today.
The experience lets viewers explore this feat of design excellence in their own time; they can sit in the driver’s seat and hear from the talented Automobili Lamborghini and LEGO Group designers who made this model a reality. To get in the driver’s seat of life-size LEGO Technic Lamborghini Sián FKP 37, see more images, videos and the model’s specifications, please visit: LEGO.com/Campaigns/Lamborghini-Sián

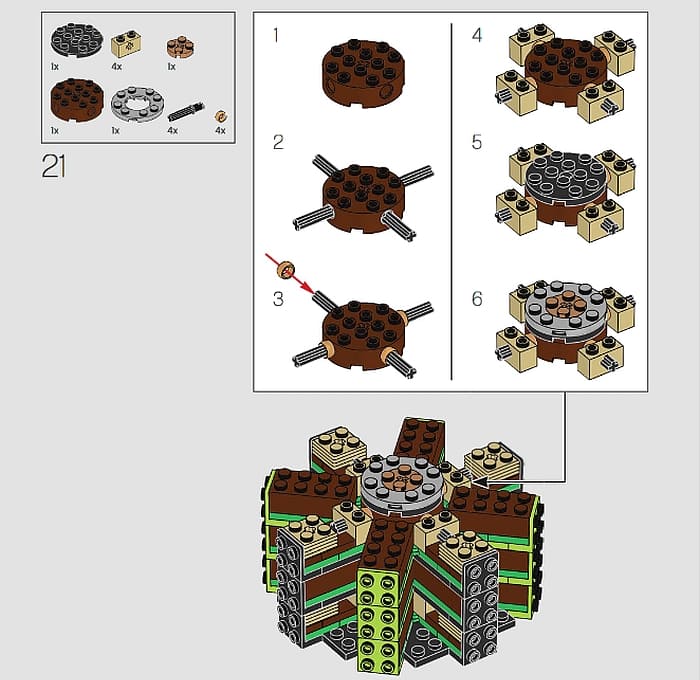
And if you are interested to build your own Lamborghini, check out the #42115 LEGO Technic Lamborghini Sián FKP 37 which – although smaller – is still a faithful representation of the original Sián FKP 37 in eye-catching lime green with golden rims. The model includes authentic details like the 8-speed transmission, activated by the movable paddle gearshift, V12 engine with moving pistons, and 4-wheel drive. You can use the steering wheel to position the car, then check out the front and rear suspension. And just like the full-size super sports car, this model car features classic scissor opening doors. The model measures over 5” (13cm) high, 23” (60cm) long and 9” (25cm) wide, comes with 3,696 pieces, for the price of $379.99. Available at the LEGO Technic section of the Online LEGO Shop.

What do you think? Do you have the LEGO Technic Lamborghini Sián FKP 37 set already? How do you like it? And what do you thin of the life-size version? Feel free to share your thoughts and discuss in the comment section below!
And you might also like to check out the following related posts: