

(Written by Geneva – gid617)
We recently looked at the last two LEGO Ninjago waves (see: LEGO Ninjago The Island Sets Review and LEGO Ninjago Seabound Sets Review), but it wouldn’t be my kind of review if I didn’t build something unique with them! So I put together some rocks and an island for the sets.
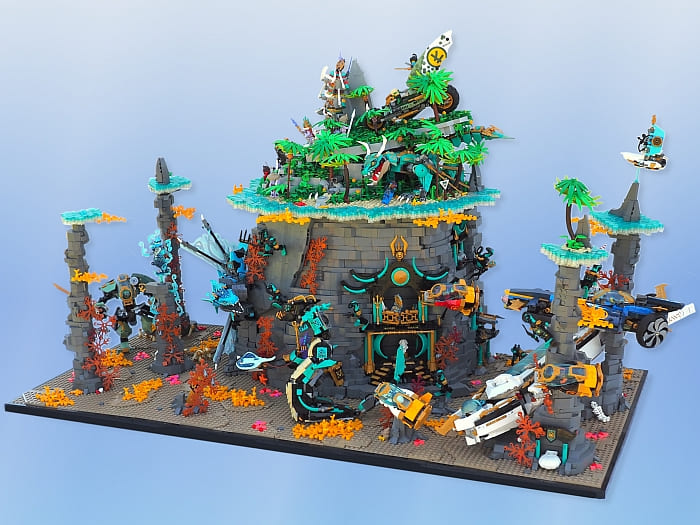
It certainly took some planning to get all the sets comfortably in one diorama. Having underwater and above water sections was obvious, but there was still a lot to fit in! Above water, space was especially tight, so I put #71745 LEGO Ninjago Lloyd’s Jungle Chopper Bike on top of a rock and built a habitat for #71746 LEGO Ninjago Jungle Dragon underneath the same rock.

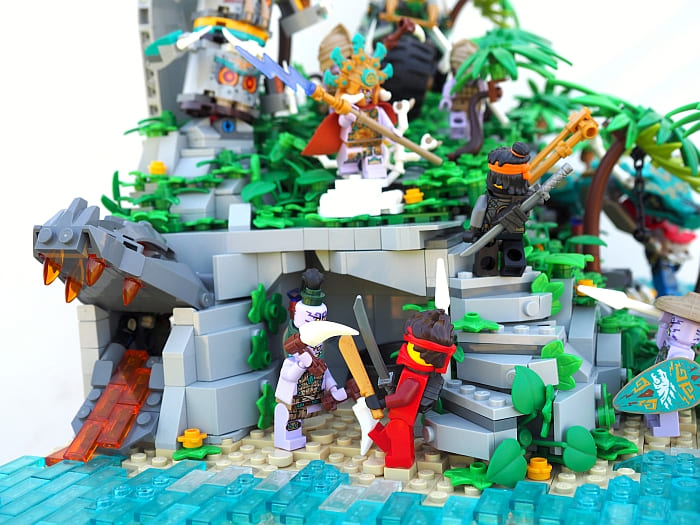
On the other side of this island is #71747 LEGO Ninjago The Keepers’ Village. Unlike Lloyd’s bike and the dragon, the Keeper’s Village underwent a lot of modification to fit into my diorama.
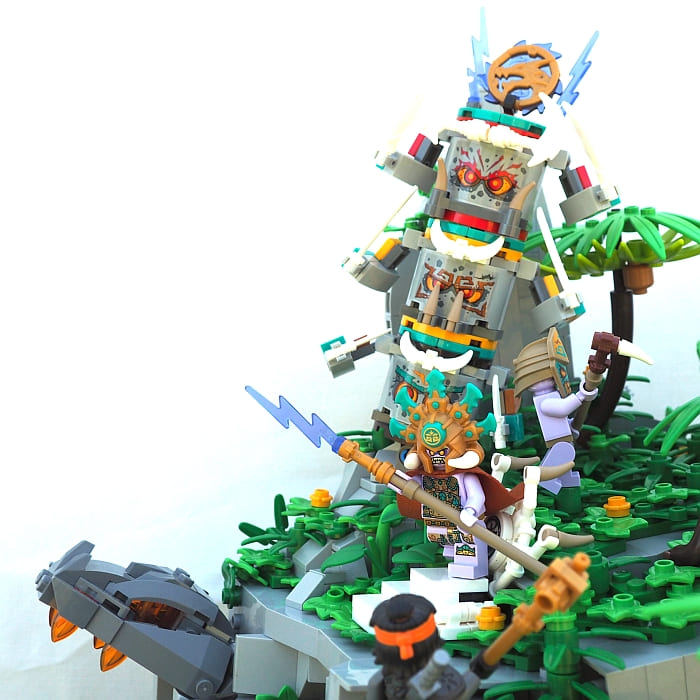
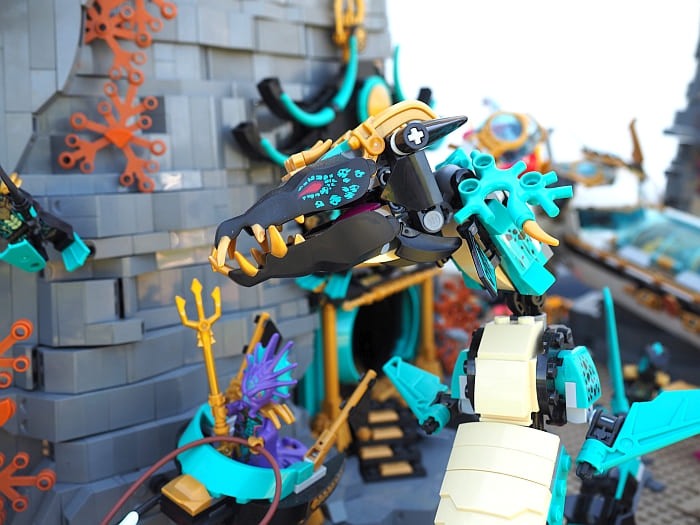
Although I loved The Keepers’ Village right out of the box, it doesn’t match the style of landscape I usually build. It also has a lot of dark-grey and dark-tan, and I was saving those colors for the underwater section. I kept the cave, the dragon head prison, the throne, and the curved stairs, but I built them into a more solid structure.
I have to briefly mention the missing set in this same group: #71748 LEGO Ninjago Catamaran Sea Battle. I hoped to have the catamarans fighting offshore, but since they didn’t arrive with the rest of the sets I had to give up that idea. Not having to build any structure to support them did certainly make my life easier!
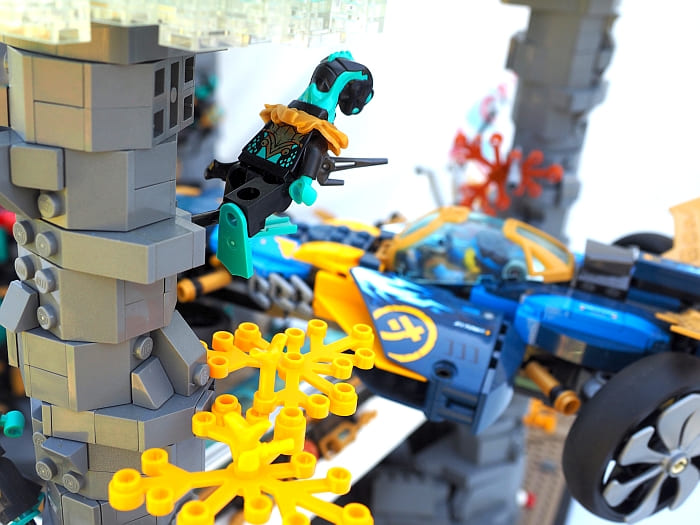
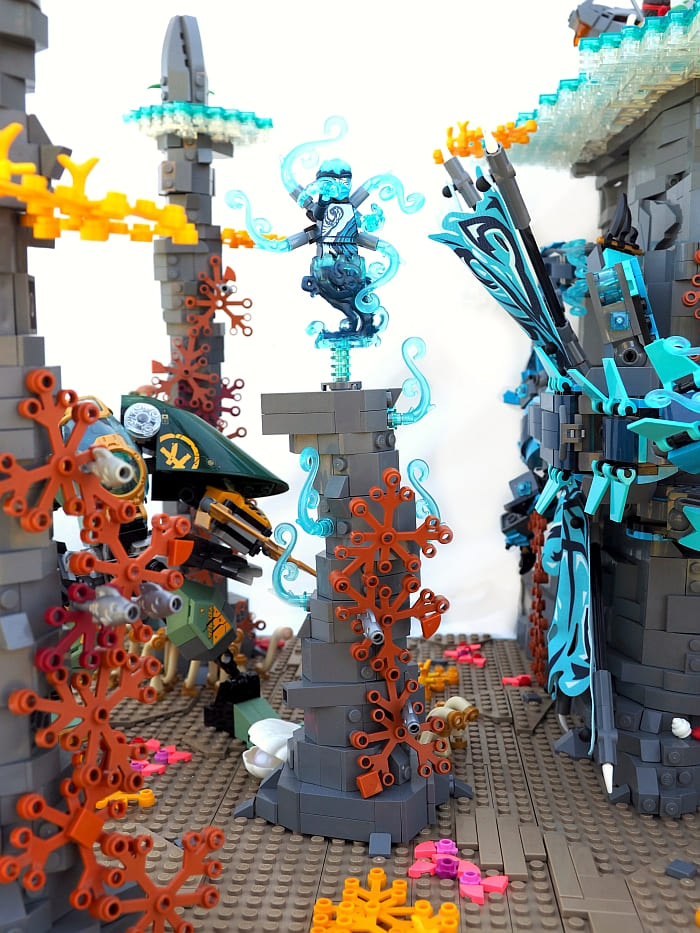
Underwater is another world from the lavender islander’s home on the island—down here is where the ninjas have to fight off teal and black snakes! On the left, we have #71750 LEGO Ninjago Lloyd’s Hydro Mech ready for battle.

The rest of the ninja vehicles are on the opposite side. Originally I had Lloyd’s mech with them on the right, but things got way too crowded!
The #71752 LEGO Ninjago Ninja Sub Speeder is under attack suspended between the two rock pillars—we’ll take a closer look at the support structure for it and the #71756 LEGO Ninjago Hydro Bounty underneath it in a future article about the techniques I used throughout this creation.
Another thing that changed while I was in the process of building was my placement for water Nya. I planned for the pillar she is on to reach the top, but after running out of my own dark-grey pieces, my brother’s dark-grey pieces, and starting to hit bottom on another brother’s dark-grey, I decided that I’d better not try for a full-length pillar. And then I noticed that it would be the perfect spot for Nya to hover over, separating her visually as the hero of the fight!
The #71754 LEGO Ninjago Water Dragon is also a hero—in fact, I think in the show it’s just another manifestation of Nya—and wrapping it around my big chunk of rock worked surprisingly well. The dragon is pretty light and four sideways studs provided enough support!

This pose ended up being a good way to get the dragon into the underwater section without using up an overpowering amount of space. So the moral of that story is, if you’re having trouble fitting sets into a display, see if it won’t make sense to turn them sideways!
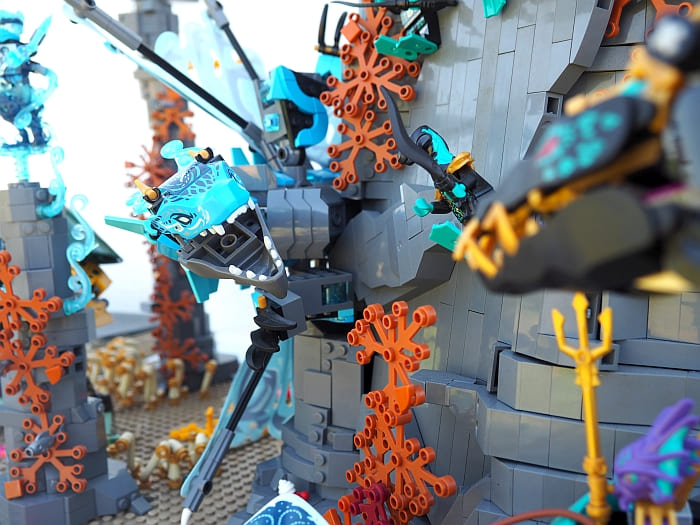
The water dragon fights the sea snake from #71755 LEGO Ninjago Temple of the Endless Sea. I did think about rebuilding the snake to make it a little bigger and more poseable, but I’m not much of a dragon builder so I thought I’d better not try to fix what wasn’t broken! The snake was possibly the easiest thing to attach to my diorama, all I needed was a simple studs-up turntable.
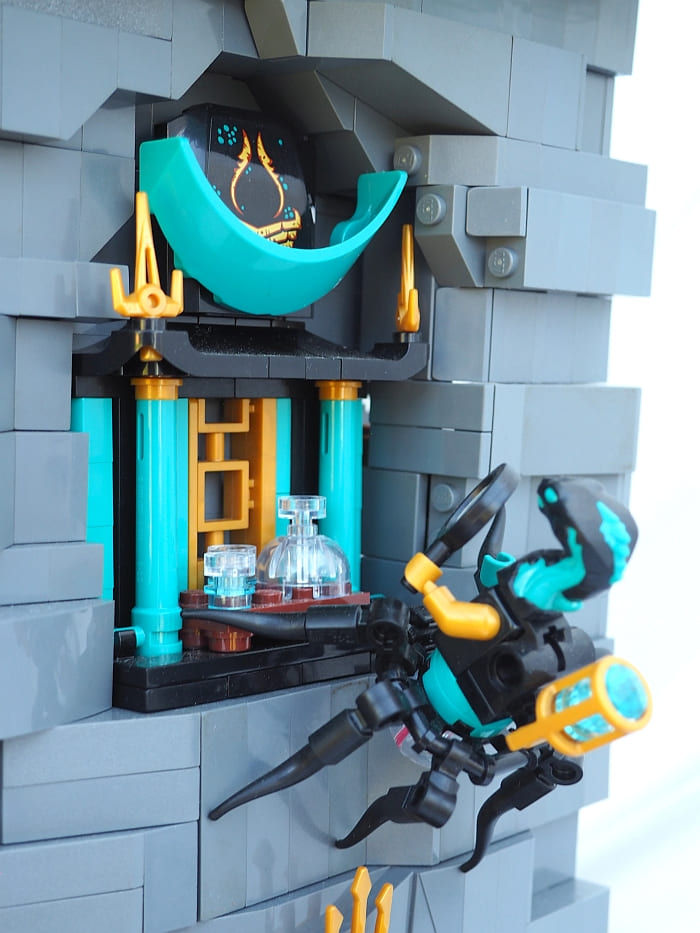
I divided up the rest of the temple and embedded it into the rock. Not only that, but I rebuilt a lot of the temple in order to remove the dark-grey pieces it used and keep it visually distinct from my rock.

The little lab and prison section were both fun to fit into the rock!

Last but not least, Prince Kalmaar’s chariot carries him to his fight against the ninja!
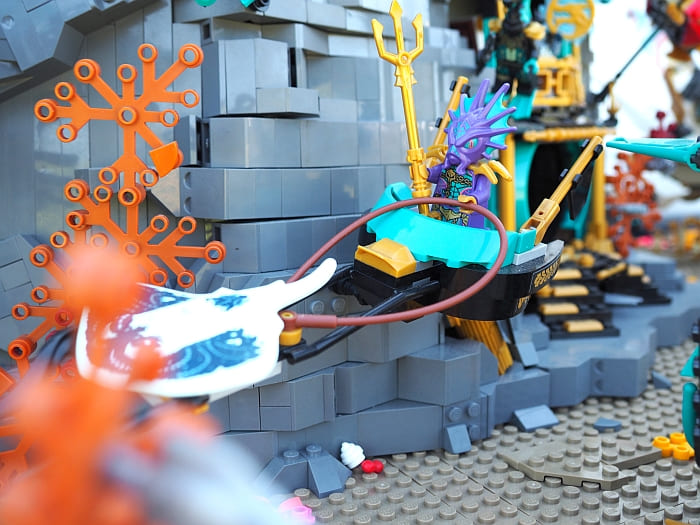
An important thing to consider if you’re building a setting for official LEGO sets is color. In this case, I wanted to make the temple underwater pop with its black and teal, so I was careful to avoid green in my seaweed. Instead, I went for shades of red and yellow. I also tried to differentiate between the top and bottom, saving light-grey and tan for the top, and using darker tones on the bottom.
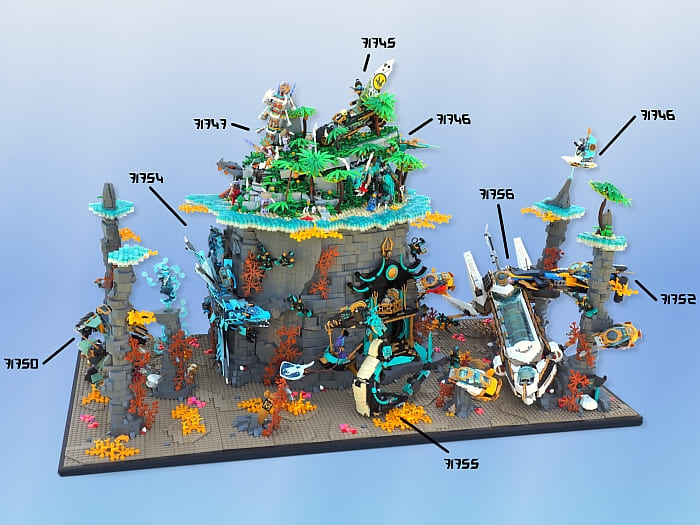
From left to right, the sets I fit into this display are #71750 LEGO Ninjago Lloyd’s Hydro Mech, #71754 LEGO Ninjago Water Dragon, #71747 LEGO Ninjago The Keepers’ Village, #71745 LEGO Ninjago Lloyd’s Jungle Chopper Bike, #71746 LEGO Ninjago Jungle Dragon, #71756 LEGO Ninjago Hydro Bounty, (Zane’s hoverboard is also from #71746 LEGO Ninjago Jungle Dragon), #71752 LEGO Ninjago Ninja Sub Speeder, and #71755 LEGO Ninjago Temple of the Endless Sea. You can find these sets in the LEGO Ninjago section of the Online LEGO Shop.
What do you think? Does my diorama inspire you to try to build something for a favorite set? Have you thought about using color in your creations to help direct the viewer’s attention? Was I able to effectively tie in the sets from these two different Ninjago waves into one display? Feel free to share in the comment section below!
And you might also like to check out the following related posts:
- LEGO Ninjago The Island Sets Review
- LEGO Ninjago Seabound Sets Review
- Awesome LEGO City & LEGO Ninjago Pop-Up Books
- LEGO World Builder – Original Ninjago Short Film
- Ninjago Season 14 Clip: Ninjas Meet Twitchy Tim
- Trailer for LEGO Ninjago Season 14: The Island
- LEGO Ninjago City Gardens Review & Thoughts


This is like the coolest thing ever! Incredible! What’s inside the mountain? Did you really build up the whole thing from lego? Or is it hollow?
Hollow for sure, wouldn’t want to carry that much weight to my photo table! 😉 I’ll have some shots of the back in the next article about how I built this!
OMG! This is epic! And I love how you added the set numbers at the last picture! I love how you did the clouds!
I don’t think those are clouds. Those are the surface of the water. But I have seen people do clouds in a similar way, so I can understand the confusion.
Undercover AFOL is right, that’s meant to be the water line–but I’m glad you like it anyways! 😀
I wonder if you could add a boat or something to make it more obvious… Or some more connected specks of water to clarify the surface. Might require a lot more bricks and be more fragile, though…
I planned to have several more inches of water sticking out from the island, but the four layers of parts ate away at my collection of trans blue and trans clear incredibly fast!
Wow .That’s a stingray? So cool! I love the whole thing! Especially the color combos. The blues and golds look great against the grays and tans. How many pieces is this?
Yeah, there have been lots of neat new animals lately and the stingray is a new print of the ray from the city diving line last year!
I’m terrible at estimating pieces, but considering that there are almost 5K pieces in the sets alone, the whole creation must be well over 15 thousand!
Amazing! I would love to see this in person! How long do you keep a moc like this around?
I’m really tough on large MOCs, because I don’t have the space to leave them on display or the parts collection to tolerate having so many bricks tied up very long. So this creation has already been completely parted out! 🙁 But the pieces will live on in future MOCs! Oh, and I did save several of the submarines for a smaller display on a bit of free shelf space.